Introduction
We have had a good introduction to Supernetting (CIDR) and we are about to have a look at an example to finally give answers to all those questions you have about the subject.
NOTE:This page requires you to have basic knowledge and understanding on Internet Protocol, Subnetting and Binary notation. These are covered in great detail on other pages and I recommend you have a quick look over these topics if you think you're not up to scratch.
Guideline - Rule to Supernetting / CIDR
Before we get in to deep waters, we must talk about the main rule that applies to creating Supernets. For our example, this rule dictates that, in order to create Supernets from Class C IP Addresses, the network address must be consecutive and the third octec of the first IP Address must be divisible by two.
If we had 8 networks we wanted to combine, then the third octec of the first IP address would need to be divisible by eight and not two.
There is one more rule you should know and this rule has to do with the routers of the network, which will need to work with the new changes. This rule dictates that all routers on the network must be running static routing or using a classless routing protocol such as RIP2 or OSPF. Classless routing protocols include the subnet mask information and can also pass supernetting information. Routing protocols such as RIP1 do NOT include subnet mask information and would just create problems!
The Example
Here is an example involving two companies that want to use Supernetting to solve their network requirements. We are going to determine which company mets the criteria for a Supernet (we are assuming the routers are setup in a way that will support supernetting):
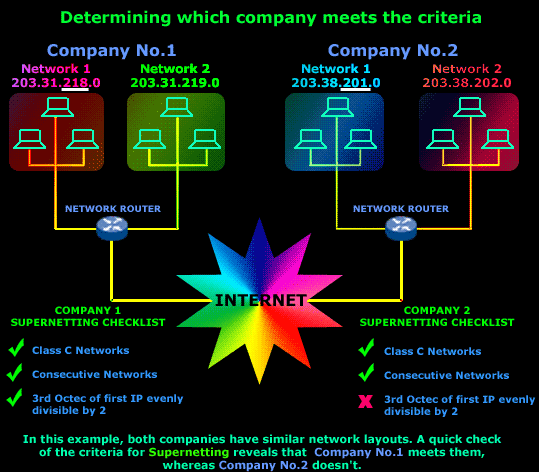
As you can see, Companys No.1's network passes the test, therefore we can Supernet its two networks.
The Analysis of Company 1's Network & creation of its Supernet
Let's now take Company No.1's network, see how the Supernet will be created and determine various important parameters like the new network's broadcast address, the identification of the new supernets etc.
To begin, we must take our two networks and look at them in binary format, this is the only way to "see" exactly what we're doing when supernetting, and take a look at the Network and Host ID portions:

If you have problems understanding why we have no Subnet ID, please read up on the IP and Subnetting sections on this site where everything is explained as simply as possible using cool 3D diagrams.
Now we need to create the Supernet. This means that we are going to take one bit from the Network ID of these networks and give it to the Host ID portion. This 1Bit is our Supernet ID. So our subnet mask will now be reduced from 24 bits to 23 bits. You might get confused or ask why we call this extra Bit we are giving to the Host ID a Supernet ID?
The answer is simple, the one Bit that we are taking from the Network ID is given to the Host ID but, in order for us to clearly "see" where the supernet is created, we colour it Green and give it the "Supernet ID" label:
So there you have it, a new supernet created!
Now we can point out something new; that we intentionally left out, in order not to confuse matters!
We have one Supernet made from two networks (203.31.218.0 and 203.31.219.0). In order to identify these two networks we name the first one (203.31.218.0) Supernet 0 and the second one (203.31.219.0) Supernet 1. This is to distinguish between the two networks and nothing more.
It actually makes more sense if you look at the values the Supernet ID field takes:

It's very important to understand that Supernet 0 and 1 are part of the same new network ! This means that there is only one network address, one network broadcast address and not two as you might expect.
Let's now have a look at some more important information regarding the new network:
ITEM | VALUE |
Supernet range | 203.31.218.0 - 203.31.219.255 |
Subnet Mask | 255.255.254.0 |
Supernet Network Address | 203.31.218.0 |
Supernet Broadcast Address | 203.31.219.255 |
Supernet 0 | 203.31.218.0 |
Supernet 1 | 203.31.219.0 |
Valid IP Address range | 203.31.218.1 - 203.31.219.254 |
Reserved IP Addresses | 203.31.218.0, 203.31.219.255 |
The above table shows pretty much all the information someone would need about the new network.
Let me also point out to you (in case you didn't ask yourself :> ) that IP Addresses 203.31.218.255 and 203.31.219.0, which would have been used as the broadcast address for our first old network and the network address of our old second network, are now usuable addresses!
Yes, you can actually assign them to hosts, because we have a Supernet. Now, even though you can use these addresses, we would probably not use them unless we really needed to. Not that it makes a difference, but we always tend to reserve these types of addresses.
Also, every host that will be part of this Supernet will need to be configured with the new Subnet mask, 255.255.254.0 as noted in the table above. Any host that isn't reconfigured will have big problems trying to communicate with the rest of the network.
Well that completes the analysis of our Supernet example. As pointed out in the beginning, you must have your IP, Subnetting and Binary Notation up to date otherwise you will have difficulties understanding a lot of the material so make sure you read up on those sections before giving this page another shot :)
No comments:
Post a Comment