Router-on-a-stick is a term frequently used to describe a setup up that consists of a router and switch connected using one Ethernet link configured as an 802.1q trunk link. In this setup, the switch is configured with multiple VLANs and the router performs all routing between the different networks/VLANs.
While some believe the term 'router-on-a-stick' sounds a bit silly, it's a very popular term and commonly used in networks where no layer-3 switch exists. A good example of a router-on-a-stick configuration (which also happens to be the one we are going to cover) would be a Call Manager Express installation where there is the need to split the VoIP network, consisting of your Cisco IP Phone devices, from your data network where all workstations and servers are located.
Example Scenario
Our example is based on a scenario you are most likely to come across when dealing with VoIP networks. Because VoIP implementations require you to separate the data and voice network in order to route packets between them, you need either a layer 3 switch or a router. This configuration ensures availability and stability of the VoIP service, especially during peak traffic hours in your network.
Packets running between VLANs are routed via the CCME router connected to the switch using one physical port configured as a trunk port on both ends (switch and router). If you would like to read more on VLAN routing and VLAN theory, you can visit our popular VLAN Section that covers all related topics and terms found in this article.
This example will show you how to configure a Cisco router and switch in order to create a trunk link between them and have the router route packets between your VLANs.
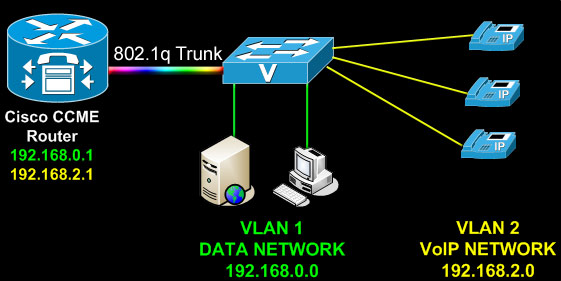
This diagram shows an illustration of the above configuration.
STEP 1 - Switch Configuration
First step is to create the required two VLANs on our Cisco switch and configure them with an IP address. Since all Cisco swiches contain VLAN1 (Default VLAN), we only need to create VLAN2:
SW1# configure terminal
SW1(config)# vlan2
SW1(config-vlan)# name voice
SW1(config-vlan)# exit
SW1(config)# interface vlan1
SW1(config-if)# description Data Vlan
SW1(config-if)# ip address 192.168.0.2 255.255.255.0
SW1(config-if)# exit
SW1(config)# interface vlan2
SW1(config-if)# description Voice Vlan
SW1(config-if)# ip address 192.168.2.2 255.255.255.0
SW1(config-if)# exit
Next, we need to create the trunk port that will connect to the router. For this purpose, we've selected port GigabitEthernet 0/1 (port 1):
SW1# configure terminal
SW1(config)# interface gigabitethernet 0/1
SW1(config-if)# description Trunk-to-Router
SW1(config-if)# switchport trunk encapsulation dot1q
SW1(config-if)# switchport mode trunk
SW1(config-if)# spanning-tree portfast
SW1(config)# interface gigabitethernet 0/1
SW1(config-if)# description Trunk-to-Router
SW1(config-if)# switchport trunk encapsulation dot1q
SW1(config-if)# switchport mode trunk
SW1(config-if)# spanning-tree portfast
To eliminate confusion, these commands are instructing the switch thus:
1) Define the trunk to use the 802.1q protocol
2) Set the specific port to 'trunk mode'
3) Enable the spanning-tree 'portfast' function to ensure the port will forward packets immediately when connected to a device e.g router.
The above steps complete the switch-side configuration.
STEP 2 - Router Configuration
We need to follow a similar configuration for our router to enable communication with our switch and allow all VLAN traffic to pass through and route as necessary.
Creating a trunk link on a router port is not very different from the process used above - while we create the trunk port on one physical interface, we are required to create a sub-interface for each VLAN.
Again, this is a fairly simple process and easy to understand once you've done it at least one time.
R1# configure terminal
R1(config)# interface gigabitethernet0/1
R1(config-if)# no ip address
R1(config-if)# duplex auto
R1(config-if)# speed auto
R1(config-if)# interface gigabitethernet0/1.1
R1(config-subif)# description Data VLAN
R1(config-subif)# encapsulation dot1q 1 native
R1(config-subif)# ip address 192.168.0.1 255.255.255.0
R1(config-subif)# ip nat inside
R1(config-subif)# ip virtual-reassembly
R1(config-subif)# interface gigabitethernet0/1.2
R1(config-subif)# description Voice VLAN
R1(config-subif)# encapsulation dot1q 2
R1(config-subif)# ip address 192.168.2.1 255.255.255.0
R1(config-subif)# ip nat inside
R1(config-subif)# ip virtual-reassembly
In order to form a trunk link with our switch it is necessary to create one sub-interface for every VLAN configured on our switch. After creating the sub-interface, we assign an IP address to it and set the encapsulation type to 802.1q along with the VLAN to which the subinterface belongs.
For example, the encapsulation dot1q 2 command defines 802.1q encapsulation and sets the subinterface to VLAN 2. The nativeparameter we used for subinterface gigabitethernet0/1.1 tells the router that the native vlan is VLAN 1. This is a default parameter on every Cisco switch and therefore must be matched by the router as well.
The ip virtual-reassembly command is usually automatically thrown in by the Cisco IOS (we've included it to show you the command) and is a security measure to avoid buffer overflow and control memory usage during an attack of fragmented packets which can cough up your router's resources. This command is added automatically when you enable the NAT service using the ip nat inside command. More information on NAT configuration can be obtained by our Cisco Router NAT Configuration articles.
Article Summary
This article explained the use of router-on-a-stick configurations and showed how you can configure an 802.1q trunk link between a Cisco switch and router. Router-on-a-stick configurations are extremely useful in environments where no layer-3 switch exists, providing Inter-VLAN routing services with a single router and one interface - cutting down seriously the costs for internal routing.
It is always preferable to use a router with a Gigabit Ethernet interface to ensure you've got plenty of bandwidth to handle large amounts of data transfers if needed.
If you have found the article useful, we would really appreciate you sharing it with others by using the services provided at the top left corner of this article. Sharing our articles takes only a minute of your time and helps Firewall.cx reach more people through such services.
No comments:
Post a Comment