Some time ago, when broadband and ADSL wasn't available, analog and digital (ISDN) modems were the only way to connect to the Internet. Even though today ISDN isn't used much for Internet connectivity, it still remains an important alternative backup dialup method.
Cisco routers are usually equipped with an ISDN BRI (Basic Rate) Interface. This interface is capable of supporting up to two 64Kbps channels, providing a maximum of 128Kbps throughput.
You can learn all about the ISDN protocol and capabilities by reading our popular ISDN WAN Protocol article.
Here will show you how to configure step-by-step your Cisco router to perform basic ISDN dialup to an Internet provider. We will also cover some basic authentication options and ISDN parameters that will help you better control your connection.
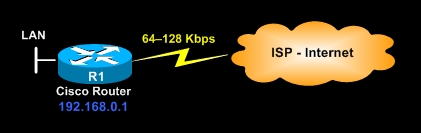
Example Scenario
The diagram below is our example network. The router is the local network's gateway and connects to our Internet provider via ISDN, when needed.
One first thing we need to do is configure the ISDN WAN interface with the necessary parameters. While every BRI ISDN interface card on a Cisco router looks the same, the actual ISDN parameters required to configure it (ISDN switch-type) changes depending on the country you live in.
For Europe, Australia, Asia and the UK, the ISDN switch-type is usually set to 'ISDN Basic Net3'. For North America, 'Basic 5ess' or 'Basic-dms100' depending on your telecommunication provider. We will be using the 'Basic Net3' switch type.
For more information, please visit our Basic ISDN configuration article. It contains extensive information on the various switch-types used throughout the world.
Further configuration of the BRI interface involves the encapsulation type, which is set to 'ppp' (Point-to-Point Protocol), common amongst all ISP's.
R1# configure terminal
R1(config)# interface bri 0
R1(config-if)# description WAN Interface
R1(config-if)# isdn switch-type basic-net3
R1(config-if)# encapsulation ppp
R1(config-if)# dialer pool-member 5
R1(config)# interface bri 0
R1(config-if)# description WAN Interface
R1(config-if)# isdn switch-type basic-net3
R1(config-if)# encapsulation ppp
R1(config-if)# dialer pool-member 5
The 'dialer pool-member' will associate the physical ISDN interface (bri 0) with a dialer interface (dialer 0) configured later on. In this example, any dialer interface assigned to 'dialer pool member 5' will use this BRI interface when dialing out.
Dialer interfaces carry the same role as a dialup connection in Windows, where you create a new connection, inserting the phone number, username, password and other parameters. This is a virtual interface that will use the BRI interface to complete the dialup and establish our Internet connection.
A number of parameters are necessary to make the connection work, these include IP address, encapsulation type, authentication method (CHAP or PAP), ISP username/password and of course, the number it needs to dial:
R1(config)# interface dialer 0
R1(config-if)# description Internet-Dialup
R1(config-if)# ip address negotiated
R1(config-if)# encapsulation ppp
R1(config-if)# ppp authentication chap pap callin
R1(config-if)# ppp chap hostname firewallcx
R1(config-if)# ppp chap password cisco
R1(config-if)# ppp pap sent-username firewallcx password cisco
R1(config-if)# dialer string 2310559500
R1(config-if)# dialer pool 5
R1(config-if)# dialer-group 1
R1(config-if)# ip nat outside
R1(config-if)# exit
R1(config)# dialer-list 1 protocol ip permit
Again, the 'dialer pool 5' command associates this dialer with the physical BRI 0 interface as it too is a member of the same pool. The 'dialer-group 1' command is used to match 'Interesting Traffic', that is, traffic that would initiate the dialup to the ISP.
The 'ip nat outside' command is part of the NAT configuration for this router. While NAT is covered in a different article, we will simply list the necessary commands to configure NAT so that the internal network has access to the Internet. You can find more information on NAT by reading through our NAT Articles.
We now need to configure the 'ip nat inside' interface, global nat overload command and associated access list. The access list is used to control which internal hosts or network(s) will pass through the nat service so they can access the Internet. Lastly, we insert a default route (0.0.0.0 0.0.0.0) instructing the router to send all traffic destined to other networks, out through the dialer 0 interface:
R1(config)# interface fastethernet 0/0
R1(config-if)# description LAN interface
R1(config-if)# ip address 192.168.0.1 255.255.255.0
R1(config-if)# ip nat inside
R1(config-if)# exit
R1(config)# ip nat inside source list 100 interface dialer0 overload
R1(config)# access-list 100 permit ip 192.168.0.0 0.0.0.255 any
R1(config)# ip route 0.0.0.0 0.0.0.0 dialer0
Here we've enabled the NAT service for the 192.168.0.1/24 network via access list 100. Generally, if you want to restrict the NAT service to a few hosts, you would simply need to modify access-list 100 to include these hosts only.
The above configuration commands are enough to successfully make your router connect to your ISP and provide full Internet access to your internal network.
Let's now take a quick look at a few additional commands you can use to help tweak your connection.
Additional ISDN Tweaks
Because ISDN dialups are usually charged by telecommunication providers based on their time usage, having the connection active without any data passing through, will eventually have you receiving a pretty large phone bill. For this reason, there is a command that can be used to instruct the router to tear-down the dialup if no data triverses the connection for an certain amount of time.
The 'dialer idle-timeout' command does exactly that. If no data passes through the Internet link within the specified time, the dialup connection is teared down. In our example, this timeout is 300 seconds:
R1(config)# interface dialer 0
R1(config-if)# dialer idle-timeout 300
R1(config-if)# dialer idle-timeout 300
Up to this point, the configuration of our 'dialer 0' interface will only use one ISDN B channel. This means you'll have a maximum throughput of 64Kbps. Because ISDN BRI can handle up to 128Kbps, we can force the router to bring up the second 64Kbps channel if the first one reaches its full capacity:
R1(config)# interface dialer 0
R1(config-if)# dialer load-threshold 255 either
R1(config-if)# dialer load-threshold 255 either
The threshold that triggeres the second channel can be configured for incoming, outgoing or either traffic. In our example, if the incoming or outgoing traffic reaches 64Kbps, the second ISDN channel will autmomatically come up.
Article Summary
This article covered basic ISDN commands required to initiate a simple ISDN dialup to an ISP. We took a look at some tweaking commands to help make the most out of the ISDN connection and also touched on Network Address Translation.
If you have found the article useful, we would really appreciate you sharing it with others by using the provided services on the top left corner of this article. Sharing our articles takes only a minute of your time and helps Firewall.cx reach more people through such services.
No comments:
Post a Comment