| Network Address Translation (NAT) Concepts |
Introduction
Before we dive into the deep waters of NAT, we need to make sure we understand exactly what NAT does. So let me give you the background of NAT, why it's here today and how it works. Even though there are different modes of NAT they are all basically extensions to the original concept.
NAT has become so popular that almost all small routers, firewall software and operating systems support at least one NAT mode. This shows how important it is to understand NAT.
The NAT Concept
NOTE: NAT is not only used for networks that connect to the Internet. You can use NAT even between private networks as we will see in the pages to follow, but because most networks use it for their Internet connection, we are focusing on that.
The NAT concept is simple: it allows a single device to act as an Internet gateway for internal LAN clients by translating the clients' internal network IP Addresses into the IP Address on the NAT-enabled gateway device.
In other words, NAT runs on the device that's connected to the Internet and hides the rest of your network from the public, thus making your whole network appear as one device (or computer, if you like) to the rest of the world.
NAT is transparent to your network, meaning all internal network devices are not required to be reconfigured in order to access the Internet. All that's required is to let your network devices know that the NAT device is the default gateway to the Internet.
NAT is secure since it hides your network from the Internet. All communications from your private network are handled by the NAT device, which will ensure all the appropriate translations are performed and provide a flawless connection between your devices and the Internet.
The diagram below illustrates this:
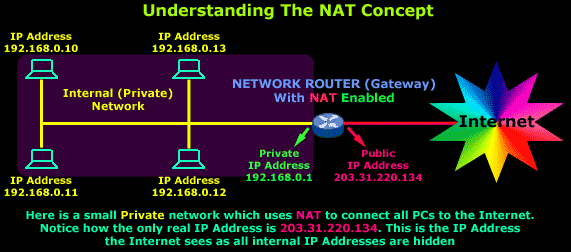
As you can see, we have a simple network of 4 hosts (computers) and one router that connects this network to the Internet. All hosts in our network have a private Class C IP Address, including the router's private interface (192.168.0.1), while the public interface that's connected to the Internet has a real IP Address (203.31.220.134).
If you're having trouble understanding, the following diagram shows how the Internet would see the above setup:
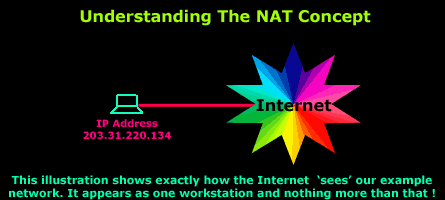
As you can see, the idea behind NAT is really simple. Remember that we have mentioned there are 3 different NAT modes to suit all types of network configurations. If required you can use NAT to allow the Internet to see specific machines on your internal network !
Such configurations will allow the Internet to access an internal webserver or ftp server you might have, without directly compromising your network security. Of course special actions need to be taken to ensure that your visitors are restricted to the resources you want and that's where the firewall comes into the picture. We'll discover how all this is possible in the next pages, so be patient and keep reading !
How NAT works
There are 3 different ways in which NAT works. However, the principle is the same for all 3 modes. To help understand it we need a good, simple example and the first one at the beginning of this page will do the job just fine.
The trick to understanding how NAT works is to realise that only the device (router, firewall or pc) that connects directly to the Internet performs NAT. For our example this device happens to be a router, but it could even be a simple PC; it makes no difference for us.
As you already know, all requests the workstations generate are sent to the Internet via the router. The router will then perform NAT on these packets and send them to their destination. As each packet arrives into the router's private interface, the router will strip the source IP Address from the 3rd layer (network layer) e.g 192.168.0.10 and place its own public IP address (203.31.220.134) before sending it to the Internet.
This is how the packet then seems to have originated from the router itself. In some cases, depending on the NAT mode, the source and destination port numbers (layer 4) will be changed as well but we examine that on the pages that follow. For now, we'll just look at the simple IP translation within the router.
The illustration below shows how the router modifies the packets:
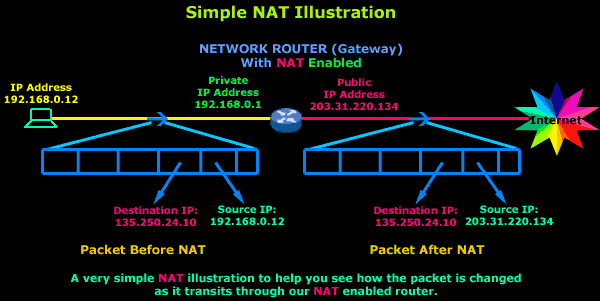
In this illustration, a workstation from our network has generated a packet with a destination IP Address 135.250.24.10. Logically, this packet is first sent to the gateway, which performs NAT on this packet and then sends it to the Internet to finally make its way to the destined host.
Looking more closely at the gateway (router) during the initial NAT operation, the original packet's Source IP is changed from 192.168.0.12 to that of the router's public interface, which is 203.31.220.134, then the router stores this information in a special address within its memory (also called NAT Table - explained next), so when the expected reply arrives it will know to which workstation within its network it needs to forward it.
The next page will show you the heart of NAT, the NAT Table, and briefly explain the function of each NAT mode.
| The Network Address Translation Table |
Introduction
After that simple and informative introduction to the NAT concept, it's time to find out more about how it works and this is where the NAT table comes in.
The NAT Table
The NAT table is the heart of the whole NAT operation, which takes place within the router (or any NAT-enabled device) as packets arrive and leave its interfaces. Each connection from the internal (private) network to the external (public-Internet) network, and vice versa, is tracked and a special table is created to help the router determine what to do with all incoming packets on all of its interfaces; in our example there are two. This table, known as the NAT table, is populated gradually as connections are created across the router and once these connections are closed the entries are deleted, making room for new entries.
The NAT table works differently depending on the NAT mode. This is explained in greater detail on each NAT mode's page. For now, we just need to get the feeling for this table to facilitate understanding of each NAT mode.
The larger the NAT table (which means the more memory it occupies), the more bi-directional connections it can track. This means that a NAT-enabled device with a big NAT table is able to serve more clients on the internal network than other similar devices with smaller NAT tables.
The illustration below shows you a typical table of a NAT-enabled device while internal clients are trying access resources on the Internet:
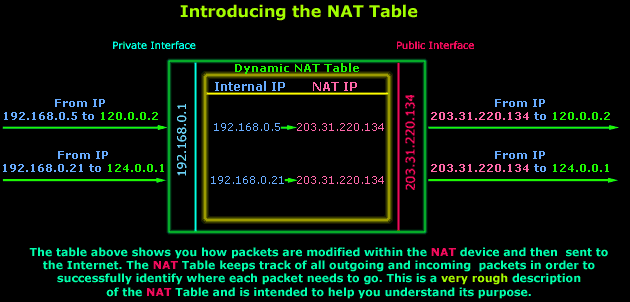
Let's explain what's happening here: The above illustration shows two requests from the private LAN, hosts 192.168.0.5 and192.168.0.21, arriving at the NAT-enabled device's (router in this example) private interface. These packets are temporarily stored in a special area in the router's memory until small changes are made to them. In this example the router will take each packet's Source IP (which is the PC the packets have come from) value and replace it with its own Public IP (203.31.220.134).
The packets are then sent out through the Public interface to their destinations, in this case 120.0.0.2 and 124.0.0.1. In addition, before the packets leave the router, an entry is made for each packet into the router's NAT table. These entries enable the router to behave appropriately when the reply for each outgoing packet hits its Public interface.
The above example covers only one specific NAT scenario. Depending on your NAT mode, the router would have dealt with the packets in a different way. This is analysed later in each NAT mode's page but, for now, you simply need to understand what the NAT table is and the purpose it serves. |
So what happens when replies come back from the Internet?
Well, strictly speaking, exactly the opposite from when they are received from the internal network and sent to the Internet:

When the reply comes back, the router will consult the NAT table, locate the correct entries and perform another change to the incoming (for the Internet) packets by replacing the "destination IP" value from 203.31.220.134 to 192.168.0.5 for the first packet, and192.168.0.21 for the second. The new packets are then sent to their destination, which are hosts 192.168.0.5 and 192.168.0.21 so the router can then delete their NAT table entries.
With most NAT devices, the NAT session limit is bound by the available memory in the device. Each NAT translation consumes about 160 bytes in the device's memory. As a result, 10,000 translations (a lot more than would normally be handled by a small router) will consume about 1.6 MB of memory. Therefore, a typical routing platform has more than enough memory to support thousands of NAT translations but in practice the story (as always) is different.
Typically on smaller Cisco routers, e.g 700, 800, 1600 series, that have an IOS with NAT capabilities, the number of NAT sessions they are able to track is around 2000 without much trouble but this also depends on the NAT mode being used. Pump that up to something like 3000 to 4000 sessions and you start having major problems as the NAT table gets too big for the router's CPU to manage. As you see, it's not only a memory issue :) This is when you start to see big delays in ping replies and eventually an exponential increase in packet loss.
We've actually seen Cisco routers having some problems while handling NAT translations (NAT Overload mode in particular). This was also confirmed by Mike Sweeney - a good friend of Firewall.cx and webmaster of www.packetattack.com, so keep in mind that the earlier Cisco IOS (pre v12.4.5) seems sometimes to behave a bit weird with NAT.
The larger router models and dedicated gateway/firewall appliances are able to track a lot more connections simultaneously (8000 to 25000), which makes them ideal for large corporations that need such capacity.
Static NAT - Part 1
Introduction
Static NAT (also called inbound mapping) is the first mode we're going to talk about and also happens to be the most uncommon between smaller networks.
Static NAT was mainly created to allow hosts on your private network to be direcly accessible via the Internet using real public IPs; we'll see in great detail how this works and is maintained. Static NAT is also considered a bit dangerous because a misconfiguration to your firewall or other NAT-enabled device can result in the full exposure of the machine on your private network to which the public IP Address maps, and we'll see the security risks later on this page.
What exactly does Static NAT do ?
As mentioned in the introduction, Static NAT allows the mapping of public IP Addresses to hosts inside the internal network. In simple english, this means you can have a computer on your private network that exists on the Internet with its own real IP.
The diagram below has been designed to help you understand exactly how Static NAT works:
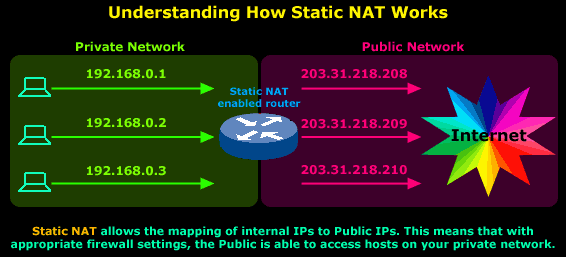
In this diagram you can see that we have our private network connected to the Internet via our router, which has been configured for Static NAT mode. In this mode each private host has a single public IP Address mapped to it, e.g private host 192.168.0.1 has the public IP Address 203.31.218.208 mapped to it. Therefore any packets generated by 192.168.0.1 that need to be routed to the Internet will have their source IP field replaced with IP Address 203.31.218.208.
All IP translations take place within the router's memory and the whole process is totally transparent to both internal and external hosts. When hosts from the Internet try to contact the internal hosts, their packets will either be dropped or forwarded to the internal hosts depending on the router's & firewall configuration.
But where would Static NAT be used?
Everyone's needs are different and with this in mind Static NAT could be the solution for many companies that require a host on their internal network to be visible and accessible from the Internet.
Let's take a close look at a few examples of places where Static NAT could be used.
Implementation of Static NAT - Example 1
We have a development server (192.168.0.20) that needs to be secure, but also allow certain customers to gain access to various services it offers for development purposes. At the same time, we need to give the customers access to a special database located on our main file server (192.168.0.10):
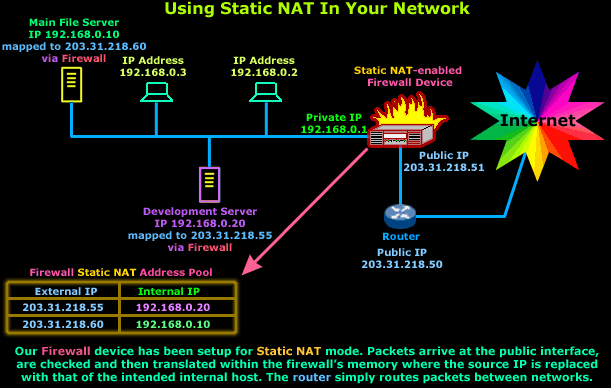
In this case, Static NAT, with a set of complex filters to make sure only authorised IP Addresses get through, would do the job just fine.
Also, if you wanted a similar setup for the purpose of using only one service, e.g http, then you're better off using a different NAT mode simply because it offers better security and is more restrictive.
Let me remind you that Static NAT requires one public IP Address for each mapping to a private IP Address. This means that you're not able to map a public IP Address to more than one private IP Address.
Implementation of Static NAT - Example 2
Another good example of using Static NAT is in a DMZ zone. The principle of having a DMZ zone is when you require certain machines e.g webservers, email servers, to be directly accessible to the Internet but at the same time, should these machines be compromised, all data can be restored without much trouble and they won't expose the internal private network to the Internet.
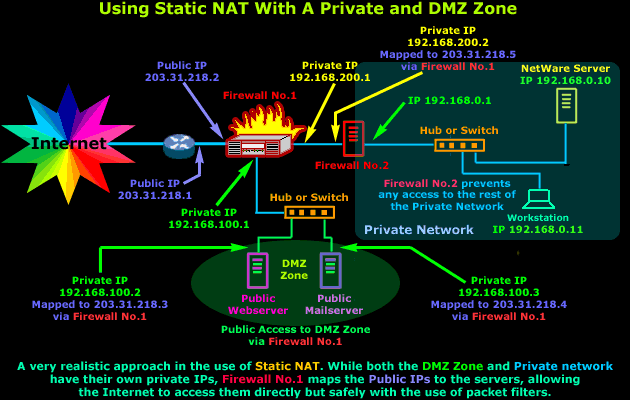
The diagram above might seem very complex, but it's actually extremely simple. Breaking it down will help you see how simple it is. If we focus on Firewall No.1 we see that it's connected to 3 networks, first one is the Internet (203.31.218.X), second one the DMZ(192.168.100.X) and the third is the small private network between our two Firewalls (192.168.200.X)
Firewall No.1 is configured to use Static NAT for 3 different hosts - that's two from the DMZ zone and one for Firewall No.2. Each interface of the Firewall must be part of a different network in order to route traffic between them. This explains why we have so many different IP Addresses in the diagram, resulting in the complex appearance.
With this setup in mind, the Static NAT table of Firewall No.1 would look like this:
Firewall No.1 Static NAT Table | |
External Public IP Address | Mapped to Internal Private IP Address |
203.31.218.2 | Firewall No.1 Public Interface |
203.31.218.3 | 192.168.100.2 - Public WebServer in DMZ |
203.31.218.4 | 192.168.100.3 - Public MailServer in DMZ |
203.31.218.5 | 192.168.200.2 - Firewall No.2 of Private Net. |
As you can see, this table is a good summary of what is happening in the diagram above. Each external IP Address is mapped to an internal private IP Address and if we want to restrict access to particular hosts then we can simply put an access policy (packet filters) on Firewall No.1.
Static NAT - Part 2
Introduction
The previous page helped us understand what exactly happens with Static NAT and how it works, and we saw a few examples of how to use it in various network configurations.
This page will deal with the transformations the packets undertake as they pass through the Static NAT device, which is normally a router or firewall appliance.
So let's get started ! Now would be a good time to fill that cup of yours and reload yourself with your special edible supplies :)
How NAT translations take place
So what exactly happens to the packet that enters or exits the Static NAT-enabled device ? Well it's not that complicated once you get the hang of it. The concept is simple and we're going to see it and analyse it using an example, which is really the best possible approach.
The process of the Static NAT translation is the same for every device that supports it (assuming the manufacturer has followed the RFCs). This means that whether we use a router or a firewall appliance to perform Static NAT they'll both follow the same guidelines.
Consider our example network:
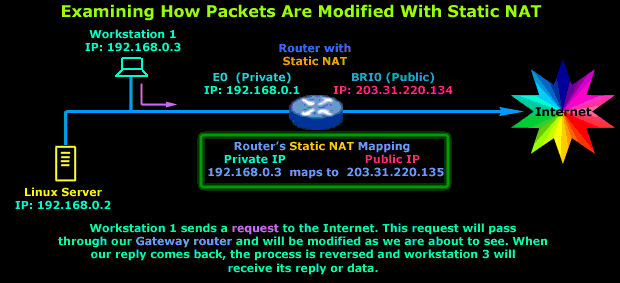
As the diagram describes we have Workstation No.1, which sends a request to the Internet. Its gateway is the router that connects the LAN to the Internet and also performs Static NAT.
The diagram below shows us how the Workstation's packet is altered as it transits the router before it's sent to the Internet (outgoing packet):
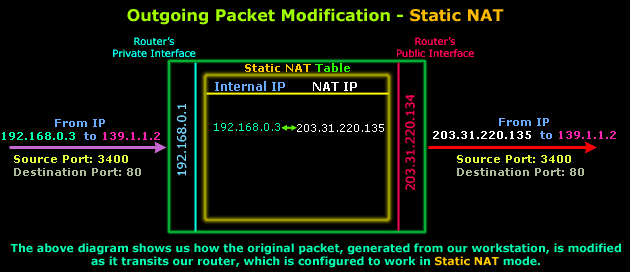
As you can see, the only thing that changes is the Source IP, which was 192.168.0.3 and was given the value of 203.31.220.135, which is a real IP Address on the Internet. The Destination IP Address, Source Port and Destination Port are not modified.
Assuming the packet arrives at its destination, we would most likely expect to see a reply. It would be logical to assume that the reply, or incoming packet, will require some sort of modification in order to successfully arrive at the originating host located on our private network (that's Workstation 1).
Here is how the incoming packet is altered as it transits the router:
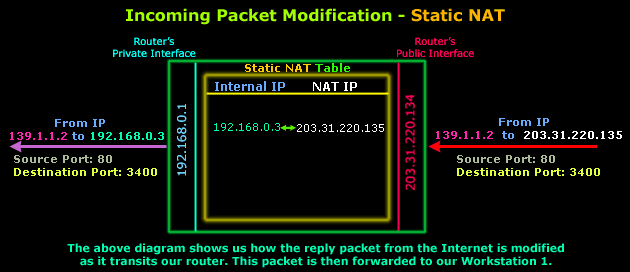
The diagram above shows the part of the incoming packet that is altered by the router. Only the destination IP Address is changed, from 203.31.220.135 to 192.168.0.3 so the packet can then be routed to the internal workstation. Source IP Address, Source Port and Destination Port remain the same.
And in case you're wondering why the ports have changed in comparison to the original outgoing packet, this is not because of NAT but the way IP communications work and happens to be way out of the scope of this topic.
Now, because I understand that even a simple diagram can be very confusing, here's one more that summarises all the above. The diagram below shows you what the outgoing and incoming packets looked like before and after transiting the router:

So there you have it, Static NAT should now make sense to you :)
As you've seen, the concept is very simple and it varies slightly depending on the NAT mode you're working with. So NAT is not that difficult to understand after all ! If there are still a few things that are unclear to you, please try reading the page again and keep in mind the forum to which you can post your questions and doubts !
Dynamic NAT - Part 1
Dynamic NAT is the second NAT mode we're going to talk about. Dynamic NAT, like Static NAT, is not that common in smaller networks but you'll find it used within larger corporations with complex networks.
The way Dynamic NAT differentiates from Static NAT is that where Static NAT provides a one-to-one internal to public static IP mapping, Dynamic NAT does the same but without making the mapping to the public IP static and usually uses a group of available public IPs.
What exactly does Dynamic NAT do?
While looking at Static NAT, we understood that for every private IP Address that needs access to the Internet we would require one static public IP Address. This public IP Address is mapped to our internal host's IP Address and it is then able to communicate with the rest of the world.
With Dynamic NAT, we also map our internal IP Addresses to real public IP Addresses, but the mapping is not static, meaning that for each session our internal hosts communicate with the Internet, their public IP Addresses remain the same, but are likely to change. These IPs are taken from a pool of public IP Addresses that have been reserved by our ISP for our public network.
With Dynamic NAT, translations don't exist in the NAT table until the router receives traffic that requires translation. Dynamic translations have a timeout period after which they are purged from the translation table, thus making them available for other internal hosts.
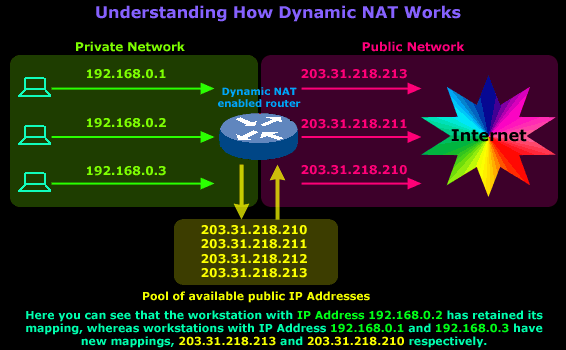
The diagram below illustrates the way Dynamic NAT works:

The diagram above is our example network and shows our router, which is configured to perform Dynamic NAT for the network. We requested 4 public IPs from our ISP (203.31.218.210 to 203.31.218.213), which will be dynamically mapped by our router to our internal hosts. In this particular session our workstation, with IP Address 192.168.0.1, sends a request to the Internet and is assigned the public IP address 203.31.218.210. This mapping between the workstation's private and public IP Address will remain until the session finishes.
The router is configured with a special NAT timeout and, after this timeout is reached (no traffic sent/received during that time), the router will expire the particular mapping and reuse it for a different internal host.
Let's say that around noon, the users of workstations with IP Address 192.168.0.1 and 192.168.0.3 go to lunch, so they log off and leave their PCs on (even if they switched them off, it wouldn't make a difference unless they had some program running that was constantly generating Internet traffic because the NAT timeout would never be reached). While these users went out for lunch, the user on the workstation with IP Address 192.168.0.2 decided to stay and do some extra work on the Internet. After 1 hour, the users return and log back on, launch their web browser and start to search on the net.
The router, as expected, deleted the old mappings once the NAT timeout had been reached for each mapping and created new ones once the users launched their web browsers, because that action generated traffic to the Internet and therefore had to transit the router.
Here's how the new mappings look:
By now, I would like to believe that you have understood what Dynamic NAT is all about and roughly how it works.
But where would Dynamic NAT be used?
Again, everyone's network needs are different, though I must admit that finding a practical implementation for Dynamic NAT is perhaps more difficult than any other NAT mode :)
Come to think of it, I can't recall ever being required to implement Dynamic NAT for a customer or my own network, but that doesn't mean it's not used. There are some network setups in which Dynamic NAT would work perfectly and that's what i'm about to show you.
Dynamic NAT Configuration for Cisco Router
Our Cisco Technical Knowledgebase contains detailed step-by-step instructions how to setup Dynamic NAT on a Cisco router. Please refer to our Dynamic NAT Configuration for Cisco Routers to read up more on its configuration.
Implementation of Dynamic NAT
This example is about a company called 'Dynasoft'. Dynasoft deals with the development of high quality software applications. As a large software firm, it has multiple contractors that help complete special sections of the software it sells.
Because of the nature of this production model, Dynasoft requires its contractors to have a permanent link into its private development network, so the source code of all ongoing projects is available to all contractors:
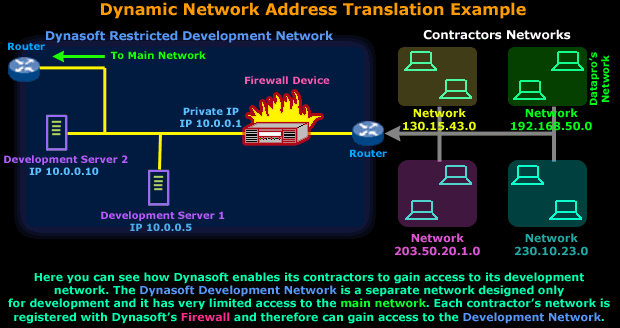
Now because Dynasoft is concerned about its network security, it purchased a firewall that was configured to regulate each contractor's access within the development network.
For the rest of this example, we will concentrate on Dynasoft's and Datapro's (green) networks:
Dynasoft has configured its firewall only to allow a particular part of Datapro's internal network to access the servers and that is network 192.168.50.0/24, which is Datapro's main development network.
This setup has been working fine, but Datapro is expanding its development network, so a second separate network (192.168.100.0/24) was created that also needs access to Dynasoft's development network. All hosts on this new network will be using the new DHCP server, which means that they'll have a dynamic IP Address.
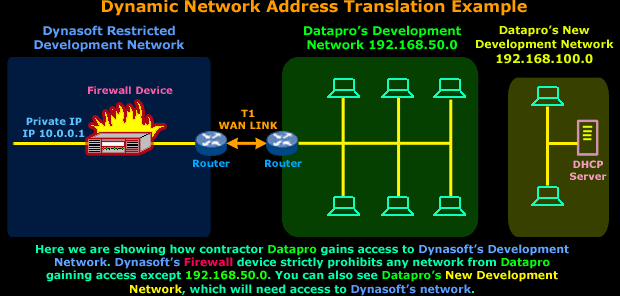
In order for the new network to access Dynasoft's network, we need to somehow trick Dynasoft's Firewall into thinking that any workstation from the new network is actually part of the 192.168.50.0 network, that way it won't be denied access.
There was a suggestion to use Static NAT but there are a few problems:
a) All workstations are on DHCP, so Static NAT will not work properly since it requires the internal hosts in the new network to have static IP Addresses.
b) Datapro's administrator wants maximum security for this new network therefore having dynamic IPs makes it more difficult for someone to track a particular host from it by using its IP Address.
So, after taking all this into consideration it was decided to implement Dynamic NAT and here's what the solution looks like:
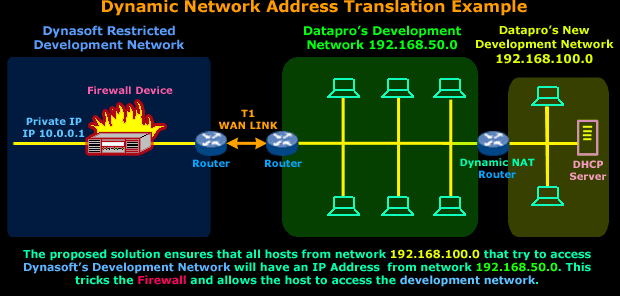
A Dynamic NAT router in this situation would do the job just fine. We would place the router between the existing (192.168.50.0) and new (192.168.100.0) network. Because of the way Dynamic NAT works, we would need to reserve a few IP Addresses from the192.168.50.0 network in order to allow the Dynamic NAT router to use them for mapping hosts on the new network - to the existing network. This way, no matter which IP Address any host in the new network has, Dynasoft's Firewall device will think it's part of the192.168.50.0 network !
We should also point out that the number of IP Addresses we'd need to reserve from network 192.168.50.0 would depend on how many simultaneous connections we want to allow from network 192.168.100.0 to Dynasoft's development network.
For example, if we required 25 workstations from network 192.168.100.0 to have simultaneous connection to Dynasoft we'd need to reserve at least 25 IP Addresses from the 192.168.50.0 network.
As previously explained, the reserved IP Addresses will be used to map hosts coming from the 192.168.100.0 network and must not be used by any host or workstation within the 192.168.50.0 network. If any were used in this way it would cause IP conflicts between the host in the 192.168.50.0 network and the Dynamic NAT router that's mapping that particular IP Address to the host from the192.168.100.0 network.
So a good practice would be to set aside the last 30 IP Addresses from the 192.168.50.0 network, which would be 192.168.50.224 to192.168.50.254, and ensure no one is assigned any IP Address within that range.
All this assumes networks 192.168.50.0 and 192.168.100.0 are using a Class C default subnetmask (255.255.255.0).
On this page, you need to understand why we're going to introduce the Dynamic NAT router, how it will solve the problem (by mapping hosts on the new network to the existing one) and the requirements for the implementation of this solution (to reserve the required IP addreess from the existing network).
The Dynamic NAT - Part 2 page deals with the analysis of the packets that will traverse the Dynamic NAT router. It will help you understand the changes in the packet and complete your understanding of Dynamic NAT.
Dynamic NAT - Part 2
Introduction
Now that you understand the basic idea of Dynamic Network Address Translation we're going to take a closer look at the packets as they traverse the Dynamic NAT enabled device, which can be a router, a firewall appliance or even a PC running special software !
How NAT translations take place
Most of the rules that apply for Static NAT (which we've already covered), also apply for Dynamic NAT and there are very few changes between the two, making it very easy to understand and digest :)
The actual process remains the same no matter which device we use, e.g Firewall appliance, Linux gateway, router etc.
Because we don't want to get confused by using a different example, we'll stick to the previous page's network between Dynasoft and its contractor - Datapro, but we're now focusing on Datapro's internal network to learn how the router between its two internal networks (192.168.50.0 and 192.168.100.0) will deal with the Dynamic NAT required in order for the new network to gain access to Dynasoft's development network:
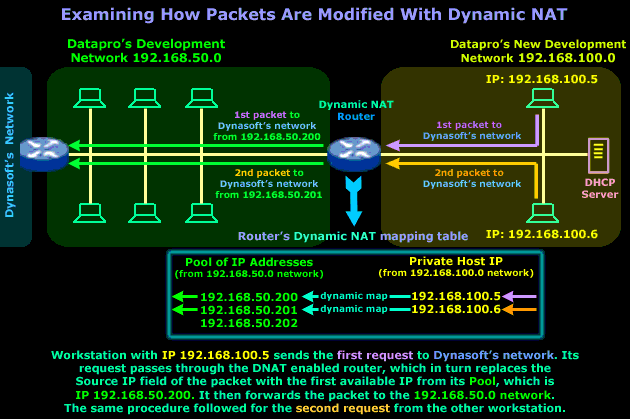
Even though the diagram explains everything, we are just going to point out a few important things about the Dynamic NAT router. It's very important that you understand that the IP Addresses in the router's Pool are reserved addresses from the 192.168.50.0 network - this means that no device or host on that network, apart from the router itself, is allowed to use them.
The dynamic mapping that is created will be in place only for that particular session, meaning that once the workstation in the new network finishes its work on the Dynasoft network, or doesn't send any packets across the Dynamic NAT router within a given time period, then the router will clear the dynamic mapping and make the IP Address available to the next host or workstation that needs it.
The timeout period is different for each transport protocol (TCP/UDP) and NAT device. The ability to modify these timeouts depends entirely on the NAT device being used. As always, the RFCs give some guidelines for these values but not all vendors follow them :) You will find more interesting information about this subject in the NAT advanced section.
So, after getting all that out of the way, it's now time to have a closer look at the packets as they traverse the router to either network:
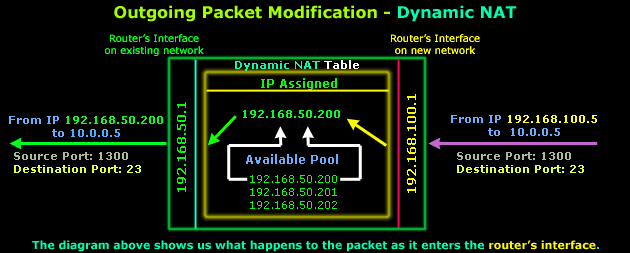
After it is determined that this packet must traverse the router, an IP Address is picked from the available pool that will be used to map IP Address 192.168.100.5. These entries are then stored within the router's RAM (NAT Table). As you can see, the Source, Destination ports and Destination IP are never modified on outgoing packets.
The router will then send the packet on to the 192.168.50.0 network and after a few milliseconds it receives the reply that our workstation on network 192.168.100.0 is waiting for:
The router finds an entry within its NAT mapping table (don't forget this table is stored in the router's RAM) and replaces destination IP192.168.50.200 with destination IP 192.168.100.5 and then forwards the packet to the new network. The Source, Destination ports and Source IP are not modified.
In case you're wondering why the ports have changed in comparison to the original outgoing packet, this is not because of NAT but the way IP communications work and happens to be way out of the scope of this page.
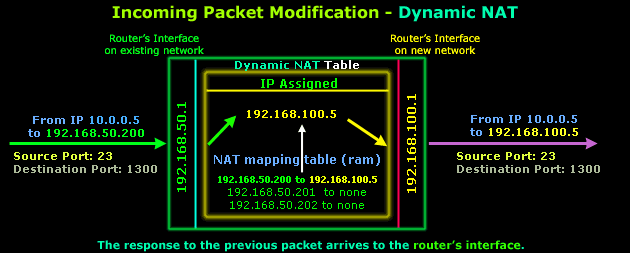
One important small detail I should bring to your attention is how the packet reply managed to arrive at the router's interface, which is on the existing network. You should know that to the existing Datapro network, the router is like a host with multiple IP Addresses.
I explained how the router maps IP Addresses on the existing network to the new network, but if someone on the existing network tried to send an ARP request for 192.168.50.200, then the router would immediately answer with its own MAC address. This is done to ensure that all traffic intended for workstations on the new network finds its way there. The same principle would apply no matter which NAT mode we used.
To sum up all the above while trying to keep things simple, because sometimes no matter how much you analyse a diagram it can still confuse you, the next diagram is a summary of how the packets are modified as they traverse a Dynamic NAT device which, in our example, is a router:
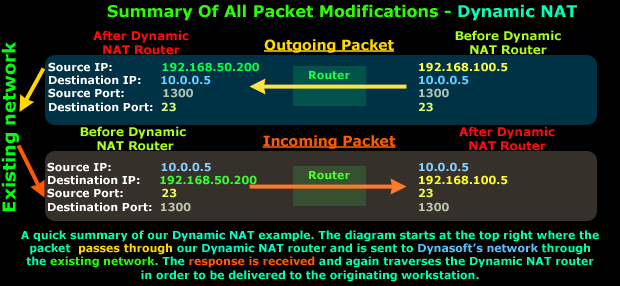
It's very easy to see that the Source IP Address (192.168.100.5) is changed as the packet traverses the Dynamic NAT router to arrive at Datapro's exist network and then move on to Dynasoft's network, whereas the reply from Dynasoft's network will enter Datapro's existing network and traverse the Dynamic NAT router and have its Destination IP Address modified to 192.168.100.5, thus reaching the workstation its intended to.
Believe it or not, we've come to the end of this page, next page talks about NAT Overload, which is also known as Network Address Port Translation, Port Address Translation or IP Masquerade in the Linux/Unix world.
| NAT Overload - Part 1 |
Introduction
NAT Overload is the most common NAT method used throughout all networks that connect to the Internet. This is because of the way it functions and the limitations it can overcome, and we'll explore all of these in the next two pages.
Whether you use a router, firewall appliance, Microsoft's Internet sharing ability or any 3rd party program that enables all your home computers to connect to the Internet via one connection, you're using NAT Overload.
This NAT mode is also know by other names, like NAPT (Network Address Port Translation), IP Masquerading and NAT with PAT (Port Address Translation). The different names logically come from the way NAT Overload works, and you'll understand this by the time we're finished with the topic.
NOTE: You should be familiar with TCP/IP & UDP communications, as well as how they use various Ports in order to identify the resources/applications they are trying to use. It's very important you understand them because NAT Overload is based on these Ports in order to identify sessions between hosts.
What exactly does NAT Overload do ?
NAT Overload is a mix of Static & Dynamic NAT with a few enhancements thrown in (PAT- Port Address Translation) to make it work the way we need. By now you understand how both Static & Dynamic NAT work so we won't get into the details again. NAT Overload takes a Static or Dynamic IP Address that is bound to the public interface of the gateway (this could be a PC, router or firewall appliance) and allows all PCs within the private network to access the Internet.
If you find yourself wondering how this is possible with one only IP Address, you will be happy to find that the answer lies within PAT.
The diagram below shows you how a single session is handled by a NAT Overload enabled device:
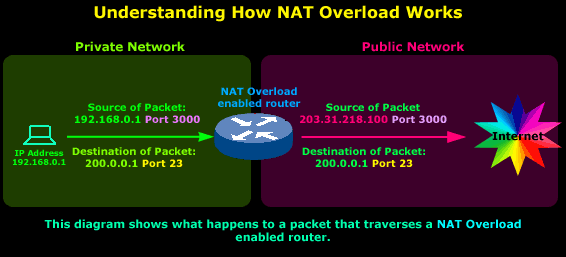
So we have a host on a private network, its IP Address is 192.168.0.1 and it's sending a packet to the Internet, more specifically to IP Address 200.0.0.1, which we're assuming is a server. The Port, which is 23, tells us that it's trying to telnet to 200.0.0.1, since this is the default port telnet uses.
As the original packet passes through the router, the Source IP Address field is changed by the router from 192.168.0.1 to203.31.218.100. However, notice that the ports are not changed.
The reason the Source IP Address is changed is obvious: The router's public IP Address must be placed in the Source IP Address field of the packet so the server we're trying to telnet to knows where the request is coming from so it can then send the reply.
That takes care of making sure the packet from the server we're telneting to finds its way back to the router's public interface. From there, the router needs to know which host on the private network it must send the reply to. For this, it uses the ports and we will be looking at that closer very soon.
Some might think that this example is pretty much the way a Static NAT router would behave, and if you're thinking just that you're totally right! In order to understand how a NAT Overload enabled router is different from Static NAT, we must add at least one more host in the private network, which we'll do right now.
With two or more hosts on the private network, in Static NAT mode we would require the equivalent number of public IP Addresses, right ? One for each private host, because Static NAT maps one public IP Address to each private host.
NAT Overload overcomes this limitation by using one public IP Address for all private hosts, but utilising the thousands of ports available in order to identify each private host's session.
Unleashing the true Power of NAT Overload
To help cover all possibilities and questions that might come up from these examples, we're going to add another two private hosts in our internal network. We'll assume that:
1) The 2nd host in our private network is trying to telnet to the same server as the 1st host
2) The 3rd host in our private network is trying to telnet to a different server on the Internet
So let's see how our example network looks:
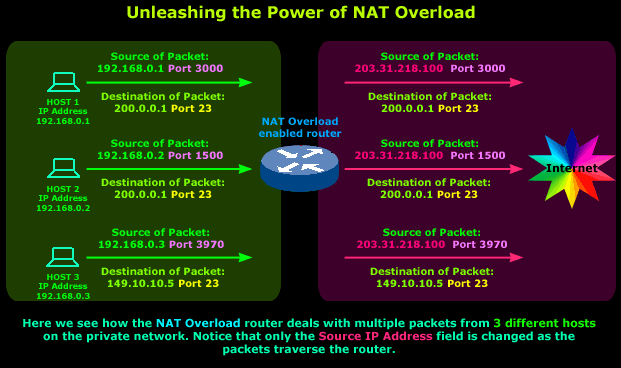
Host 1 and 2 are telneting to the same server (203.31.218.100), the only difference between the two packets is their Source Port Numbers, the router uses these to keep track of which packet belongs to each host.
Let's examine what happens when Host 1's reply arrives:
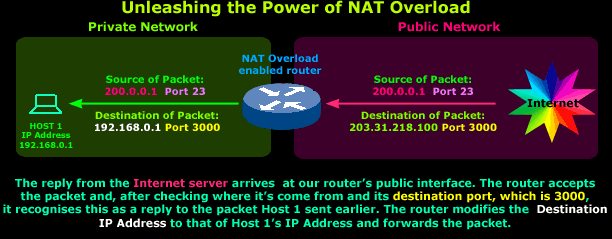
A packet arrives on our router's public interface and is accepted. The packet's details are examined and show that it came from IP Address 200.0.0.1 Port 23 with a destination of 203.31.218.100 Port 3000. The router remembers that Host 1 and 2 just sent a packet to this IP Address and now, in order to determine to whom this response belongs, it carefully examines its Destination Port.
It focuses on the Destination Port because in any reply, the Destination Port takes the value of the initial packet's Source Port. This means that this packet is a reply to one sent previously to IP Address 200.0.0.1 with Source Port 3000. The router refers to its NAT table and finds a matching entry for the described initial packet. It recognises that the reply is intended for Host 1 and will forward it to the host.
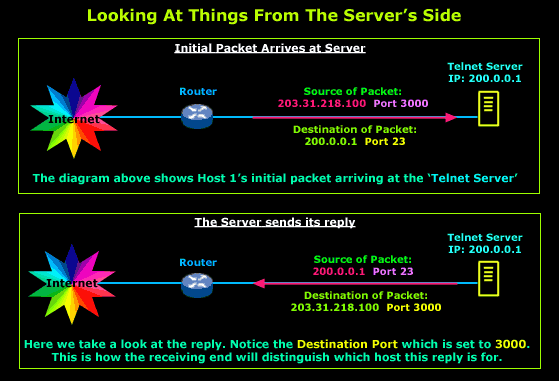
The server to which Host 1 and 2 of our example private network are telneting uses the same logic to distinguish between the two separate sessions.
Because this can also be a bit difficult to imagine, I've included a diagram which shows the server receiving Host 1's initial packet and then sending a reply:
The example on this page is intended to show you the idea behind NAT Overload and how it works. We saw our little NAT Overload enabled router doing wonders with one single public IP Address. If we wanted to use Static or Dynamic NAT in this same example, we would definitely require 3 public IP Addresses for our 3 private hosts but thanks to NAT Overload, we only need one IP Address.
NAT Overload Configuration for Cisco Router
Our Cisco Technical Knowledgebase contains detailed step-by-step instructions how to setup NAT Overload on a Cisco router. Please refer to our NAT Overload Configuration for Cisco Routers to read up more on its configuration.
The next page will deal with a more detailed analysis of the packets as they traverse the router and take a look at a few more interesting parts of NAT Overload.
| NAT Overload - Part 2 |
Introduction
This page deals with the analysis of the packets that traverse a NAT Overload enabled device. We'll examine which fields of the packets are modified and how the NAT device, a router in our example, keeps track of them in its NAT Table.
In order to keep things simple, we're going to use a few simple examples and then deal with a few more complicated ones, this should help make the complex stuff much easier to understand and digest.
Time to grab something to drink or munch on, and prepare to download this information into your head!
How NAT translations take place
When covering Dynamic and Static NAT, we saw that it was either the Source or Destination IP Address that had to be modified by the NAT device. No matter which mode was used, the Source and Destination ports were never altered in any way.
NAT Overload on the other hand will use a single public IP Address for the routing process and change, in most cases, the Source or Destination port depending on whether it's an incoming or outgoing packet.
In the next diagram we have two computers that have each sent a packet out to the Internet and are expecting a reply. We take a look at how the router deals with these packets individually and where the information required to identify the expected replies is stored:
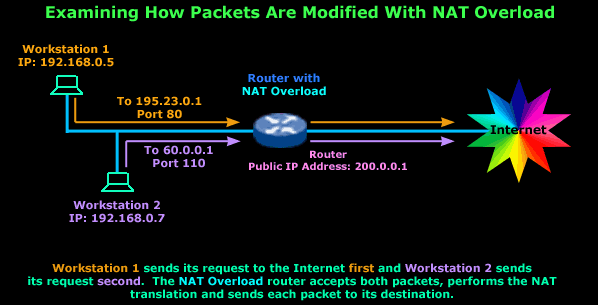
You've got to agree that that's a very simple setup. To make life easy, I haven't included any additional information about the generated packets because we'll deal with them individually.
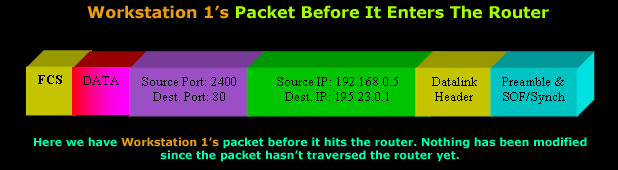
So it's time to take a look at how the router deals with this first packet which belongs to Workstation 1:
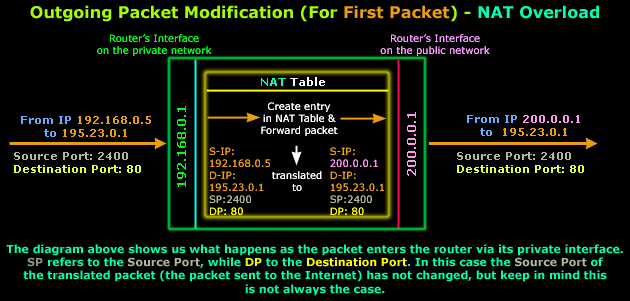
The packet Workstation 1 generated arrives at the router's private interface which has IP Address 192.168.0.1. The router accepts the packet and processes it. Once inside the router, the packet's Source IP Address, Destination IP Address, Source Port and Destination Port are examined and the router decides that this is a valid packet so it should be forwarded to the Internet.
NAT is now about to take place (check NAT Table in the above diagram). The router will replace the Source IP Address (192.168.0.5) with its Public IP Address (200.0.0.1) and keep the rest of the information intact.
Note that in most cases, the Source Port is not changed unless it has already been used by a previous packet from the private network but, since this is the first outgoing packet, this cannot be the case.
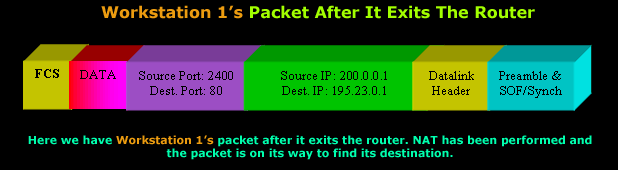
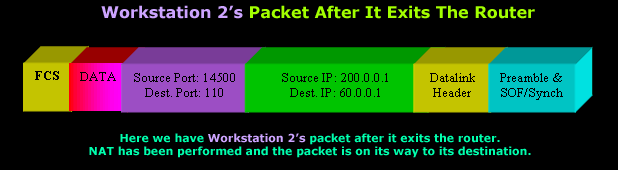
Here's how the packet looked once it exited the router's public interface:
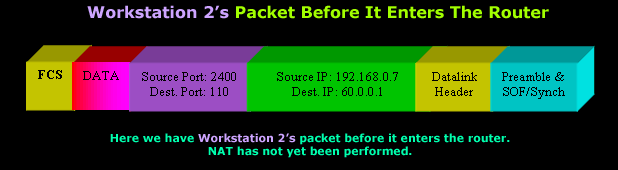
Time to check our second packet that will traverse the router, which is generated by Workstation 2 (the router has not yet received the reply to Workstation 1's packet).
We're going to assume that Workstation 2 uses the same Source Port (2400) as Workstation 1's packet, so you can see how the router will react:
This packet is a very good example to show you how great NAT Overload is because the router will need to 'do' something to make sure it's able to successfully receive the reply.
Let's look at what happens within the router as the packet arrives at its private interface:
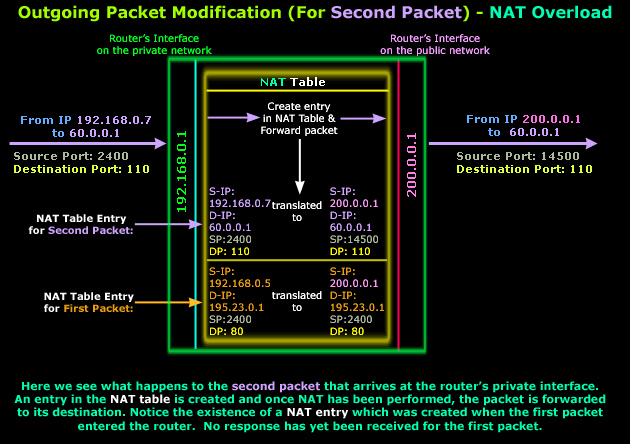
As you can see, our second packet arrives at the router's private interface. It enters the router and since the packet is valid (it's not corrupt and contains a valid Destination IP Address in its IP Header) it's routed to the public interface and NAT is performed while a new entry is added into the router's NAT Table.
Looking at the NAT entries, you will notice that both first and second packets have the same Source Port, which is 2400. Since the router already used port 2400 as a Source Port for the first packet's NAT Translation and hasn't yet received a reply, it cannot use it again for the second packet. If it did use it, when a reply for any of the two packets came back the router wouldn't be able to distinguish whose it was.
For this reason, the router assigns a new Source Port for the second packet (14500), ensuring that the reply will get to the internal host for which it is intended:
Usually most NAT Overload enabled devices will assign Source Ports in the range of 1025 to 65500.
Keep in mind that when one host sends a packet to another, the Source Port it used in the packet will be substituted for the Destination Port in the reply packet.
For example, Host A sends a packet to Host B and this packet has a Source Port of 200, then when Host B replies to Host A its packet will have a Destination Port of 200. This way, Host A knows this is a reply to the initial packet it sent.
This is why it's important for the router to keep close track of Source Ports on outgoing packets and Destination Ports in all incoming packets.
Last Notes
NAT Overload will work perfectly no matter which type of IP Address assignment you have. Whether it's Dynamic IP or Static, via dial up or a permanent connection, it makes no difference to the NAT device. You can now see how this particular NAT mode has helped preserve real (public) IP Addresses, because no matter how many internal hosts any private network has, it only requires one real IP Address in order to allow all internal hosts to access the Internet.
Now you have a good idea why NAT is such a popular topic, simply cause it's made such a big difference ion how networks connect to the Internet.
No comments:
Post a Comment