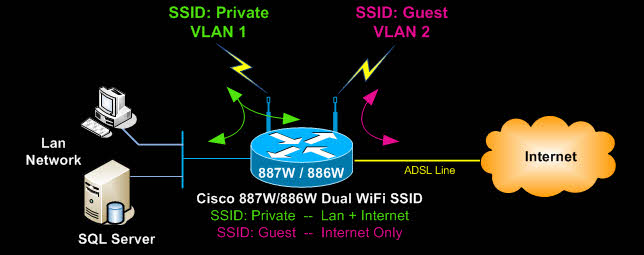
This article aims to explain the configuration required for a Cisco 880W series router (e.g Cisco 887W, Cisco 886W, Cisco 881W, Cisco 888W, etc), in order to setup the integrated Cisco access point with multiple encrypted SSIDs, each SSID belonging to a different VLAN with specific access to the local network and Internet.
The most common setup of this type is one SSID that connects to the local network and another SSID serving guests that require Internet access only. The commands shown in this article are applicable on all Cisco 880W series models.
Configuring VLANs on the Cisco 880W (881W, 886W, 887W, 888W) Series Router
First step is to examine the VLANs required. In our example we assume two VLANs - one for the local network and one for guest Internet access. By default VLAN 1 is already created as it is the first VLAN on the router, so we will need to create the second VLAN that will serve the guest wireless network, or second SSID:
Once VLAN2 is created (cover later in this article), we can connect to the integrated access point and begin its configuration. If the integrated access point has no IP address assigned to it yet in order to telnet directly to it, you can connect from within the existing session of your Cisco 880 series router using the service-module wlan-ap 0 session command.
Cisco Access Point Multiple - Dual SSID Configuration
Configuring multiple SSIDs on a Cisco access point is a straightforward process, however, it does contain a few details we will analyse as we progress.
We need to now create the two SSIDs by defining their names which will be broadcast so users can find them, the encryption method to be used, wireless secret keys and lastly the VLAN assignment for each SSID:
AP (config)# dot11 ssid Private
AP (config-ssid)# vlan 1
AP (config-ssid)# authentication open
AP (config-ssid)# authentication key-management wpa
AP (config-ssid)# guest-mode
AP (config-ssid)# mbssid guest-mode
AP (config-ssid)# infrastructure-ssid optional
AP (config-ssid)# wpa-psk ascii 0 firewall.cx
AP (config-ssid)# exit
AP (config)# dot11 ssid Guest
AP (config-ssid)# vlan 2
AP (config-ssid)# authentication open
AP (config-ssid)# authentication key-management wpa
AP (config-ssid)# mbssid guest-mode
AP (config-ssid)# wpa-psk ascii 0 free-internet
AP (config-ssid)# exit
AP (config)# dot11 vlan-name vlan1 vlan1
AP (config)# dot11 vlan-name vlan2 vlan2
The above configuration is quite different from setups with one SSID. The reason being the multiple SSID and VLAN configuration required to ensure each SSID is assigned to the correct VLAN. The 'Private' wireless network is assigned to VLAN 1 and the 'Guest' wireless network to VLAN 2.
Notice that when using multiple SSIDs on a Cisco access point it is imperative to use the mbssid guest-mode command otherwise the SSID name of the wireless network will not be broadcast correctly.
The dot11 vlan-name command ensures the correct mapping of VLANs and their respective VLAN names. In our example, the VLAN names follow the actual VLAN numbers. So, VLAN 1 has been named 'VLAN 1'. This helps easily to keep track of them.
Next, we must ensure the integrated routing and bridging (IRB) feature is enabled to allow the routing of our protocols (IP) between routed interfaces and bridge groups. This command is most likely already present in the configuration, but let's play safe and enter it:
AP (config)# bridge irb
Configuring the Dot11Radio0 interface
Configuring the Dot11Radio0 interface is our next step. Dot11Radio0 is the actual radio interface of the integrated Cisco access point. We will need to assign the SSIDs configured previously, to this interface, along with the encryption methods and a few more parameters.
AP (config)# interface Dot11Radio0
AP (config-if)# encryption vlan1 mode ciphers tkip
AP (config-if)# encryption vlan2 mode ciphers tkip
AP (config-if)# ssid Private
AP (config-if)# ssid Guest
AP (config-if)# mbssid
AP (config-if)# station-role root
AP (config-if)# speed basic-1.0 2.0 5.5 11.0 6.0 9.0 12.0 18.0 24.0 36.0 48.0 54.0 m0. m1. m2. m3. m4. m8. m9. m10. m11. m12. m13. m14. m15.
AP (config-if)# channel 2462
Most commands are self-explanatory. We will however explain the basic and important ones:
The Encryption VLAN commands set the encryption mode for each VLAN and, therefore, each SSID.
The SSID command assigns the SSIDs to this interface.
The mbssid command ensures both SSIDs are broadcast and are viewable to our wireless clients.
The station-role root is a default command and makes the access point act as a root station, in other words as an autonomous access point.
Note the speed basic command. This is a default command that sets the supported speeds. The first portion, 1.0 to 54.0, refers to the 802.11 b/g protocol, while the m0 to m15 refers to the 802.11n protocol.
Configuring the Dot11Radio0 sub-interfaces
At this point we are required to configure sub-interfaces on Dot11Radio0, assigning each sub-interface to a VLAN.
AP (config)# interface Dot11Radio0.1
AP (config-subif)# encapsulation dot1Q 1 native
AP (config-subif)# no ip route-cache
AP (config-subif)# bridge-group 1
AP (config-subif)# bridge-group 1 subscriber-loop-control
AP (config-subif)# bridge-group 1 block-unknown-source
AP (config-subif)# no bridge-group 1 source-learning
AP (config-subif)# no bridge-group 1 unicast-flooding
AP (config-subif)# bridge-group 1 spanning-disabled
AP (config)# exit
AP (config)# interface Dot11Radio0.2
AP (config-subif)# encapsulation dot1Q 2
AP (config-subif)# no ip route-cache
AP (config-subif)# bridge-group 2
AP (config-subif)# bridge-group 2 block-unknown-source
AP (config-subif)# no bridge-group 2 source-learning
AP (config-subif)# no bridge-group 2 unicast-flooding
AP (config-subif)# bridge-group 2 spanning-disabled
When creating the subinterfaces we always use easy-to-identify methods of mapping. Thus, interface Dot11Radio0.1 means this interface will be mapped to VLAN 1, while interface Dot11Radio0.2 will map to VLAN 2.
The encapsulation dot1Q 1 native command surves two purposes. It maps VLAN 1 to sub-interface Dot11Radio0.1 and tells the access point that this VLAN (1) is the native VLAN. This means that untagged VLAN traffic belongs to VLAN 1. More information on VLANs is available in our VLAN Section - be sure to visit it.
Similarly, under interface Dot11Radio0.2, the encapsulation dotQ 2 command maps VLAN 2 traffic to this sub-interface.
The bridge-group command assigns each sub-interface to a bridge group. Each sub-interface is assigned to its own bridge-group. The bridge group essentially connects the wireless sub-interfaces with the internal Gigabit Ethernet interface this access point has. This is analysed next.
Configuring Cisco Access Point GigabitEthernet0, Sub-Interfaces and BVI interface
As mentioned earlier, the integrated access point connects with the Cisco 887W router via an internal GigabitEthernet link. On the access point side this is the GigabitEthernet0 interface.
Following is the configuration required to create the necessary GigabitEthernet sub-interfaces and map the Dot11Radio0.X interfaces previously created with them:
AP (config)# interface GigabitEthernet0
AP (config-if)# description the embedded AP GigabitEthernet 0 is an internal interface connecting AP with the host router
AP (config-if)# no ip address
AP (config-if)# no ip route-cache
AP (config-if)# exit
AP (config)# interface GigabitEthernet0.1
AP (config-if)# encapsulation dot1Q 1 native
AP (config-if)# no ip route-cache
AP (config-if)# bridge-group 1
AP (config-if)# no bridge-group 1 source-learning
AP (config-if)# bridge-group 1 spanning-disabled
AP (config-if)# exit
AP (config)# interface GigabitEthernet0.2
AP (config-if)# encapsulation dot1Q 2
AP (config-if)# no ip route-cache
AP (config-if)# bridge-group 2
AP (config-if)# no bridge-group 2 source-learning
AP (config-if)# bridge-group 2 spanning-disabled
AP (config-if)# exit
AP (config)# interface BVI1
AP (config-if)# ip address 10.117.17.4 255.255.255.0
AP (config-if)# no ip route-cache
The GigabitEthernet interface and sub-interface configuration follows the same logic as the Dot11Radio0 interface. Notice that each GigabitEthernet sub-interface is mapped to the same VLAN and bridge-group as the Dot11Radio0 sub-interfaces.
Next, we create the one and only BVI1 interface and assign it an IP Address. This is basically the IP Address of our access point and is reachable from our LAN network, so it's best to assign it an IP Address from your LAN network.
It is important to note that only one bridge-interface (BVI Interface) is configured with an IP Address. The rest of the bridge groups are not required to have a BVI interface as all traffic is trunked through the BVI1 Interface. This is per Cisco design.
Finally, we must enable ip routing for bridge 1:
AP (config)# bridge 1 protocol ieee
AP (config)# bridge 1 route ip
AP (config)# bridge 1 route ip
This completes the setup of our Cisco 887W integrated access point. We can now move to our Cisco 887W router side, complete the configuration and get everything up and running.
Configuring the Cisco Router End - DHCP Services & VLAN Interfaces
The first step is to define the DHCP service and ip address pools for our two VLANs and, therefore, SSIDs.
Detailed instructions on setting up a DHCP Server can be found at our Cisco DHCP Server Configuration article.
To make it easy, we are providing the necessary commands for our example:
R1-887W(config)# ip dhcp excluded-address 10.117.17.1 10.117.17.200
R1-887W(config)# ip dhcp excluded-address 192.168.1.1 192.168.1.200
R1-887W(config)# ip dhcp pool Private
R1-887W(dhcp-config)# network 10.117.17.0 255.255.255.0
R1-887W(dhcp-config)# dns-server 10.117.17.3
R1-887W(dhcp-config)# default-router 10.117.17.3
R1-887W(config)# ip dhcp pool Guest
R1-887W(dhcp-config)# network 192.168.1.0 255.255.255.0
R1-887W(dhcp-config)# default-router 192.168.1.1
R1-887W(dhcp-config)# dns-server 192.168.1.1
Next, we must ensure the internal Wlan-GigabitEthernet0 interface, connecting the router with the integrated access point, is configured as a trunk port. Essentially, the router's internal Wlan-GigabitEthernet0 connects with integrated access point GigabitEthernet0 we previously configured.
By simply using the switchport mode trunk command, the router will allow all VLAN traffic, configured on both sides, to communicate between the two devices (Router - Access Point):
R1-887W(config)# interface Wlan-GigabitEthernet0
R1-887W(config-if)# description Internal switch interface connecting to the embedded AP
R1-887W(config-if)# switchport mode trunk
R1-887W(config-if)# description Internal switch interface connecting to the embedded AP
R1-887W(config-if)# switchport mode trunk
Lastly, we need to configure our router's VLANs. VLAN 1 is the native VLAN that connects to our local network, while VLAN 2 is used for the wireless Guest Internet access service. Note the ip addresses assigned match the networks configured in our DHCP service.
R1-887W(config)# interface Vlan1
R1-887W(config-if)# description Local-Network
R1-887W(config-if)# ip address 10.117.17.3 255.255.255.0
R1-887W(config-if)# ip nat inside
R1-887W(config-if)# ip virtual-reassembly
R1-887W(config-if)# ip tcp adjust-mss 1452
R1-887W(config)# interface Vlan2
R1-887W(config-if)# description Guest-Vlan
R1-887W(config-if)# ip address 192.168.1.1 255.255.255.0
R1-887W(config-if)# ip nat inside
R1-887W(config-if)# ip virtual-reassembly
!
To ensure VLAN 2 is created, we suggest you configure one of the router's FastEthernet interfaces so that it is assigned to VLAN 2. This will force the router to create VLAN 2 in its VLAN database:
R1-887W(config)# interface FastEthernet3
R1-887W(config-if)# switchport access VLAN 2
R1-887W(config-if)# switchport access VLAN 2
Once the switchport access VLAN 2 command is given, the router will automatically create VLAN 2 if it does not exist. Below is the output to expect when this happens:
% Access VLAN does not exist. Creating VLAN 2
You can reassign the interface to VLAN 1 if you wish by using the no switchport access VLAN 2 command.
Remember that NAT Overload is required to be configured, otherwise no one will have any Internet access. This is covered extensively in our Cisco Router NAT Overload article.
Article Summary
This article provided an in-depth coverage on how to configure a Cisco 880W series router with integrated Access Point to support multiple SSID wireless networks. The information provided not only covers the basic commands, but also analyses the background theory and logic used for these types of configurations to ensure the reader fully understands why this method is used.
If you have found the article useful we would really appreciate you sharing it with others by using the services provided in the top left corner of this article. Sharing our articles takes only a minute of your time and helps Firewall.cx reach more people.
No comments:
Post a Comment