Introduction
This article deals with the popular topic of InterVLAN routing, which is used to allow routing & communication between VLAN networks. Our article analyses InterVLAN routing and provides 4 different methods of InterVLAN routing to help understand the concept.The Need For Routing
Each network has it's own needs, though whether it's a large or small network, internal routing, in most cases, is essential - if not critical. The ability to segment your network by creating VLANs, thus reducing network broadcasts and increasing your security, is a tactic used by most engineers. Popular setups include a separate broadcast domain for critical services such as File Servers, Print servers, Domain Controllers e.t.c, serving your users non-stop.
The issue here is how can users from one VLAN (broadcast domain), use services offered by another VLAN?
Thankfully there's an answer to every problem and in this case, its VLAN routing:
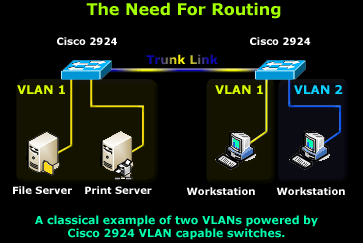
The above diagram is a very simple but effective example to help you get the idea. Two VLANs consisting of two servers and workstations of which one workstation has been placed along with the servers in VLAN 1, while the second workstation is placed in VLAN 2.
In this scenario, both workstations require access to the File and Print servers, making it a very simple task for the workstation residing in VLAN 1, but obviously not for our workstation in VLAN 2.
As you might have already guessed, we need to somehow route packets between the two VLANs and the good news is that there is more than one way to achieve this and that's what we'll be covering on this page.
VLAN Routing Solutions
While the two 2924 Catalyst switches are connected via a trunk link, they are unable to route packets from one VLAN to another. If we wanted the switch to support routing, we would require it to be a layer 3 switch with routing capabilities, a service offered by the popular Catalyst 3550 series and above.
Since there are quite a few ways to enable the communcation between VLANs (InterVLAN Routing being the most popular) there is a good chance that we are able to view all possible solutions. This follows our standard method of presenting all possible solutions, giving you an in-depth view on how VLAN routing can be setup, even if you do not have a layer 3 switch.
Note: The term 'InterVLAN Routing' refers to a specific routing method which we will cover as a last scenario, however it is advised that you read through all given solutions to ensure you have a solid understanding on the VLAN routing topic.
VLAN Routing Solution No.1: Using A Router With 2 Ethernet Interfaces
A few years ago, this was one of the preferred and fastest methods to route packets between VLANs. The setup is quite simple and involves a Cisco router e.g 2500 series with two Ethernet interfaces as shown in the diagram, connecting to both VLANs with an appropriate IP Address assigned to each interface. IP Routing is of course enabled on the router and we also have the option of applying access lists in the case where we need to restrict network access between our VLANs.
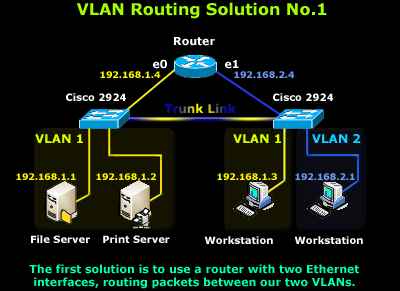
In addition, each host (servers and workstations) must either use the router's interface connected to their network as a 'default gateway' or a route entry must be created to ensure they use the router as a gateway to the other VLAN/Network. This scenario is however expensive to implement because we require a dedicated router to router packets between our VLANs, and is also limited from an expandability prospective.
In the case where there are more than two VLANs, additional Ethernet interfaces will be required, so basically, the idea here is that you need one Ethernet interface on your router that will connect to each VLAN.
To finish this scenario, as the network gets bigger and more VLANs are created, it will very quickly get messy and expensive, so this solution will prove inadequate to cover our future growth.
VLAN Routing Solution No.2: Using A Router With One Ethernet (Trunk) Interface
This solution is certainly fancier but requires, as you would have already guessed, a router that supports trunk links. With this kind of setup, the trunk link is created, using of course the same type of encapsulation the switches use (ISL or 802.1q), and enabling IP routing on the router side. This method of InterVLAN routing is also known as 'Router on a Stick'. You can read more on its configuration under our Cisco Router Knowledgebase
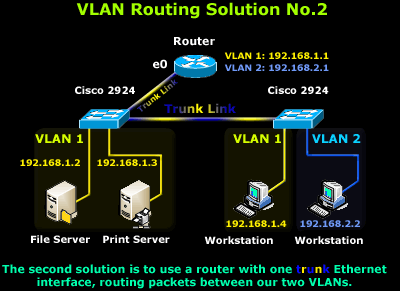
The downside here is that not many engineers will sacrifice a router just for routing between VLANs when there are many cheaper alternatives, as you will soon find out. Nevertheless, despite the high cost and dedicated hardware, it's still a valid and workable solution and depending on your needs and available equipment, it might be just what you're looking for!
Closing this scenario, the router will need to be configured with two virtual interfaces, one for each VLAN, with the appropriate IP Address assigned to each one so routing can be performed.
VLAN Routing Solution No.3: Using A Server With Two Network Cards
We would call this option a "Classic Solution". What we basically do, is configure one of the servers to perform the routing between the two VLANs, reducing the overal cost as no dedicated equipment is required.
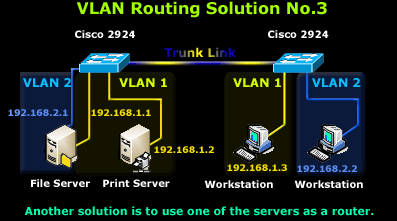
In order for the server to perform the routing, it requires two network cards - one for each VLAN and the appropriate IP Addresses assigned, therefore we have configured one with IP Addresses 192.168.1.1 and the other with 192.168.2.1. Once this phase is complete, all we need to do is enable IP routing on the server and we're done.
Lastly, each workstation must use the server as either a gateway, or a route entry should be created so they know how to get to the other network. As you see, there's nothing special about this configuration, it's simple, cheap and it gets the job done.
VLAN Routing Solution No.4: InterVLAN Routing
And at last.... InterVLAN routing! This is without a doubt the best VLAN routing solution out of all of the above. InterVLAN routing makes use of the latest in technology switches ensuring a super fast, reliable, and acceptable cost routing solution.
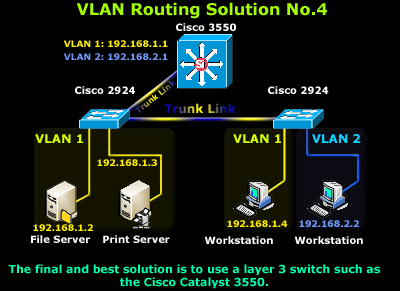
The Cisco Catalyst 3550 series switches used here are layer 3 switches with built-in routing capabilities, making them the preferred choice at a reasonable cost. Of course, the proposed solution shown here is only a small part of a large scale network where switches such as the Catalyst 3550 are usually placed as core switches, connecting all branch switches together (2924's in this case) via superfast fiber Gigabit or Fast Ethernet links, ensuring a fast and reliable network backbone.
We should also note that InterVLAN routing on the Catalyst 3550 has certain software requirements regarding the IOS image loaded on the switch as outlined on the table below:
| Image Type & Version | InterVLAN Routing Capability |
|---|---|
| Enhanced Multilayer Image (EMI) - All Versions | YES |
| Standard Multilayer Image (SMI) - prior to 12.1(11)EA1 | NO |
| Standard Multilayer Image (SMI) - 12.1(11)EA1 and later | YES |
If you happen to have a 3550 Catalyst in hand, you can issue the 'Show version' to reveal your IOS version and find out if it supports IP routing.
In returning to our example, our 3550 Catalyst will be configured with two virtual interfaces, one for each VLAN, and of course the appropriate IP Address assigned to them to ensure there is a logical interface connected to both networks. Lastly, as you might have guessed, we need to issue the 'IP Routing' command to enable the InterVLAN Routing service!
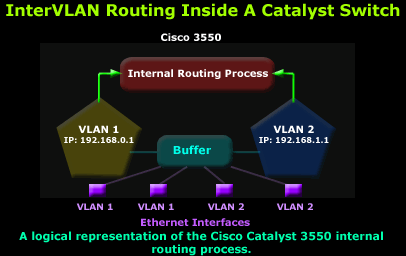
The diagram above was designed to help you 'visualise' how switches and their interfaces are configured to specific VLAN, making the InterVLAN routing service possible. The switch above has been configured with two VLANs, VLAN 1 and 2. The Ethernet interfaces are then assigned to each VLAN, allowing them to communicate directly with all other interfaces assigned to the same VLAN and the other VLAN, when the internal routing process is present and enabled.
Access Lists & InterVLAN Routing
Another common addition to the InterVLAN routing service is the application of Access Lists (packet filtering) on the routing switch,to restrict access to services or hosts as required.
In modern implementations, central file servers and services are usually placed in their own isolated VLAN, securing them from possible network attacks while controlling access to them. When you take into consideration that most trojans and viruses perform an initial scan of the network before attacking, an administrator can smartly disable ICMP echoes and other protocols used to detect a live host, avoiding possible detection by an attacker host located on a different VLAN.
Summary
InterVLAN is a terrific service and one that you simply can't live without in a large network. The topic is a fairly easy one once you get the idea, and this is our aim here, to help you get that idea, and extend it further by giving you other alternative methods.
The key element to the InterVLAN routing service is that you must have at least one VLAN interface configured with an IP Address on the InterVLAN capable switch, which will also dictate the IP network for that VLAN. All hosts participating in that VLAN must also use the same IP addressing scheme to ensure communication between them. When the above requirements are met, it's then as simple as enabling the IP Routing service on the switch and you have the InterVLAN service activated.
good post.
ReplyDeleteNetwork routing and switching
Best wifi router
Best wireless router
Network router
Routing solutions