NAT (Network Address Translation) is a method that allows the translation (modification) of IP addresses while packets/datagrams are traversing the network. Dynamic NAT enables multiple internal hosts access to the Internet by assigning each host a unique real (Public) IP address for the duration of the session.
Once the internal host stops sending and receiving packets from the Internet, the router's NAT timeout will clear the Dynamic NAT entry from its NAT table, making the real IP address available to the next internal host.
The following steps explain basic Cisco router Dynamic NAT configuration. If you would like to read more on the NAT theory, be sure to read our popular NAT articles, which explain in great depth the NAT functions and applications in today's networks. Lastly, if you're only interested in Dynamic NAT, you can simply follow this link and read up on our theoretical example covered on Firewall.cx.
Example Scenario
The diagram below represents our example network, which consists of a number of internal clients trying to access the Internet via our router. The router is connected to the ISP via its serial interface. The company has been assigned the following Class C subnet: 200.2.2.0/29 (255.255.255.248). This translates to the following usable Public IP addresses: 200.2.2.1 - 200.2.2.6.
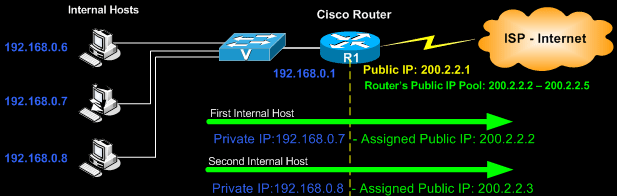
As one would expect, we need to sacrifice two IP addresses: one for the router's serial interface and one for the ISP's router. This leaves us with the following pool of usable Public IP addresses: 200.2.2.2 - 200.2.2.5.
The goal here is to configure the router to dynamically allocate the pool of Public IP addresses to our internal network.
Configure Dynamic NAT
Dynamic NAT configuration is a pretty straightforward process and is almost identical to other types of NAT configurations. The first step in any NAT configuration is to define the inside and outside interfaces. It is imperative that we define these interfaces for the Dynamic NAT service to function.
Set the fast ethernet 0/0 interface as the inside interface:
R1# configure terminal
R1(config)# interface fastethernet0/0R1(config-if)# ip nat inside
R1(config)# interface fastethernet0/0R1(config-if)# ip nat inside
Next step is to set the serial interface S0/0 as the outside interface:
R1(config-if)# interface serial0/0R1(config-if)# ip nat outside
R1(config-if)# exit
R1(config-if)# exit
Next step is to create our pool of Public IP addresses that will be handed out by the router to our internal hosts trying to connect to the Internet. Each time a host sends a packet destined for the Internet, the router will automatically allocate one of the Public IP addresses for the length of that session.
When the session is over, the NAT entry will timeout and the Public IP address is released, making it available once again to the Dynamic NAT pool. Let us define the NAT Pool:
R1(config)# ip nat pool Public-IPS 200.2.2.2 200.2.2.5 prefix-length 29
We now need to create an Access Control List (ACL) that will include local (private) hosts or network(s), depending on how large the internal network is.
This ACL will be applied to the NAT pool named 'Public-IPS', effectively controlling the hosts that will be assigned a Public IP address and therefore able to access the Internet.
You can use standard or extended access lists depending on your requirements:
R1(config)# ip nat inside source list 100 pool Public-IPS
R1(config)# access-list 100 remark == [Control NAT Pool Service]==
R1(config)# access-list 100 permit ip 192.168.0.0 0.0.0.255 any
R1(config)# access-list 100 remark == [Control NAT Pool Service]==
R1(config)# access-list 100 permit ip 192.168.0.0 0.0.0.255 any
The above command instructs the router to allow the 192.168.0.0/24 network to use the NAT Pool and provide each host with a unique Dynamic Public IP address. Note that Cisco router standard and extended ACLs always use wildcards (0.0.0.255).
Verifying Dynamic NAT operation
By viewing the Dynamic NAT table you can easily verify that the internal hosts are correctly being assigned a Dynamic IP address from the configured pool:
R1# show ip nat translations
Pro Inside global Inside local Outside local Outside global
--- 200.2.2.2 192.168.0.6 --- ---
--- 200.2.2.3 192.168.0.8 --- ---
Pro Inside global Inside local Outside local Outside global
--- 200.2.2.2 192.168.0.6 --- ---
--- 200.2.2.3 192.168.0.8 --- ---
As shown, two internal hosts (192.168.0.6 & 192.168.0.8) have each been assigned an external IP address from the pool we previously created.
These translations will eventually timeout if no activity is present from the internal hosts, however, if you need to forcibly clear them this can be easily done by entering the following command:
R1# clear ip nat translation *
Assuming no request has been sent right after the command was entered, the NAT translation table should be empty:
R1# show ip nat translations
Pro Inside global Inside local Outside local Outside global
Pro Inside global Inside local Outside local Outside global
Lastly, you can obtain statistics on the Dynamic NAT service. This will help you monitor the usage of your Dynamic NAT pool and available public IP addresses:
R1# show ip nat statistics
Total active translations: 2 (0 static, 2 dynamic; 0 extended)
Outside interfaces:
Serial0/0
Inside interfaces:
FastEthernet0/0
Hits: 8968 Misses: 2
Expired translations: 0
Dynamic mappings:
-- Inside Source
[Id: 1] access-list 100 pool Public_IPS refcount 2
pool PUBLIC: netmask 255.255.255.0
start 200.2.2.2 end 200.2.2.5
type generic, total addresses 4, allocated 2 (50%), misses 0
Article Summary
In this article we've covered the configuration of Dynamic NAT on Cisco routers. We also saw how you can control the Dynamic NAT service using ACLs and obtain detailed statistics on the NAT service. The configuration and commands presented here are compatible with all Cisco router models and IOSs.
If you have found the article useful, we would really appreciate you sharing it with others by using the provided services on the top left corner of this article. Sharing our articles takes only a minute of your time and helps Firewall.cx reach more people through such services.
No comments:
Post a Comment