Introduction
Hosting your own webserver or email server would normaly require a static IP address from your ISP. This ensures that your services are always reachable using the same IP address or domain name.
If you had a domain name, e.g Firewall.cx, you would then map your static IP address to your domain (via DNS) so when you hit your domain name, you would be directed to your statically assigned IP address and access the resources you need.
While this is the recommended setup for most companies doing serious business, it doesn't really apply to home users or small branch offices because of the increased cost for static IP addresses.
The solution to the above problem is named 'DDNS' - Dynamic DNS Service. DDNS providers allow the registeration and creation of Fully Qualified Domain Names (FQDN) that can be mapped to home or branch office Internet connections without cost . This eliminates the need for a static IP address, since the DDNS provider will automatically update its DNS records with your dynamic IP address every time it changes.
From Cisco IOS version 12.4 onwards, Cisco routers have built-in support for a variety of DDNS providers, making it much easier and a more reliable alternative, as you no longer require a PC in your network that will run the DDNS provider's client program.
This article will show you how you can configure your Cisco router so it can support the DDNS service with No-IP.com and DynDNS.com. Detailed Cisco router CLI commands and debugging information is included to ensure correct configuration and results are obtained.
Example Scenario
Consider the following network diagram. It shows the simple logic of how DDNS works:
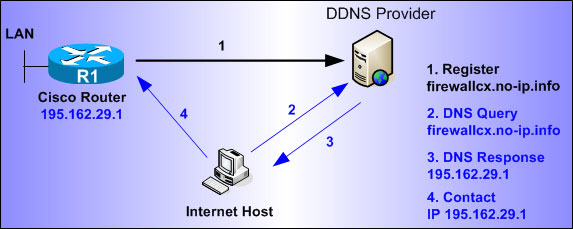
Firstly we need to configure our Cisco router to register and send its periodical updates to the DDNS provider. Once received, the DDNS provider updates the relevant DNS records, in our example, firewallcx.no-ip.info.
When an Internet host queries the DDNS provider for the domain firewallcx.no-ip.info, it will then point the host towards the public IP addresses currently assigned to the router, that is, 195.162.29.1. As the ISP changes the IP address it assigned to the Cisco router, the router in turn will also update its DDNS provider. This way, the domain firewallcx.no-ip.info is always updated no matter how many times its IP address changes.
So, without further delay, here's how you can configure your Cisco router to register with the following DDNS providers:
1) No-ip.com
2) Dyndns.com
Case No.1: No-ip.com
First step is to enable the DNS service and configure an IP name server (public DNS server) so it can successfully resolve Internet domain names. For our example, we are using Public DNS servers:
R1# configure terminal
R1(config)# ip dns server
R1(config)# ip name-server 4.2.2.6
R1(config)# ip name-server 4.2.2.5
R1(config)# ip dns server
R1(config)# ip name-server 4.2.2.6
R1(config)# ip name-server 4.2.2.5
Next, we need to enable the DDNS update service and give it a name (no-ip), and then select the update method to be used, for this example, it's HTTP:
R1(config)# ip ddns update method no-ip
R1(DDNS-update-method)# HTTP
R1(DDNS-update-method)# HTTP
Now we add the authentication details. The router will use this information to authenticate to the DDNS provider so it can then update the necessary hostname. We should note that each DDNS provider uses its own authentication method & parameters. In No-ip.com's case, it makes use of a login name & password, where the login name is your registered email address.
The command will look something like this:
add http://email:password@dynupdate.no-ip.com/nic/update?hostname=<h>&myip=<a>
As noted, the login name is the registered email address. This means that the full syntax above will contain two "@" characters, which can create a problem with the URL sent to the DDNS provider. In addition, the question mark "?" character cannot be inserted straight into the command as the router will consider it as a help request and provide a list of parameters and commands. For this reason, it is required to enter CTRL+V, then insert the "?" character. The same procedure applies for the "@" symbol:
R1(DDNS-HTTP)# add http://user@firewall.cx:password@dynupdate.no-ip.com/nic/update?hostname=<h>&myip=<a>
Note: The above command is one single lineIn the above command, the <h> variable will be substituted with the FQDN that needs to be updated (firewallcx.no-ip.info) which we will configure next, and the <a> variable will be substituted with the IP address of the interface we have enabled for the DDNS updates.
In the next step, we set the update interval, to ensure the FQDN is updated as frequently possible, but without causing problems to the DDNS provider:
R1(DDNS-HTTP)# interval maximum 0 0 5 0
The above command sets the update interval to 0 Days, 0 Hours, 5 Minutes and 0 Seconds.
Last step is to set the FQDN we'll be updating and enable the DDNS service on our public interface (usually the Dialer 0 or public FastEthernet interface):
R1(DDNS-update-method)# interface dialer0
R1(config-if)# ip ddns update hostname firewallcx.no-ip.info
R1(config-if)# ip ddns update no-ip
R1(config-if)# ip ddns update hostname firewallcx.no-ip.info
R1(config-if)# ip ddns update no-ip
This completes the setup and your router should start sending its updates to the DDNS provider.
If you see that your FQDN hasn't been updated after 5-10 minutes, then you can also use the following debug commands (hit CTRL-Z first) to get an idea of what's happening in the background:
R1# debug ip ddns update
Here are the results of our debug:
Jan 23 14:26:51.859: %LINEPROTO-5-UPDOWN: Line protocol on Interface Virtual-Access3, changed state to down
Jan 23 12:26:51.859: DYNUPD: SWIF goingdown 'Virtual-Access3'
Jan 23 14:27:05.091: %LINEPROTO-5-UPDOWN: Line protocol on Interface Virtual-Access3, changed state to up
Jan 23 12:27:05.091: DYNUPD: SWIF comingup 'Virtual-Access3'
Jan 23 12:27:07.883: DYNDNSUPD: Adding DNS mapping for firewallcx.no-ip.info<=> 195.162.29.1
Jan 23 12:27:07.883: HTTPDNS: Update add called for firewallcx.no-ip.info<=> 195.162.29.1
Case No.2: Dyndns.com
Dyndns.com requires a similar configuration as our previous DDNS provider, however, the HTTP authentication string is slightly different, and you'll need to adjust your update interval to once a day rather than every 5 minutes. The interval adjustment is very important as Dyndns.com is unfortunately less forgiving than No-ip.com and will lock your account if multiple updates occur without your IP address having been changed!
The following cli code is the actual configuration required up till the authentication method:
R1# configure terminal
R1(config)# ip dns server
R1(config)# ip name-server 4.2.2.6
R1(config)# ip name-server 4.2.2.5
R1(config)# ip ddns update method dyndns
R1(DDNS-update-method)# HTTP
R1(config)# ip dns server
R1(config)# ip name-server 4.2.2.6
R1(config)# ip name-server 4.2.2.5
R1(config)# ip ddns update method dyndns
R1(DDNS-update-method)# HTTP
The HTTP authentication string required for Dyndns.com will look something like this:
add http://username:password@members.dyndns.org/nic/update?system=dyndns&hostname=<h>&myip=<a>
In order to insert the "@" and "?" symbol, it is required to enter CTRL+V before each character, as explained previously.
R1(DDNS-HTTP)# add http://username:password@members.dyndns.org/nic/update?system=dyndns&hostname=<h>&myip=<a>
Note: The above command is one full line
Again, the <h> will be substituted with the FQDN that needs to be updated (firewallcx.dyndns.info) which we will configure next, and the <a> will be substituted with the IP address of the interface we have enabled for the DDNS updates.
Next up, we set the update interval to ensure the FQDN is updated as frequently as possible. DynDNS is a bit sensitive on regular update, so we set it to once a day:
R1(DDNS-HTTP)# interval maximum 1 0 0 0
The above command sets the update interval to 1 Day, 0 Hours, 0 Minutes and 0 Seconds.
As a final step, we set the FQDN we'll be updating and enable the DDNS service on our public interface (usually your Dialer 0 or public Ethernet interface):
R1(DDNS-update-method)# interface dialer0
R1(config-if)# ip ddns update hostname firewall.dyndns.info
R1(config-if)# ip ddns update dyndns
R1(config-if)# ip ddns update hostname firewall.dyndns.info
R1(config-if)# ip ddns update dyndns
This completes the setup and your router should start sending its updates to the DDNS provider.
If you see that the your FQDN hasn't been updated after 5-10 minutes, then you can also use the following debug commands (hit CTRL-Z first) to get an idea on what's happening in the background:
Jan 24 12:26:51.859: %LINEPROTO-5-UPDOWN: Line protocol on Interface Virtual-Access3, changed state to down
Jan 24 12:26:51.859: DYNUPD: SWIF goingdown 'Virtual-Access3'
Jan 24 12:27:05.091: %LINEPROTO-5-UPDOWN: Line protocol on Interface Virtual-Access3, changed state to up
Jan 24 12:27:05.091: DYNUPD: SWIF comingup 'Virtual-Access3'
Jan 24 12:27:07.883: DYNDNSUPD: Adding DNS mapping for firewall.dyndns.info<=> 195.162.49.4
Jan 24 12:27:07.883: HTTPDNS: Update add called for firewall.dyndns.info<=> 195.162.49.4
Article Summary
In this article we've covered how to enable and configure Dynamic DNS for popular no-ip.com and dyndns.com. We've seen the process in great depth and analysed all commands required to get the service up and running, but also debug it in case of problems.
Closing, we hope the article comes in handy and answers your questions regarding the configuration of DDNS on Cisco routers.
If you have found the article useful, we would really appreciate you sharing it with others by using the provided services on the top left corner of this article. Sharing our articles takes only a minute of your time and helps Firewall.cx reach more people through such services.
No comments:
Post a Comment