Metal as a Service: MAAS
Metal as a Service -- MAAS -- brings the language of the cloud to physical servers. It makes it easy to set up the hardware on which to deploy any service that needs to scale up and down dynamically; a cloud being just one example.
It lets you provision your servers dynamically, just like cloud instances – only in this case, they’re whole physical nodes. “Add another node to the Hadoop cluster, and make sure it has at least 16GB RAM” is as easy as asking for it.
With a simple web interface, you can add, commission, update and recycle your servers at will. As your needs change, you can respond rapidly, by adding new nodes and dynamically re-deploying them between services. When the time comes, nodes can be retired for use outside the MAAS.
Installation and initial set-up
How you install and run MAAS depends largely on whether you have control of the network you're using.
In this guide, we'll look at two common scenarios:
- You own the network: you own the network you're connecting to and you're happy to let MAAS own that network's DHCP.
- You're experimenting while using someone else's network: you can't allow MAAS to own the network's DHCP.
We'll look at both of these ways to run MAAS.
You own the network
To start with, let's run through the quickest way to get MAAS up and running. For this quick-start guide, we're assuming that:
- You own and control the network you're connecting to.
- You are willing to give MAAS control of that network's DHCP.
- You have a fresh Ubuntu 12.04 LTS installation that can access the Ubuntu archive (or a local mirror) and you're happy to dedicate that machine to MAAS.
- That you have knowledge on how to install Ubuntu Server
Installing MAAS from the 12.04 Server CD
- Download the 12.04 Server Image and burn to your installation media
- Boot the Server CD
- Select "Install MAAS or Enlist" TODO Change to new sting & Screenshot
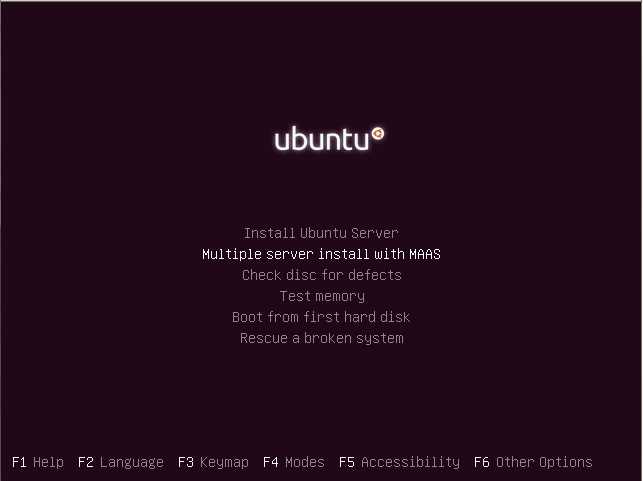
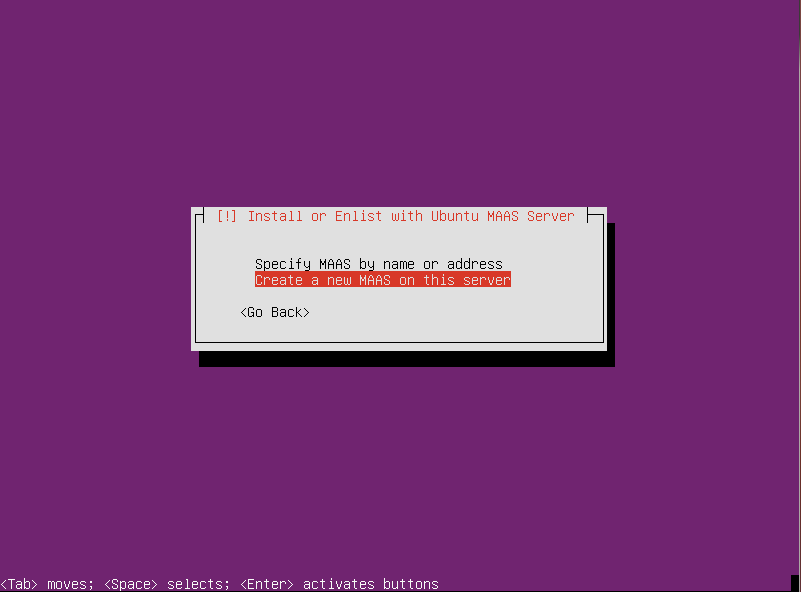
- When the "Install or Enlist with MAAS Server" dialog appears
- Select "Create a New MAAS on this Server"
- You will get dialog saying the MAAS is installed with the URL to the MAAS Web Interface
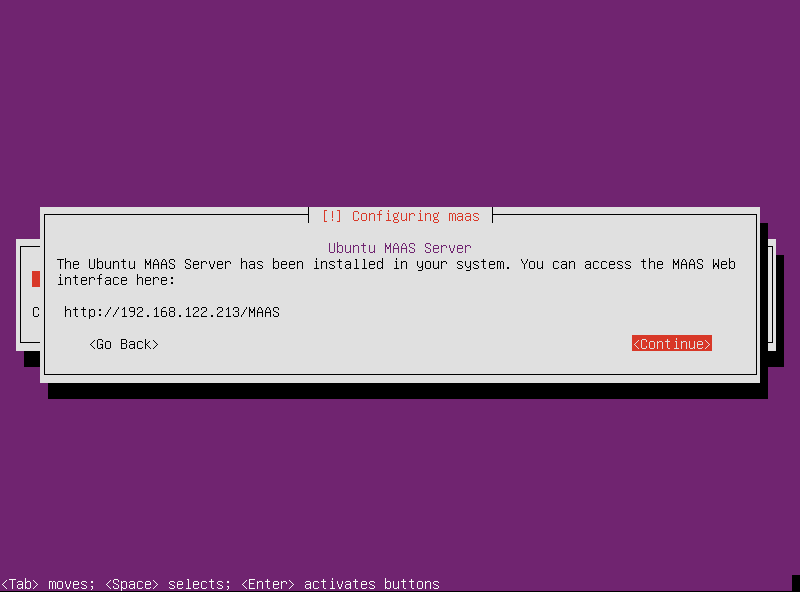
- Installation will complete and reboot
At this point MAAS is installed. Now you can move on to createing your MAAS admin account.
Create MAAS admin account
Once MAAS is installed, you'll need to create your first administrator account.
- Point your brower at http://ip.address/MAAS
- You will see instructions on how to create a MAAS admin user by running:
ubuntu@ubuntu-qa-maas:~$ sudo maas createsuperuser
Follow the prompts and MAAS will create an admin account that you can later use to log in.
Username (Leave blank to use 'root'): admin

E-mail address: me@canonical.com

Password:

Password (again):

Superuser created successfully.

ubuntu@ubuntu-qa-maas:~$
Configuring DHCP
If you own the network you're working with, MAAS can use DHCP to PXE boot the servers that you connect to your cluster.
There are three ways of handling this:
- Set up a fresh DHCP server to work with MAAS.
- Configure your existing DHCP server to work with MAAS.
- Existing DHCP server you don't control.
For now, we'll look at the first of those: setting up a dedicated DHCP server for MAAS. You can choose whichever DHCP server you prefer but for this guide we'll use dnsmasq via the maas-dhcp package.
dnsmasq might already be installed, however, it is not configured to work with MAAS. In order to install and/or configure it, enter the following:
sudo apt-get install maas-dhcp
During the installation process, you will be able to able to specify three configuration options. These are:
- DHCP Range: specify the range from which dnsmasq should allocate IP addresses to servers in your MAAS.
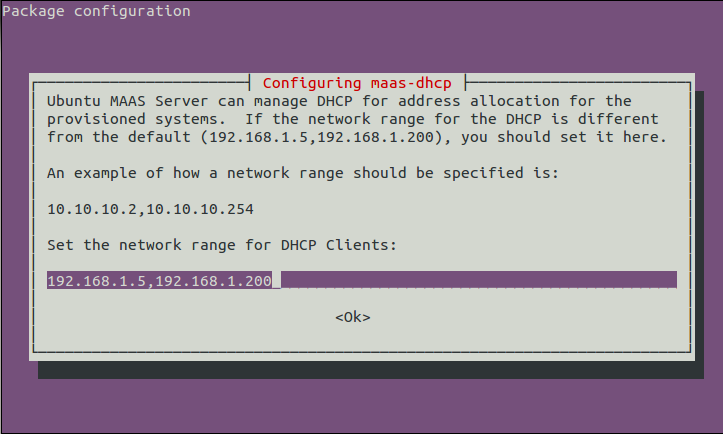
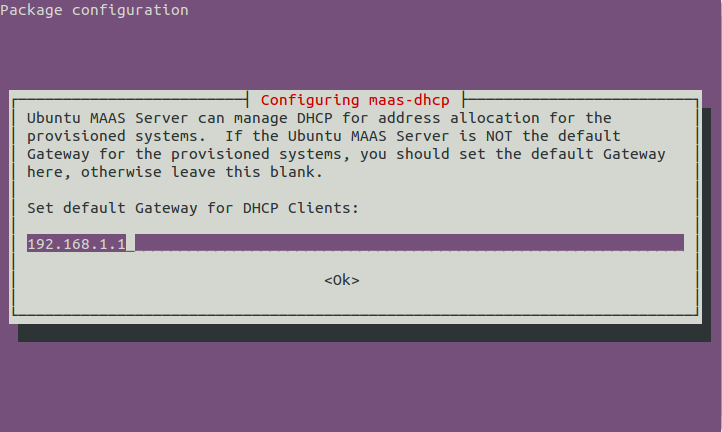
- Gateway: specify the network's Gateway IP address. If your MAAS is the gateway you can leave it as it defaults.
- Domain: if applicable, you will be able to specify your network domain. Otherwise, you can leave this blank.
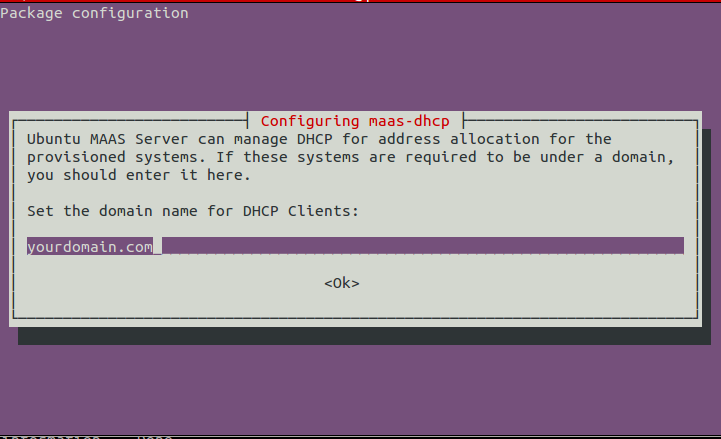
dnsmasq is now running as a DHCP server on your network.
Import the Ubuntu images
MAAS will check for and download new Ubuntu images once a week. However, you'll need to download them manually the first time:
sudo maas-import-isos
Next steps
Now you have a working MAAS. You can log into the web interface at the following address, substitute the hostname for your machine of course:
http://hostname/MAAS
MAAS: adding a node


Now that you have installed MAAS, you're ready to add your first couple of nodes.


There are two ways to add a node to MAAS:
From the Ubuntu Server Installer: install Ubuntu Server on the machine and ask the installer to find the MAAS you want to associate it with.
From the MAAS web interface: have MAAS PXE boot the machine and install Ubuntu.
From the Ubuntu Server Installer from USB Stick
Before you start, you'll need to:
- Install the Ubuntu 12.04 Server Image on a USB Stick TODO: Link to install docs
- Boot the MAAS node with the USB Stick you just created.
You will get a dialog "Install or Enlist with Ubuntu MAAS Server" with 3 options:- TODO - Insert example
- Specify MAAS Server by Name or Address
- Create a new MAAS on this server.
- It is best to select option 1. which is the auto-discovered MAAS server.
- When complete the machine will power off
- Do this for as many machines as you want to enlist into your MAAS infastructure.
Now, we'll look at the second way: PXE booting the node from within MAAS's web interface.
Adding a node by PXE booting
This is the easiest way to add a node to your MAAS. Before you start, you'll need to:
- Configure the server to wake on LAN and PXE boot.
- Make a note of the MAC address of the machine you want to add to the MAAS.
- Have set up your MAAS so it is running the network's DHCP.
Next, visit your MAAS dashboard in your browser and click the Add Node button. You'll see a few options but all you need to do are:
- Enter the machine's MAC address.
Leave the After commissioning drop-down at its default option of Queue for dynamic allocation to services.
When you're done, MAAS adds the machine to the pool of nodes to which you can deploy a service. You'll see the MAAS dashboard update to show that a new node is ready for action.
Troubleshooting
Next steps
Once you have added at least two nodes to your MAAS, go to MAAS web interface. Click on the nodes link and you will see all of of your enlisted nodes.
Accept & Commission Nodes
In order to use Juju you have to Accept & Commission the nodes for use.
Click on Nodes link at the top left of the page
You will then see a list of each node
Click on each node and you will be taken to the Node Properties Page
Click the Accept & Commission button
Click on the Nodes link to repeat the process until all the nodes you wish to use are accepted.
MAAS: getting started with Juju
Before you get going
To follow this guide, you'll need to:
- Have at least two nodes added to your MAAS.
Install Juju from the PPA ppa:juju/pkgs (once Ubuntu 12.04 LTS comes out of beta, you'll be able to use the default Juju).
 sudo add-apt-repository ppa:juju/pkgs

 sudo apt-get update

 sudo apt-get install juju
Getting an API key for MAAS
So that Juju can communicate with MAAS, you'll need to generate a MAAS API key associated with your MAAS account.
Each user account in MAAS can have as many API keys as needed and already has one key by default.
To retrieve the API key, or generate another:
Step 1: In the MAAS web interface, select Preferences from your user-name drop-down at the top-right of the page.
Step 2: There you can copy the key that is generated by default or click the Add Key button to generate another key.
Note: you need to use a different API key for each Juju environment you set up within a single MAAS cluster.
Defining a Juju environment
A Juju environment is somewhere that can provide, on demand, an Ubuntu instance. You can set up one or more Juju environments in your MAAS cluster, just as you can create Juju environments with virtual machines from providers such as Amazon EC2.
To use Juju with MAAS, you'll need to define at least one Juju environments.
On you MAAS host, use your favourite text editor, create the file:
mkdir ~/.juju

vim ~/.juju/environments.yaml
Now add the following:
environments:

  maas:

    type: maas

    juju-origin: ppa   TODO: Remove before final realease

    maas-server: 'http://maas.server.ip:80/MAAS'

    maas-oauth: '${maas-api-key}'

    admin-secret: 'nothing'

    default-series: precise
There are few things you need to replace:
- Substitute the API key you copied earlier for ${maas-api-key}.
- Replace maas.server.ip in the maas-server line. You will need to specificy an ip address for the maas server that the nodes can reach.
- You'll want to make sure default-series is set to the Ubuntu Server release you want.
You can also change maas in third line to whatever name you want to give that environment, which is useful when you're creating subsequent MAAS-based environments later.
Bootstrapping your Juju environment
After you've defined the environment, Juju needs to bootstrap it:
Make sure the account that you are running juju bootstrap from has a ssh key. If not run:
ssh-keygen
Now run:
juju bootstrap
Bootstrapping the environment allocates a node to the environment that Juju uses to coordinate the services you deploy.
You should get a success message quite quickly. However, the bootstrap process includes installing Ubuntu on the Juju node, so it will take a few minutes to complete.
Juju will try and boot the nodes, however if your machines don't support wake on lan you will have to power on the machines by using the power switch.
You can check the status of your environment with:
juju status
Until the environment is ready, you'll get a timeout or another error message. Once it's ready, you'll see a status report for the environment.
Note: if Juju complains that there are multiple environments and no explicit default, add -e ${environment-name} after each command. For example:
juju status -e maas
NOTE: in the event that during your install you start getting corrupt package errors run this command on the MAAS master:
sudo rm -rf /var/cache/squid-deb-proxy/*
This will clear out the proxy cache and resolv the error. This is a known issue and will be fixed in a update.
Deploying a charm to your MAAS
Now you're ready for the most exciting part: deploying a charm to your MAAS!
juju deploy mysql
MAAS will now allocate a node to Juju and Juju will deploy the MySQL charm to that node. Again, it'll take a few minutes to complete while Ubuntu installed and then the charm deploys.
Let's have a quick status-check:
juju status
Once the charm is deployed, you'll see it reflected in the environment's status.
If you have another node free you can deploy WordPress and hook it up to the MySQL service we just deployed:
juju deploy wordpress

juju add-relation wordpress mysql

juju expose wordpress

juju status
In just a few minutes, and with a few lines of commands, you've deployed WordPress, backed by MySQL, to dynamically allocated physical servers, with MAAS and Juju. The address of the wordpress will be in the status output; put that URL in your browser and you can start using Wordpress!

No comments:
Post a Comment