You want to do this because:
- You want to show your friends and family what you’re working on by sharing a URL with them
- You’ll need to learn enough Ops stuff to build a proper production environment in the future, this is the first step
- You want to validate your prototype with prospective customers/beta testers by watching them use your app in the context of their own devices and browser. (similar to 1)
- It just feels awesome to deploy, especially if you turn this into a regular habit
*Disclaimer: all stack technology choices made in this post were made on the rationale of being maximally mainstream and minimally viable.
Launch your Free EC2 Amazon Machine Image (AMI)
First sign-up for Amazon’s EC2 service, it’s a pretty straightforward process where they ask you for some personal details, credit card and verify your identity via an automated phone call. Once you’re confirmed, you can log in to the AWS Management Console and go to the ‘EC2’ tab to fire up a free (for the 1st year) micro instance in the region that’s closest to you.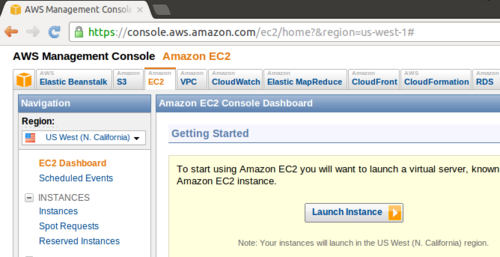
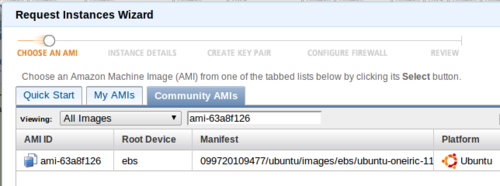
Now you’ll need to go through the classic wizard, in the ‘Choose an AMI’ step we’re going to use a Community AMI from Alestic. The folks at Alestic have been kind enough to setup Ubuntu to run securely on Amazon EC2 and create an image from that setup which we can simply load onto our instance.
- Go to the ‘Community AMIs’ tab and search for “ami-6da8f128” - that’s the ID for a 64 bit Ubuntu image in the US West-1 location. If you want to use a different location you’ll need to look up the correct ID on the Alestic page.
- In ‘Instance Details’ you’ll want 1 instance and you’ll need to choose the Micro Instance Type so it qualifies for the free tier.
- Next you’ll need to create and download a key pair which will enable you to SSH into your machine later.
- For the rest of the ‘Launch Instance’ wizard you can choose the default options presented and skip through to the end to launch it.
Allocate Elastic IP Address and Update Security Groups
Now we’re going to create allocate an elastic IP address to the machine instance we just launched so we can access the machine directly (via HTTP or SSH) over the internet. Go to the ‘Elastic IPs’ link underneath ‘Network and Security’ in the left sidebar and ‘Allocate New Address’. Now go to ‘Associate Address’ and choose the one and only machine that will appear in the dropdown.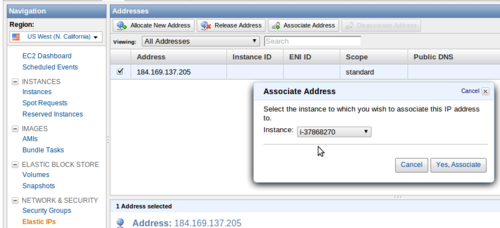
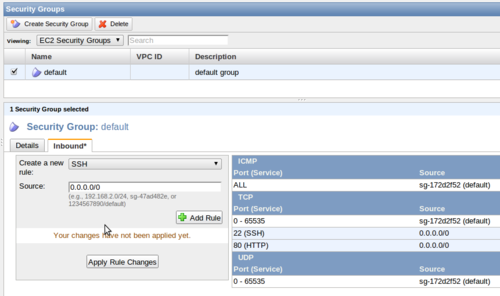
This will give you an Associated IP address with which you can access your machine that you launched a moment ago. But before you do that you’ll need to edit your default Security Group so that it allows incoming SSH and HTTP requests. Go to ‘Security Groups’ then click on default and the ‘Inbound’ tab so you add the new rules for HTTP and SSH (If you have a static IP address for your home/office you should put that address into the ‘Source’ field for the SSH rule instead of 0.0.0.0/0). Don’t forget to ‘Apply Rule Changes’.
At this point, it’s a good idea to go to your domain registrar (like Godaddy) to set the A record for one of your domains to point to your Elastic IP Address so you (and the people you show your app to) have something more friendly to work with rather than entering an IP address directly into their URL bar.
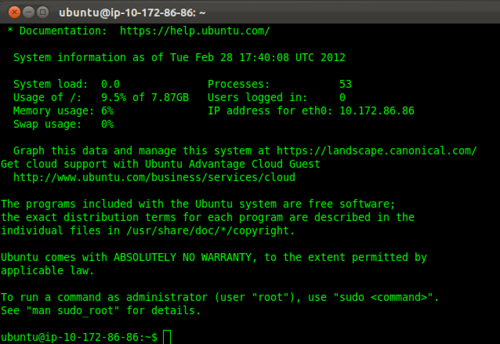
Ok - let’s test it out. You should be able to open a terminal, go to the directory the downloaded keypair resides in and SSH into your instance by doing:
With the Alestic AMI, the user that’s setup for you to login as is called ‘ubuntu’. You can either use your domain or the IP address where I’ve typed ‘mydomain.com’. You should see something like this:chmod 400 MyKeyPair.pem;
ssh -i MyKeyPair.pem ubuntu@mydomain.com
Install the Required Applications onto the EC2 Instance
Since we’re now able to SSH into our EC2 instance this is where the fun begins. We get to install the technology stack. For this tutorial we’re going setup Apache, Python/Django, PostgreSQL monolithically on the same machine to keep it as simple as possible and also stay within the free tier at Amazon.Get latest package database and upgrade existing programs to latest version.
Install Apache2 with WSGIsudo apt-get update; sudo apt-get upgrade
Install Python Package Installersudo apt-get install apache2 libapache2-mod-wsgi
Install Djangosudo apt-get install python-pip
Install Build Essentialsudo pip install django
Install PostgreSQL server/client and PyGreSql, a postgresql module for python.sudo apt-get install build-essential
Install Postgresql-dev-all (extension build tool) so you can build the psycopg extension (next)sudo apt-get install postgresql postgresql-client postgresql-contrib python-pygresql
Install Psycopg, Python Dev 2.7 (so our Django App can connect to PostgreSQL)sudo apt-get install postgresql-server-dev-all
At this point you Amazon instance now has a full technology stack (OS, web server, database server, Python/Django) that will allow you to run your app. The next 2 hurdles will involve configuring the web server and database server.sudo apt-get install python2.7-dev; sudo easy_install psycopg2
Configure Apache To Work With Django App
We’re going to configure Apache so it uses WSGI. Put simply WSGI is the middleware that allows Apache to serve up dynamic content from Django. We’ll also enable Apache to serve static files inside your project directly.To do this you’ll need to edit /etc/apache2/httpd.conf. I kinda know my way around vim so I’ll be using that as the editor.
When you’ve opened the file in your editor you’ll need to add the following:sudo vim /etc/apache2/httpd.conf
Save the file and quit vim. What’s happening here is we’re telling Apache to serve the static files inside ‘my-django-app/static’. We’re also telling Apache to look inside my-django-app/apache/django.wsgi for the WSGI script. As you can probably tell we’ll be deploying ‘my-django-app’ directly into the home directory for ‘ubuntu’ but you can change this if you want.Alias /static/ /home/ubuntu/my-django-app/static/
<Directory /home/ubuntu/my-django-app/static>
Order deny, allow
Allow from all
</Directory>
WSGIScriptAlias / /home/ubuntu/my-django-app/apache/django.wsgi
Setup PostgreSQL Database for Django App
Now you need to setup a postgresql database for your app to use so it doesn’t use SQLite in your ‘production like’ environment (just for a bit of fun really).Open PostgreSQL client from Linux command line
Change ‘postgres’ users password to ‘password’ and then quit the client:sudo su postgres -c psql template1
In the terminal change the linux user ‘postgres’ password to ‘password’:template1=# ALTER USER postgres WITH PASSWORD 'password';
template1=# \q
Now login again to PostgreSQL client againsudo passwd -d postgres
sudo su postgres -c passwd
Create a database user and a database that your app will use:sudo su postgres -c psql template1
Edit the pgSQL conf filepostgres=# CREATE USER mydjangoapp WITH PASSWORD 'mypassword';
CREATE ROLE
postgres=# create database mydjangoappdb;
CREATE DATABASE
postgres=# grant all privileges on database mydjangoapp to mydjangoappdb;
GRANT
postgres=# \q
Add following line to the bottomsudo vim /etc/postgresql/9.1/main/pg_hba.conf
Restart the Postgresql serverlocal mydjangoappdb mydjangoapp md5
This sequence of commands will have created a database for which you’ll be able to put the details into the settings.py file of your app.sudo service postgresql restart
‘Deploy’ and Configure Your App
Chances are, if you’ve been developing and running Django apps on your local machine you probably haven’t thought much about how to get this code onto an Amazon server like the one you just built. The simplest way to do it is to use a code repository service like BitBucket with Mercurial. That way you can push the code from your own machine to BitBucket and then SSH into your Amazon machine to clone the whole repository or subsequently pull the updates from BitBucket.Instructions for setting up a BitBucket repository and pushing your code there for the first time is outside the scope of this how-to. On your EC2 instance you’ll need to install Mercurial which will give you the command line tools to clone/pull your code:
Then can clone your project by running this command in /home/ubuntu:sudo apt-get install mercurial
Before we get too excited just yet, there’s a couple of things we need to edit inside our app namely the settings.py file and adding the apache/django.wsgi file.hg clone https://bitbucket.org/myusername/mydjangoapp
settings.py
You’re using a postgres database now so we’ll need to change our database settings:
DATABASES = {
    'default': {
         'ENGINE': 'django.db.backends.postgresql_psycopg2',
         'NAME': 'mydjangoappdb',
         'USER': 'mydjangoapp',
         'PASSWORD':'password',
         'HOST' : '',
         'PORT' : '',
     }
}
You also setup Apache to serve your static files from your domain so you’ll need to ensure the STATIC_ROOT and STATIC_URL are set correctlySave and close your settings.py file.You’ll notice that I put ADMIN_MEDIA_PREFIX down the bottom, what we’re going to do here is symlink the Django Admin static assets to our static directory so they can be served too by Apache.SITE_ROOT = os.path.dirname(os.path.realpath(__file__))
STATIC_ROOT = os.path.join(SITE_ROOT, 'static')
STATIC_URL = 'http://mydjangoappdomain.com/static/'
STATICFILES_FINDERS = (
'django.contrib.staticfiles.finders.FileSystemFinder',
'django.contrib.staticfiles.finders.AppDirectoriesFinder',
'django.contrib.staticfiles.finders.DefaultStorageFinder',
)
ADMIN_MEDIA_PREFIX = '/static/admin/'
apache/django.wsgiln -s /usr/lib/pymodules/python2.7/django/contrib/admin/media /home/ubuntu/appointly/static/admin
Create a folder in your django app called apache and then create a file called django.wsgi (remember that our httpd.conf for Apache will be looking for this file). Then copy the following into the file:
Save and close the file, we’re almost there… let’s do a syncdb in the app root directory so your tables get created in the postgres database.import os
import sys
path = '/home/ubuntu/my-django-app'
if path not in sys.path:
sys.path.append(path)
os.environ['DJANGO_SETTINGS_MODULE'] = 'settings'
import django.core.handlers.wsgi
application = django.core.handlers.wsgi.WSGIHandler()
And finally you need to restart Apache so it will serve up your app with wsgi../manage.py syncdb
Hooray! With any luck you should be going to http://mydjangoappdomain.com and see you your app running just like it does at http://localhost:8000 but now it’s running on a server in the cloud and accessible via the internet. Prettysudo /etc/init.d/apache2 restart
tableau training
ReplyDeleteSAP BW on Hana training
sap sd training
osb training
oracle scm training
app v training