Friday, June 29, 2012

EC2 Instance Management with Ami tools

EC2StartersGuide - Community Ubuntu Documentation


Contents
  1. Introduction
  2. Types of credentials
  3. Setting up an Amazon account
  4. Official Ubuntu Cloud Guest Amazon Machine Images (AMIs)
  5. Installing the API tools
  6. EC2 security groups
  7. Instantiating an image

Introduction


This page gives you the first keys to using Ubuntu Cloud Guest official images on Amazon EC2. Please follow the instructions below to use them.
Running Ubuntu Cloud Guest on Amazon Web Services requires you to go through the following steps: 


  1. Create your account on Amazon (if you do not already have one) and setup your credentials
  2. Install Amazon EC2 API Tools
  3. Instantiate your images(s)
  4. Configure your instance


Types of credentials


First, a note on the area of EC2 that most often confuses people: credentials. There are multiple different kinds of credential, Amazon uses slightly non-standard nomenclature, and it's not always clear which credential is required for a given application.
  1. Signon credentials: These are the email address/password pair that you use when you sign up. You use these to sign on to the AWS console, and can be considered the "master" credentials as they allow you to regenerate all other types of credentials. 

  2. Access Credentials: There are three types: access keys, X.509 certificates and key pairs. The first and second type allow you to connect to the Amazon APIs. Which type of credential depends on which API and tool you are using. Some APIs and tools support both options, whereas others support just one. The third type is SSH public/private key pairs that are used for initial logins to newly created instances.

    1. access keys: Symmetric key encryption. These are for making requests to AWS product REST or Query APIs. Can be obtained/regenerated from the Access Keys tab on the AWS Security Credentials page. 

    2. X.509 certificates: Public key encryption. Use X.509 certificates to make secure SOAP protocol requests to AWS service APIs. These are the credentials you will use when using the command-line ec2 api tools. Can be obtained/regenerated from the X.509 Certificates tab on the AWS Security Credentials page. 

    3. key pairs: SSH key pairs. When you create an instance, Amazon inserts the public key of your SSH key pair into your new instance so that you can log in using your private key. You can add new SSH key pairs through the AWS management console by clicking on Key Pairs under Networking and Security in the Navigation pane and then the  

      Create Key Pair button. After specifying a name you will be prompted to download and save your private key. EC2 stores the public portion of your key pair, and inserts it into /home/ubuntu/.ssh/authorized_keys when you instantiate your instance. If you lose this private key, it cannot be downloaded again; you will need to regenerate a new key pair. 

Setting up an Amazon account


You can associate your new EC2 account with an existing Amazon account (if you already have one), or create a new account.
  1. Go to http://aws.amazon.com, and select Sign-up Now. Sign in to your existing Amazon account or create a new one. 

  2. Go to http://aws.amazon.com/ec2, and select "Sign Up for Amazon EC2". 
    1. Enter your credit card information.
    2. Complete your signup for the Amazon EC2 service. 
  3. After signing up, you should end up at the EC2 console
    1. Create a key pair and download the private key
      1. Click Key Pairs under Networking and Security in the Navigation pane and then click the Create Key Pair button (save it in e.g. ~/.ec2/ec2.pem). This private key is for making SSH connections to newly created instances.
    2. You will also need to set up your Amazon API credentials. Go to Account->Security Credentials
      1. click X.509 Certificates tab
      2. Create a new Certificate
      3. Download the private key and the certificate (save them in e.g. ~/.ec2/cert-XXXXXXXXXXXXXXXXXXXXXXXXXXXXXXXX.pem and ~/.ec2/pk-XXXXXXXXXXXXXXXXXXXXXXXXXXXXXXXX.pem).
      4. Make your credential files private: chmod go-rwx ~/.ec2/*.pem
      5. Scroll to the bottom of the page and note your account ID (a number of the form XXXX-XXXX-XXXX).
If at a later time you discover you need to generate a new X.509 certificate, click on "Your Account" at the top of the EC2 console page. You may need to click the small button with two down arrows near the top right of the EC2 console page

to make the "Your Account" link visible. Then in the "Access Credentials" box, click the tab named "X.509 Certificates" and click "Create a New Certificate". Download the private key and certificate when prompted.

Official Ubuntu Cloud Guest Amazon Machine Images (AMIs)


The Official AMI Ids can be obtained from http://cloud.ubuntu.com/ami. Official Ubuntu AMIs are published by the 'Canonical' user, with Amazon ID '099720109477'. 


 Images containing the string 'ubuntu' but not owned by that ID are not official AMIs. 


Unofficial but well-maintained AMIs (8.04 Hardy through 9.04 Jaunty), including "EBS root" images for Hardy and Karmic are available from Eric Hammond's site Alestic.com

Installing the API tools


The EC2 API tools is now available for 9.04 users to install and configure the software. For previous versions of Ubuntu please see here.
  1. Make sure you have multiverse enabled and run the following command:
    sudo apt-get install ec2-api-tools

    If you're not on the latest ubuntu release the packages may be a bit old. You can make use of the awstools ppa by doing: 

    sudo apt-add-repository ppa:awstools-dev/awstools
    sudo apt-get update
    sudo apt-get install ec2-api-tools
     
  2. Make sure you have the following environment variables set up in your shell profile. This is accomplished by adding the following lines to your ~/.bashrc if you use bash as your shell: 

    export EC2_KEYPAIR=<your keypair name> # name only, not the file name
    export EC2_URL=https://ec2.<your ec2 region>.amazonaws.com
    export EC2_PRIVATE_KEY=$HOME/<where your private key is>/pk-XXXXXXXXXXXXXXXXXXXXXXXXXXXX.pem
    export EC2_CERT=$HOME/<where your certificate is>/cert-XXXXXXXXXXXXXXXXXXXXXXXXXXXXXX.pem
    export JAVA_HOME=/usr/lib/jvm/java-6-openjdk/
     Notes:
    1. See Common Options for API Tools for a description of what these environment variables do.
    2. The EC2_KEYPAIR is the Key Pair Name as listed in the AWS Management Console under Networking and Security -> Key Pairs, not the filename of the private key file that you saved to your local machine. This variable tells ec2 which SSH public key to insert into the instance during instantiation.
    3. The ec2 regions at the time of writing were: 
Region
URL

US-East (Northern Virginia)
ec2.us-east-1.amazonaws.com

US-West (Northern California)
ec2.us-west-1.amazonaws.com

EU (Ireland)
ec2.eu-west-1.amazonaws.com

Asia Pacific (Singapore)
ec2.ap-southeast-1.amazonaws.com

Asia Pacific (Tokyo)
ec2.ap-northeast-1.amazonaws.com

  1. Load the changes into the current shell environment:
    source ~/.bashrc
     
  2. Check to see if it's working by running the following command:
    ec2-describe-images -o self -o amazon
     
    Note: If this fails due to "Client.AuthFailure" then ensure you have signed up for both AWS and ec2 with amazon.com, and have provided valid payment details. Also double check that the EC2_PRIVATE_KEY and EC2_CERT point to the correct locations.

EC2 security groups


Security groups allow you to specify firewalling rules for your instances. These firewalling rules are independent of, and in addition to, the software firewalling provided by the instance's operating system (iptables in the case of modern Ubuntu systems). Security groups must be defined before you create the instances that you would like to be members of those security groups. You specify the security groups to add an instance to at creation time with the -g option to the ec2-run-instances command. You cannot add an existing instance to a security group. 

How you set up your security groups is up to you. You may choose to set up security groups that correspond to server functions, or have a separate security group for each instance. An instance may be a member of multiple security groups. If you don't specify any security groups when you instantiate an instance, it will be added to the default security group. Our examples use the default security group, but keep in mind that this means that this causes an inability to set up firewalling rules in a granular fashion.
If you wish to create a more complex security group configuration, you can do so with these commands:
  •  ec2-add-group <group name> -d <description>
    ec2-delete-group <group name>
    ec2-describe-group [<group name> ...]
See the Using Security Groups section of the User Guide for Amazon EC2 for more information.

Instantiating an image


The images and kernel are public, so they do not require any registration. To start an instance, we use a command of the following form:
To see the status of your instance, you can run the following command:
  • ec2-describe-instances
In order to log in to your instance, you will need to authorize network access to the ssh port for the default security group:
  • ec2-authorize default -p 22
You may then log in to the instance using ssh:
  • ssh -i <private SSH key file> ubuntu@<external-host-name>
The <private SSH key file> is the filename of the private SSH key that corresponds to the Amazon Key Pair that you specified in the ec2-run-instances command. The <external-host-name> can be found using the ec2-describe-instances command. An example SSH command:
  • ssh -i ~/.ec2/ec2.pem ubuntu@ec2-135-28-52-91.compute-1.amazonaws.com
Once you have logged in, you may begin to set up and use the instance just like any other Ubuntu machine.
You will be billed as long the host is running1, so you will probably want to shut it down when you're done. Note that each partial instance-hour consumed will be billed as a full hour.
  • ec2-terminate-instances <instance_id>

How to resize an Amazon EC2 AMI when boot disk is on EBS


Screwing around with the boot volume is part of our regular “explore around the edges” work before we get serious with how we are going to configure and orchestrate the new systems. 

The boot volume in this scenario does not have PV driver support and thus will perform slower than the actual ephemeral storage. 

Our need was for the boot volume to be big enough to hammer with bonnie++ – this is not something we’d do in a production scenario.

Background
All of the cloud nerds at BioTeam are thrilled now that the Amazon Compute Cluster nodes have been publicly launched. If you missed the exciting news please visit the announcement post over at the AWS blog 


We’ve been madly banging on the new instance types and trying to (initially) perform some basic low level benchmarks before we go on to the cooler benchmarks where we run actual life science & informatics pipelines against the hot new gear. 

Using our Chef Server it’s trivial for us to orchestrate these new systems into working HPC clusters in just a matter of minutes. We plan to start blogging and demoing live deployment of elastic genome assembly pipelines and NextGen DNA sequencing instrument pipelines (like the Illumina software) on AWS soon. 

Like James Hamilton says, the real value in these new EC2 server types lies in the non-blocking 10Gigabit ethernet network backing them up. All of a sudden our “legacy” cluster and compute farm practices that involved network filesharing among nodes via NFS, GlusterFS, Lustre and GPFS seem actually feasible rather than a sick masochistic exercise in cloud futility. 

We expect to see quite a bit of news in the near future about people using NFS, pNFS and other parallel/cluster filesystems for HPC data sharing on AWS – seems like a no-brainer now that we have full bisectional 10GbE bandwidth between our Compute Cluster cc1.4xlarge instance types. 

However, despite the fact that the coolest stuff is going to involve what we can do now node-to-node over the fast new networking fabric there is still value in doing the low-level “what does this new environment look and feel like?” tests involving EBS disk volumes, S3 access and the like. 

The Amazon AWS team did a great job preparing the way for people who want to quickly experiment with the new HPC instance types. The EC2 AMI images have to boot off of EBS and run under HVM virtualization rather than the standard paravirtualization used on the other instance types.

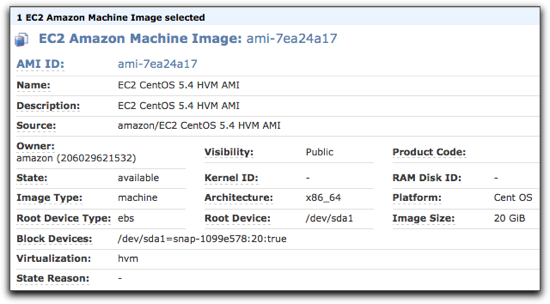
Recognizing that bootstrapping a HVM-aware EBS-booting EC2 server instance is a non-trivial exercise, AWS created a QuickStart public AMI with CentOS Linux that anyone can use right away:

amiResize-001.png

The Problem – how to grow the default 20GB system disk in the QuickStart AMI? 

As beautiful as the CentOS HVM AMI is, it only gives us 20GB of disk space in it’s native form. This is perfectly fine for most of our use cases but presented a problem when we decided we wanted to use bonnie++ to perform some disk IO benchmarks on the local boot volume to complement our tests against more traditional mounted EBS volumes and RAID0 stripe sets.

Bonnie++ really wants to work against a filesystem that is at least twice the size of available RAM so as to mitigate any memory-related caching issues when testing actual IO performance. 

The cc1.4xlarge “Cluster Compute” instance comes with ~23GB of physical RAM. Thus our problem — we wanted to run bonnie++ against the local system disk but the disk is actually smaller than the amount of RAM available to the instance!

For this one particular IO test we really wanted a HVM-compatible AMI that had at least 50GB of storage on the boot volume. 

The Solution
I was shocked and amazed to find that in about ~20 minutes of screwing around with EBS snapshot sizes, instance disk partitions and LVM settings I was able to achieve the goal of converting the Amazon Quickstart 20GB AMI into a custom version where the system disk was 80Gb in size. 

The fact that this was possible and achievable out of the box without having to debug mysterious boot failures, kernel panics and all the other sorts of things I’m used to dealing with when messing with low level disk and partition issues is the ultimate testament to both Amazon’s engineering prowess (how cool is it that we can launch EBS snapshots of arbitrary size?) as well as the current excellent state of Linux, Grub and LVM2. 

I took a bunch of rough notes so I’d remember how the heck I managed to do this. Then I decided to clean up the notes and really document the process in case it might help someone else. 

The Process
I will try to walk through step-by-step the commands and methods used to increase the system boot disk from 20GB in size to 80GB in size.

It boils down to two main steps
  • Launch the Amazon QuickStart AMI but override & increase the default 20GB boot disk size
  • Get the CentOS Linux OS to recognize that it’s now running on a bigger disk
You can’t do the following step using the AWS Web Management Console as the webUI does not let you alter the parameters of the block device settings. You will need the command-line EC2 utilities installed and working in order to proceed.

On the command line we can easily tell Amazon that we want to start the QuickStart AMI but instead of launching it within a 20GB snapshot of the EBS boot volume we will launch it against a much larger snapshot.

If you look at the info for AMI ami-7ea24a17 within the web page you will see this under the details for the block devices that will be available to the system at boot:
Block Devices: /dev/sda1=snap-1099e578:20:true
That is basically saying that Linux Device “/dev/sda1″ will be built from EBS snapshot volume “snap-1099e578″. The next “:” delimited parameter sets the size to 20GB.

We are going to change that from 20GB to 80GB.
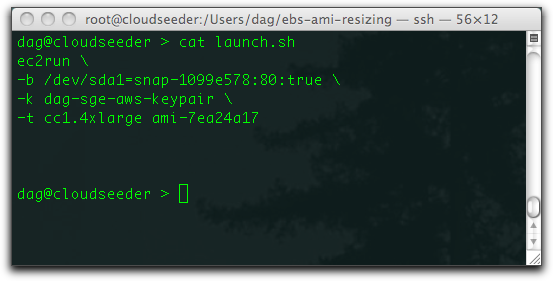
Here is the command to launch that AMI using a disk of 80GB in size instead of the default 20GB.

In the following screenshot, note how we are starting the Amazon AMI ami-7ea24a17 with a block device (the “-b” switch) that is bootstrapping itself from the snapshot “snap-1099e578″.

All we needed to do in order to make the EC2 server have a larger boot disk is pass in “80″ to override the default value of 20GB. Confused? Look at the “-b” block device argument below, the 80GB is set right after the snapshot name:

amiResize-002.png

Your EBS volume might take a bit longer than normal to boot up but once it is online and available you can login normally.
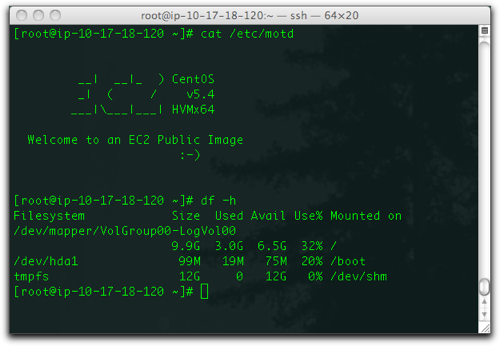
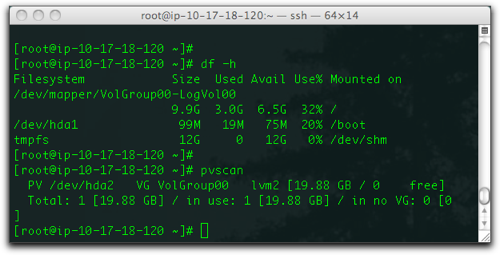
Of course, the system will appear to have the default 20GB system disk:

amiResize-003.png

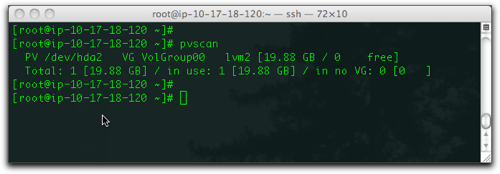
Even the LVM2 physical disk reports show the ~20GB settings:

amiResize-004.png

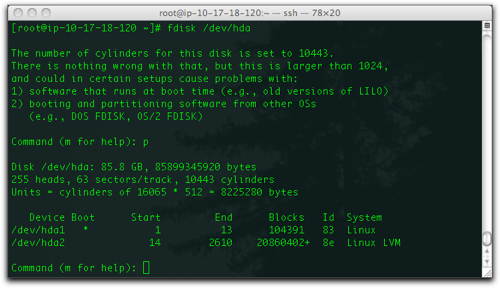
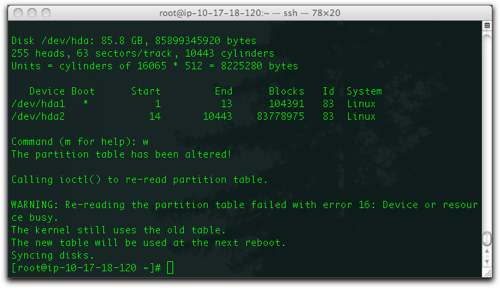
However, if we actually use the ‘fdisk’ command to examine the disk we see that the block device is, indeed, much larger than the 20GB the Operating System thinks it has to utilize:

amiResize-005.png

Fdisk tells us that disk device /dev/hda has 85.8 GB of physical capacity.
Now we need to teach the OS to make use of that space!

There are only two partitions on this disk, /dev/hda1 is the 100MB /boot partition common to RedHat varients. Lets leave that alone.

The second partition, /dev/hda2 is already set up for logical volumes under LVM. We are going to be lazy. We are just going to use ‘fdisk’ to delete the /dev/hda2 partition so that we can immediately recreate it so that it spans the full remaining space on the physical drive.

After typing “fdisk /dev/hda” we type “d” and delete partition “2″. Then we type “n” for a new partition of type “p” for primary and “2″ to name it as the second partition. After that we just hit return to accept the default suggestions for the begin and end of the recreated second partion.

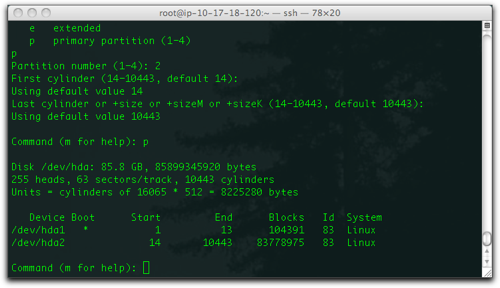
If it all worked, we can type the “p” command to print the new partition table out.

Note how /dev/hda2 now has many more blocks? Cool!

amiResize-006.png

We are not done yet. None of our partition changes have actually been written to disk yet. We still need to type “w”  to write the new partition table down to disk and “q” to exit.

Obviously we can’t make live changes on a running boot disk. The new partition settings will come into effect after a system reboot.

amiResize-007.png

Now we reboot the system and wait for it to come back up.
When it comes back up, don’t be alarmed that both ‘df’ and ‘pvscan’ still show the incorrect size:

amiResize-008.png

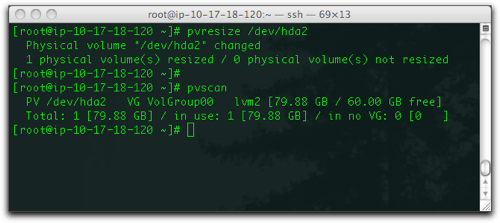
We can fix that! Now we are in the realm of LVM so we need to use the “pvresize <device>” command to rescan the physical disk. Since our LVM2 partition is still /dev/hda2 that is the physical device path we give it:

amiResize-009.png

Success! LVM recognizes that the drive is larger than 20GB.
With LVM aware that the disk is larger we are pretty much done. We can resize an existing logical volume or add a new one to the default Volume Group (“VolGroup00″).

Since I’m lazy AND I want to mount the extra space away from the root (“/”) volume I chose to create a new logical volume that shares the same /dev/hda2 physical volume (“PV”) and Volume Group (“VG”).

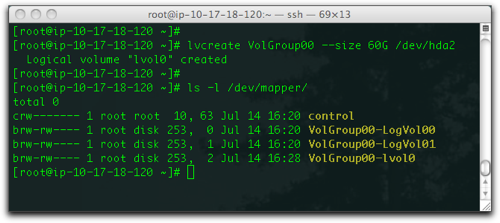
We are going to use the command “lvcreate VolGroup00 –size 60G /dev/hda2?” to make a new 60GB logical volume that is part of the existing Volume Group named “VolGroup00″:

amiResize-010.png

Success. Note that our new logical volume got assigned a default name of “lvol0″ and it now exists in the LVM device path of “/dev/mapper/VolGroup00-lvol0″.

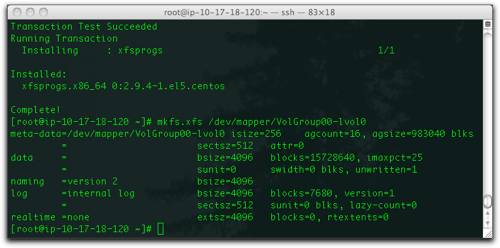
Now we need to place a Linux filesystem on our new 60GB of additional space and mount it up. Since I am a fan of XFS on EC2 I need to first install the “xfsprogs” RPM and then format the volume. A simple “yum -y install xfsprogs” does the trick and now I can make XFS filesystems on my server:

amiResize-011.png

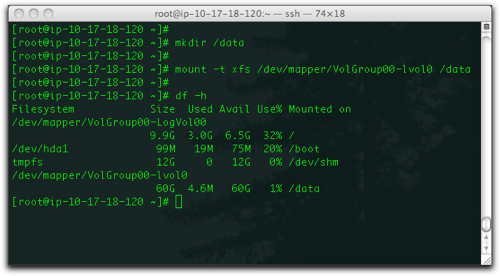
Success. We now have 60GB more space, visible to the OS and formatted with a filesystem. The final step is to mount it.

amiResize-012.png

And we are done. We’ve successfully converted the 20GB Amazon QuickStart AMI into a version with a much larger boot volume.

Conclusion
None of this is rocket science. It’s actually just Linux Systems Administration 101.

The real magic here is how easily this is all accomplished on our virtual cloud system using nothing but a web browser and some command-line utilities.

What makes this process special for me is how quick and easy it was – anyone who has spent any significant amount of time managing many physical Linux server systems knows the pain and hours lost when trying to do this stuff in the real world on real (and flaky) hardware.

I can’t even count how many hours of my life I’ve lost trying to debug Grub bootloader failures, mysterious kernel panics and other hard-to-troubleshoot booting and disk resizing efforts on production and development server systems when I’ve altered settings that we’ve covered in this post. In cluster environments we often have to do this debugging via a 9600 baud serial console or via flaky IPMI consoles. It’s just nasty.

The fact that this method worked so quickly and so smoothly is probably only amazing to people who know the real pain of having done this in the field, crouched on the floor of a freezing cold datacenter and trying not to pull your hair out as text scrolls slowly by at 9600 baud.

Congrats to the Amazon AWS team. Fantastic work. It’s a real win when virtual infrastructure is this easy to manipulate.


Thursday, June 28, 2012

Django Deployment in Production by Sidharth Shah


  1. Create virtualenv with no site packages
  1. virtualenv mphoria-env --no-site-packages
  1. Use the virtualenv with
  1. source mphoria-env/bin/activate
  1. Checkout latest version of code
  1. svn checkout https://mphoria.svn.beanstalkapp.com/src/mphoriacatalog/trunk mphoriacatalog
  1. Install preqs
  1. CouchDB
  2. Memcache
  3. Nginx
  1. Install required modules using pip
  1. cd mphoriacatalog; pip install -r requirements.txt
  1. Initialize couchdb’s databases
  1. cd ..;cd couchdb-init;python create_couchdbs.py
  1. Install couchapp utility (this will help up push our defined views onto couchdb)
  1. pip install couchapp
  1. Push all backed up views to couchdb
  1. couchapp push emailpasswds http://127.0.0.1:5984/catalog_users
  2. couchapp push meta http://127.0.0.1:5984/searchmeta_users
  3. cd productsmeta_user/; couchapp push meta http://127.0.0.1:5984/productmeta_users 
  1. Update the domain of the app that we will running this off from (this is to avoid redirect issues)
  1. In settings.py under INSTALLED_APPS add  'django.contrib.admin',

INSTALLED_APPS = (
    'django.contrib.auth',
    'django.contrib.contenttypes',
    'django.contrib.sessions',
    'django.contrib.sites',
    'django.contrib.messages',
    'django.contrib.staticfiles',
    'django.contrib.admin',
    'frontend',
)
  1. Under urls.py make sure the follwing lines are uncommented or exits

from django.contrib import admin
admin.autodiscover()
urlpatterns = patterns('',
    url(r'^admin/', include(admin.site.urls)),
  1. Run python manage.py syncdb. Its going to  start command prompt to create admin user name, which we’re going to use later to to change site name
  2. Run python manage.py runserver 0.0.0.0:8000, log on to server with right IP:8000
  3. Enter credentials that we just created.
  4. Click on Sites, example.com and change it to desired values. In this case agor.it
  5. Comment out the line in settings.py and urls.py  that we used to create admin interface.

  1. Update Nginx’s config
  1. In our project directory we have nginx’s desired config. Within server blog we need to add following. Make sure you replace root with right direcotry of your deployment as highlighted below

               location = /_.gif {
                empty_gif;
                }              
               
                location /static/ {
                autoindex    on;          
                root /home/sidharth/Code/odesk/mphoria/mphoriacatalog;
                }
                # your standard Nginx config for your site here...
                location / {
                 proxy_pass        http://localhost:8000;
                 proxy_set_header  X-Real-IP  $remote_addr;
                }
  1. After this run our django application using gunicorn
  1. cd mphoriacatalog; ~/mphoria-env/bin/gunicorn_django -w4
Alternatively as phase 2 of installation we can use supervisord that will restart unicorn automatically if required
  1. Supervisor is already installed when we did pip install -r requirements.txt
  2. Copy supervisord.conf from our home directory to /etc
  3. Check our config using supervisord -c /etc/supervisord.conf
  4. If needed modify the config (Hint: Change paths that are highlighted in bold below)

[inet_http_server]                          ; inet (TCP) server setings
port=127.0.0.1:9001                    ; (ip_address:port specifier, *:port for all iface)
[supervisord]
logfile=/home/sidharth/logs/supervisord.log         ; (main log file;default $CWD/supervisord.log)
logfile_maxbytes=20MB                               ; (max main logfile bytes b4 rotation;default 50MB)
logfile_backups=4                                 ; (num of main logfile rotation backups;default 10)
loglevel=debug                                       ; (log level;default info; others: debug,warn,trace)
pidfile=/home/sidharth/supervisord.pid                                  ; (supervisord pidfile;default supervisord.pid)
nodaemon=false                                      ; (start in foreground if true;default false)
minfds=1024                                         ; (min. avail startup file descriptors;default 1024)
minprocs=200                                        ; (min. avail process descriptors;default 200)
[rpcinterface:supervisor]
supervisor.rpcinterface_factory = supervisor.rpcinterface:make_main_rpcinterface
[supervisorctl]
[program:mphoriacatalog]
directory = /home/sidharth/Code/latest/mphoriacatalog/
user = sidharth
command = /home/sidharth/Code/latest/mphoriacatalog/mphoriacatalog/start-django.sh
  1. You may also need to modify paths in start-django.sh files that contains command/params for our gunicon_django process  (Hint: Change paths that are highlighted in bold below)

#!/bin/bash
  set -e
  LOGFILE=/home/sidharth/logs/access.log
  LOGDIR=$(dirname $LOGFILE)
  NUM_WORKERS=3
  # user/group to run as
  USER=sidharth
  GROUP=sidharth
  source ~/Code/mphoriacatalog/bin/activate
  test -d $LOGDIR || mkdir -p $LOGDIR
  exec gunicorn_django -b 0.0.0.0:8000 -w $NUM_WORKERS \
    --user=$USER --group=$GROUP --log-level=debug \
    --log-file=$LOGFILE 2>>$LOGFILE
  1. Start our supervisor process using
  1. supervisorctl
  2. if mphoriacatalog seems not to be running, use start all
  1. Upon successful execution you can log on to http://localhost:9001 and see web interface like following

Setting Up My-SQL Fail-over and Load Balancing Cluster in Production


Since I recently configured and installed a MySQL-cluster, I thought I’d share the procedure. A lot of the examples around explains how to set it all up on the same machine for “testing purposes” — which, in theory, is the same as setting it up on different machines. I’ll be explaining the latter, that is, installing it onto different machines.

To achieve true redundancy in a MySQL-cluster, you need at least 3 seperate, physical machines; two data-nodes, and one management-node. The latter you can use a virtual machine for, as long as it doesn’t run on the two data-nodes (which means you still need at least 3 physical machines). You can also use the management-node as a mysql-proxy for transparent failover/load-balancing for the clients.


My setup was done using two physical machines (db0 and db1) running Ubuntu 8.04 (Hardy Heron), and one virtual machine (mysql-mgmt) running Debian 6 (Squeeze). The VM is not running on the two physical machines. db0 and db1 is the actual data-nodes/servers, and mysql-mgmt is going to be used as the management-node for the cluster. In addition, mysql-mgmt is also going to be configured with mysql-proxy, so that we have transparent failover/load-balancing for the clients.

Update 2011-10-26: I’ve changed the setup a bit, compared to my original walkthrough. I hit some memory-limits when using the NDB-engine. This caused MySQL to fail inserting new rows (stating that the table was full). There are some variables that you can set (DataMemory and IndexMemory), to increase the memory-consumption for the ndb-process (which was what caused the issues). Since I had limited amount of memory available on the mysql-mgmt virtual machine (and lots on db0/1), I decided to run ndb_mgmd on db0 + db1. Apparently, you can do this, and it’s still redundant. The post has been changed to reflect this.
My setup was done using two physical machines (db0 and db1) running Ubuntu 8.04 (Hardy Heron), and one virtual machine (mysql-proxy) running Debian 6 (Squeeze). Previously, the virtual machine ran ndb_mgmd, but due to the above mentioned issues, both db0 and db1 runs their own ndb_mgmd-processes. The virtual machine is now only used to run mysql-proxy (and hence it’s hostname has changed to reflect this).
Update 2012-01-30: morphium pointed out that /etc/my.cnf needed it’s own [mysql_cluster]-section, so that ndbd and ndb_mgmd connects to something else than localhost (which is the default if no explicit hosts is defined). The post has been updated to reflect this.


1. Prepare db0 + db1
Go to MySQLs homepage, and find the download-link for the latest MySQL Cluster-package, availablehere. Then proceed as shown below (changing the ‘datadir’ to your likings);
root@db0:~# cd /usr/local/
root@db0:/usr/local# wget -q http://dev.mysql.com/get/Downloads/MySQL-Cluster-7.1/mysql-cluster-gpl-7.1.10-linux-x86_64-glibc23.tar.gz/from/http://mirror.switch.ch/ftp/mirror/mysql/
root@db0:/usr/local# mv index.html mysql-cluster-gpl-7.1.10-linux-x86_64-glibc23.tar.gz
root@db0:/usr/local# tar -xzf mysql-cluster-gpl-7.1.10-linux-x86_64-glibc23.tar.gz
root@db0:/usr/local# rm -f mysql-cluster-gpl-7.1.10-linux-x86_64-glibc23.tar.gz
root@db0:/usr/local# ln -s mysql-cluster-gpl-7.1.10-linux-x86_64-glibc23 mysql
root@db0:/usr/local# ls -ald mysql*
lrwxrwxrwx 1 root root 45 2011-03-04 18:30 mysql -> mysql-cluster-gpl-7.1.10-linux-x86_64-glibc23
drwxr-xr-x 13 root mysql 4096 2011-03-05 00:42 mysql-cluster-gpl-7.1.10-linux-x86_64-glibc23
root@db0:/usr/local# cd mysql
root@db0:/usr/local/mysql# mkdir /opt/oracle/disk/mysql_cluster
root@db0:/usr/local/mysql# mkdir /opt/oracle/disk/mysql_cluster/mysqld_data
root@db0:/usr/local/mysql# groupadd mysql
root@db0:/usr/local/mysql# useradd -g mysql mysql
root@db0:/usr/local/mysql# chown mysql:root /opt/oracle/disk/mysql_cluster/mysqld_data
root@db0:/usr/local/mysql# scripts/mysql_install_db --user=mysql --no-defaults --datadir=/opt/oracle/disk/mysql_cluster/mysqld_data/
root@db0:/usr/local/mysql# cp support-files/mysql.server /etc/init.d/
root@db0:/usr/local/mysql# chmod +x /etc/init.d/mysql.server
root@db0:/usr/local/mysql# update-rc.d mysql.server defaults
Repeat on db1. Do not start the MySQL-server yet.
root@db0:/usr/local/mysql# vim /etc/my.cnf
Put the following in the my.cnf-file;
[mysqld]
basedir=/usr/local/mysql
datadir=/opt/oracle/disk/mysql_cluster/mysqld_data
event_scheduler=on
default-storage-engine=ndbcluster
ndbcluster
ndb-connectstring=db0.internal,db1.internal # IP/host of the NDB_MGMD-nodes

key_buffer = 512M
key_buffer_size = 512M
sort_buffer_size = 512M
table_cache = 1024
read_buffer_size = 512M

[mysql_cluster]
ndb-connectstring=db0.internal,db1.internal # IP/host of the NDB_MGMD-nodes
Repeat on db 1. And (again), do not start the MySQL-server yet.


2. Prepare ndb_mgmd
We can now prepare ndb_mgmd as follows;
root@db0:~# cd /usr/local/mysql
root@db0:/usr/local/mysql# chmod +x bin/ndb_mgm*
root@db0:/usr/local/mysql# mkdir /var/lib/mysql-cluster
root@db0:/usr/local/mysql# vim /var/lib/mysql-cluster/config.ini
Put the following into the config.ini-file;
[NDBD DEFAULT]
NoOfReplicas=2
DataDir=/var/lib/mysql-cluster
DataMemory=8G
IndexMemory=4G

[MYSQLD DEFAULT]
[NDB_MGMD DEFAULT]
[TCP DEFAULT]

# 2 Managment Servers
[NDB_MGMD]
HostName=db0.internal # IP/host of first NDB_MGMD-node
NodeId=1

[NDB_MGMD]
HostName=db1.internal # IP/host of second NDB_MGMD-node
NodeId=2

# 2 Storage Engines
[NDBD]
HostName=db0.internal # IP/host of first NDBD-node
NodeId=3
[NDBD]
HostName=db1.internal # IP/host of second NDBD-node
NodeId=4

# 2 MySQL Clients
# Lave this blank to allow rapid changes of the mysql clients.
[MYSQLD]
[MYSQLD]
There are two variables in the above config you’d want to pay attention to; DataMemory andIndexMemory. These values needs to be changed according to how large tables you need. Without setting these values, they default to 80MB (DataMemory) and 18MB (IndexMemory), which is not much (after around 200.000 rows, you’ll get messages stating that the table is full when trying to insert new rows). My values are probably way to high for most cases, but since we have a few tables with a lot of messages, and lots of RAM, I just set them a bit high to avoid issues. Keep in mind that NDBD will allocate/reserve the amount of memory you set for DataMemory (so in my config above, NDBD uses 8GB of memory from the second the service is started).
Now we’re ready to start the management-server for the first time. Please notice the use of the parameter ‘–initial’. This should only be used the first time you start it. Once you’ve started it for the first time, you remove the ‘–initial’ parameter.
root@db0:/usr/local/mysql/bin# ndb_mgmd -f /var/lib/mysql-cluster/config.ini --initial --config-dir=/var/lib/mysql-cluster/
MySQL Cluster Management Server mysql-5.1.51 ndb-7.1.10
Repeat on db1.
When done, we go back to the storage-servers.


3. Finalize db0 + db1
Now we make the ndb data-dirs, and start the ndb-service;
root@db0:/usr/local/mysql# mkdir /var/lib/mysql-cluster
root@db0:/usr/local/mysql# cd /var/lib/mysql-cluster
root@db0:/var/lib/mysql-cluster# /usr/local/mysql/bin/ndbd --initial
2011-03-04 22:51:54 [ndbd] INFO -- Angel connected to 'localhost:1186'
2011-03-04 22:51:54 [ndbd] INFO -- Angel allocated nodeid: 3
Repeat on db1.
We’re now going to alter some of the tables, so that they use the ‘ndbcluster’-engine. This is to ensure that user/host-priviledges also gets synced (so that if you add a user on one server, it gets replicated to the other).
root@db0:/var/lib/mysql-cluster# /etc/init.d/mysql.server start
Starting MySQL.. *
root@db1:/var/lib/mysql-cluster# /etc/init.d/mysql.server start
Starting MySQL.. *
root@db0:/usr/local/mysql# mysql
Welcome to the MySQL monitor. Commands end with ; or \g.
Your MySQL connection id is 3
Server version: 5.1.51-ndb-7.1.10-cluster-gpl MySQL Cluster Server (GPL)
Copyright (c) 2000, 2010, Oracle and/or its affiliates. All rights reserved.
This software comes with ABSOLUTELY NO WARRANTY. This is free software,
and you are welcome to modify and redistribute it under the GPL v2 license
Type 'help;' or '\h' for help. Type '\c' to clear the current input statement.

mysql> use mysql
Reading table information for completion of table and column names
You can turn off this feature to get a quicker startup with -A
Database changed

mysql> ALTER TABLE mysql.user ENGINE=NDBCLUSTER;
Query OK, 6 rows affected (0.25 sec)
Records: 6 Duplicates: 0 Warnings: 0

mysql> ALTER TABLE mysql.db ENGINE=NDBCLUSTER;
Query OK, 2 rows affected (0.16 sec)
Records: 2 Duplicates: 0 Warnings: 0

mysql> ALTER TABLE mysql.host ENGINE=NDBCLUSTER;
Query OK, 0 rows affected (0.18 sec)
Records: 0 Duplicates: 0 Warnings: 0

mysql> ALTER TABLE mysql.tables_priv ENGINE=NDBCLUSTER;
Query OK, 0 rows affected (0.16 sec)
Records: 0 Duplicates: 0 Warnings: 0

mysql> ALTER TABLE mysql.columns_priv ENGINE=NDBCLUSTER;
Query OK, 0 rows affected (0.16 sec)
Records: 0 Duplicates: 0 Warnings: 0

mysql> SET GLOBAL event_scheduler=1;
Query OK, 0 rows affected (0.00 sec)

mysql> CREATE EVENT `mysql`.`flush_priv_tables` ON SCHEDULE EVERY 30 second ON COMPLETION PRESERVE DO FLUSH PRIVILEGES;
Query OK, 0 rows affected (0.00 sec)

mysql> exit
Now we’ll stop the MySQL-service on both servers, and copy the data on db0 over to db1. Then we’ll start the servers again.
root@db0:/usr/local/mysql# /etc/init.d/mysql.server stop
root@db1:/usr/local/mysql# /etc/init.d/mysql.server stop
root@db0:/opt/oracle/disk/mysql_cluster# scp -r mysqld_data/ db1:/opt/oracle/disk/mysql_cluster/
root@db0:/usr/local/mysql# /etc/init.d/mysql.server start
Starting MySQL.. *
root@db1:/usr/local/mysql# /etc/init.d/mysql.server start
Starting MySQL.. *


4. Testing
So far, so good. We’re now gonna check if the management/control of the cluster works as it should.
root@db0:~# ndb_mgm
-- NDB Cluster -- Management Client --
ndb_mgm> show
Connected to Management Server at: db0.internal:1186
Cluster Configuration
---------------------
[ndbd(NDB)] 2 node(s)
id=3 @10.10.10.10 (mysql-5.1.51 ndb-7.1.10, Nodegroup: 0)
id=4 @10.10.10.20 (mysql-5.1.51 ndb-7.1.10, Nodegroup: 0, Master)

[ndb_mgmd(MGM)] 2 node(s)
id=1 @10.10.10.10 (mysql-5.1.51 ndb-7.1.10)
id=2 @10.10.10.20 (mysql-5.1.51 ndb-7.1.10)

[mysqld(API)] 2 node(s)
id=5 @10.10.10.10 (mysql-5.1.51 ndb-7.1.10)
id=6 @10.10.10.20 (mysql-5.1.51 ndb-7.1.10)
Seems to be working just fine! However, we also want to make sure that replication works. We’re going to populate a database with some data, and check that it replicates to the other server. We’re also going to shut down one server, alter some data, and start it again, to see if the data synchronizes.
root@db0:/var/lib/mysql-cluster# mysql
Welcome to the MySQL monitor. Commands end with ; or \g.
Your MySQL connection id is 2
Server version: 5.1.51-ndb-7.1.10-cluster-gpl MySQL Cluster Server (GPL)
Copyright (c) 2000, 2010, Oracle and/or its affiliates. All rights reserved.
This software comes with ABSOLUTELY NO WARRANTY. This is free software,and you are welcome to modify and redistribute it under the GPL v2 license
Type 'help;' or '\h' for help. Type '\c' to clear the current input statement.

mysql> use test
Database changed

mysql> CREATE TABLE loltest (i INT) ENGINE=NDBCLUSTER;
Query OK, 0 rows affected (0.15 sec)

mysql> INSERT INTO loltest () VALUES (1);
Query OK, 1 row affected (0.00 sec)

mysql> SELECT * FROM loltest;
+------+
| i |
+------+
| 1 |
+------+
1 row in set (0.00 sec)
We now move over to db1 to check if it got replicated.
root@db1:/var/lib/mysql-cluster# mysql
Welcome to the MySQL monitor. Commands end with ; or \g.
Your MySQL connection id is 3
Server version: 5.1.51-ndb-7.1.10-cluster-gpl MySQL Cluster Server (GPL)
Copyright (c) 2000, 2010, Oracle and/or its affiliates. All rights reserved.
This software comes with ABSOLUTELY NO WARRANTY. This is free software,and you are welcome to modify and redistribute it under the GPL v2 license
Type 'help;' or '\h' for help. Type '\c' to clear the current input statement.

mysql> use test
Reading table information for completion of table and column names
You can turn off this feature to get a quicker startup with -A
Database changed

mysql> SELECT * FROM loltest;
+------+
| i |
+------+
| 1 |
+------+
1 row in set (0.00 sec)
That seems to be working just fine, as well. However, we also want to test that the servers synchronize when a server comes back up after being down (so that changes done to the other server gets synchronized).
root@db0:/var/lib/mysql-cluster# /etc/init.d/mysql.server stop
Shutting down MySQL..... *

root@db0:~# ndb_mgm
-- NDB Cluster -- Management Client --
ndb_mgm> show
Connected to Management Server at: db0.internal:1186
Cluster Configuration
---------------------
[ndbd(NDB)] 2 node(s)
id=3 @10.10.10.10 (mysql-5.1.51 ndb-7.1.10, Nodegroup: 0)
id=4 @10.10.10.20 (mysql-5.1.51 ndb-7.1.10, Nodegroup: 0, Master)

[ndb_mgmd(MGM)] 2 node(s)
id=1 @10.10.10.10 (mysql-5.1.51 ndb-7.1.10)
id=2 @10.10.10.20 (mysql-5.1.51 ndb-7.1.10)

[mysqld(API)] 2 node(s)
id=5 (not connected, accepting connect from any host)
id=6 @10.10.10.20 (mysql-5.1.51 ndb-7.1.10)

root@db1:/var/lib/mysql-cluster# mysql
Welcome to the MySQL monitor. Commands end with ; or \g.
Your MySQL connection id is 4
Server version: 5.1.51-ndb-7.1.10-cluster-gpl MySQL Cluster Server (GPL)

Copyright (c) 2000, 2010, Oracle and/or its affiliates. All rights reserved.
This software comes with ABSOLUTELY NO WARRANTY. This is free software,
and you are welcome to modify and redistribute it under the GPL v2 license

Type 'help;' or '\h' for help. Type '\c' to clear the current input statement.

mysql> use test
Reading table information for completion of table and column names
You can turn off this feature to get a quicker startup with -A
Database changed

mysql> INSERT INTO loltest () VALUES (99);
Query OK, 1 row affected (0.00 sec)

mysql> INSERT INTO loltest () VALUES (999);
Query OK, 1 row affected (0.00 sec)

mysql> INSERT INTO loltest () VALUES (100);
Query OK, 1 row affected (0.00 sec)

mysql> SELECT * FROM loltest;
+------+
| i |
+------+
| 1 |
| 100 |
| 99 |
| 999 |
+------+
4 rows in set (0.00 sec)

root@db0:/var/lib/mysql-cluster# /etc/init.d/mysql.server start
Starting MySQL. *
root@db0:/var/lib/mysql-cluster# mysql
Welcome to the MySQL monitor. Commands end with ; or \g.
Your MySQL connection id is 2
Server version: 5.1.51-ndb-7.1.10-cluster-gpl MySQL Cluster Server (GPL)
Copyright (c) 2000, 2010, Oracle and/or its affiliates. All rights reserved.
This software comes with ABSOLUTELY NO WARRANTY. This is free software,
and you are welcome to modify and redistribute it under the GPL v2 license
Type 'help;' or '\h' for help. Type '\c' to clear the current input statement.

mysql> use test
Reading table information for completion of table and column names
You can turn off this feature to get a quicker startup with -A
Database changed

mysql> SELECT * FROM loltest;
+------+
| i |
+------+
| 99 |
| 999 |
| 1 |
| 100 |
+------+
4 rows in set (0.00 sec)
That also seems to be working just fine. That also concludes the configuration of the cluster it self.


5. Failover/redundancy/load-balancing
The only thing that’s left is to setup a mysql-proxy, which all the clients will use as it’s MySQL hostname. This mysql-proxy is then ‘the middleman’, completely transparent for both the servers and the clients. Should a server go down, the clients won’t notice it. It also does automatic load-balancing. If you proceed with this, keep in mind that this mysql-proxy becomes a single-point-of-failure in the setup (hence it kinda makes the whole MySQL-cluster useless). 
In my setup, I chose to install the mysql-proxy on the mysql-mgmt machine.
I’ve installed mysql-proxy on it’s own virtual host. Since this is virtualized, it’s also redundant should something happen. You could also use two physical machines, and use Linux HA etc, however that’s quite more complex than using a VM (at least if you already have virtualization available).
root@mysql-proxy:~# apt-get install mysql-proxy
root@mysql-proxy:~# mkdir /etc/mysql-proxy
root@mysql-proxy:~# cd /etc/mysql-proxy
root@mysql-proxy:/etc/mysql-proxy# vim mysql-proxy.conf
Add the following to the mysql-proxy.conf-file;
[mysql-proxy]
daemon = true
keepalive = true
proxy-address = mysql-proxy.internal:3306

# db0
proxy-backend-addresses = db0.internal:3306

# db1
proxy-backend-addresses = db1.internal:3306
Then you can start the mysql-proxy service;
root@mysql-proxy:/etc/mysql-proxy# mysql-proxy --defaults-file=/etc/mysql-proxy/mysql-proxy.conf
Now point your clients to use the hostname of the mysql-proxy server, and you’re good to go!


6. Init-scripts (automatic startup at boot)
The ‘ndbd’- and ‘ndb_mgmd’-services needs init-scripts in order to be loaded automatically at boot. Since they don’t seem to be provided in the MySQL Cluster-package, I made them myself.
The init-script that’s included with the mysql-proxy service didn’t work for me, so I wrote my own for that as well.
Copy them, save them in /etc/init.d/. Then make them executable (chmod +x /etc/init.d/<filename>). Finally you add them to rc.d, so that they’re loaded at boot; update-rc.d <filename> defaults.
/etc/init.d/ndbd
#!/bin/bash
# Linux Standard Base comments
### BEGIN INIT INFO
# Provides: ndbd
# Required-Start: $local_fs $network $syslog $remote_fs
# Required-Stop: $local_fs $network $syslog $remote_fs
# Should-Start:
# Should-Stop:
# Default-Start: 2 3 4 5
# Default-Stop: 0 1 6
# Short-Description: mysql cluster manager client
# Description: mysql cluster manager client
### END INIT INFO
 
ndbd_bin=/usr/local/mysql/bin/ndbd
 
if ! test -x $ndbd_bin; then
echo "Can't execute $ndbd_bin";
exit;
fi
 
start_ndbd(){
number_of_ndbd_pids=`ps aux|grep -iv "grep"|grep -i "/usr/local/mysql/bin/ndbd"|wc -l`
if [ $number_of_ndbd_pids -eq 0 ]; then
$ndbd_bin
echo "ndbd started."
else
echo "ndbd is already running."
fi
}
 
stop_ndbd(){
number_of_ndbd_pids=`ps aux|grep -iv "grep"|grep -i "/usr/local/mysql/bin/ndbd"|wc -l`
if [ $number_of_ndbd_pids -ne 0 ]; then
ndbd_pids=`pgrep ndbd`
for ndbd_pid in $(echo $ndbd_pids); do
kill $ndbd_pid 2> /dev/null
done
 
number_of_ndbd_pids=`ps aux|grep -iv "grep"|grep -i "/usr/local/mysql/bin/ndbd"|wc -l`
 
if [ $number_of_ndbd_pids -eq 0 ]; then
echo "ndbd stopped."
else
echo "Could not stop ndbd."
fi
else
echo "ndbd is not running."
fi
}
 
 
case "$1" in
'start' )
start_ndbd
;;
'stop' )
stop_ndbd
;;
'restart' )
stop_ndbd
start_ndbd
;;
*)
echo "Usage: $0 {start|stop|restart}" >&2
;;
esac
/etc/init.d/ndb_mgmd
#!/bin/bash
# Linux Standard Base comments
### BEGIN INIT INFO
# Provides: ndb_mgmd
# Required-Start: $local_fs $network $syslog $remote_fs
# Required-Stop: $local_fs $network $syslog $remote_fs
# Should-Start:
# Should-Stop:
# Default-Start: 2 3 4 5
# Default-Stop: 0 1 6
# Short-Description: mysql cluster manager
# Description: mysql cluster manager
### END INIT INFO
 
ndb_mgmd=/usr/local/mysql/bin/ndb_mgmd
config_file=/var/lib/mysql-cluster/config.ini
config_dir=/var/lib/mysql-cluster
 
if ! test -x $ndb_mgmd; then
echo "Can't execute $ndb_mgmd"
exit;
fi
 
start_ndb_mgmd(){
number_of_ndb_mgmd_pids=`ps aux|grep -iv "grep"|grep -i "$ndb_mgmd"|wc -l`
if [ $number_of_ndb_mgmd_pids -eq 0 ]; then
$ndb_mgmd -f $config_file --config-dir=$config_dir
echo "ndb_mgmd started."
else
echo "ndb_mgmd is already running."
fi
}
 
stop_ndb_mgmd(){
number_of_ndb_mgmd_pids=`ps aux|grep -iv "grep"|grep -i "$ndb_mgmd"|wc -l`
if [ $number_of_ndb_mgmd_pids -ne 0 ]; then
ndb_mgmd_pids=`pgrep ndb_mgmd`
for ndb_mgmd_pid in $(echo $ndb_mgmd_pids); do
kill $ndb_mgmd_pid 2> /dev/null
done
 
number_of_ndb_mgmd_pids=`ps aux|grep -iv "grep"|grep -i "$ndb_mgmd"|wc -l`
 
if [ $number_of_ndb_mgmd_pids -eq 0 ]; then
echo "ndb_mgmd stopped."
else
echo "Could not stop ndb_mgmd."
fi
else
echo "ndb_mgmd is not running."
fi
}
 
 
case "$1" in
'start' )
start_ndb_mgmd
;;
'stop' )
stop_ndb_mgmd
;;
'restart' )
stop_ndb_mgmd
start_ndb_mgmd
;;
*)
echo "Usage: $0 {start|stop|restart}" >&2
;;
esac
/etc/init.d/mysql-proxy
#! /bin/bash
### BEGIN INIT INFO
# Provides: mysql-proxy
# Required-Start: $local_fs $network $syslog $remote_fs
# Required-Stop: $local_fs $network $syslog $remote_fs
# Should-Start:
# Should-Stop:
# Default-Start: 2 3 4 5
# Default-Stop: 0 1 6
# Short-Description: MySQL Proxy
# Description: MySQL Proxy
### END INIT INFO
 
mysql_proxy=/usr/bin/mysql-proxy
config_file=/etc/mysql-proxy/mysql-proxy.conf
 
if ! test -x $mysql_proxy; then
echo "Can't execute $mysql_proxy"
exit;
fi
 
start_mysql_proxy(){
number_of_mysql_proxy_pids=`ps aux|grep -iv "grep"|grep -i "/usr/bin/mysql-proxy"|wc -l`
if [ $number_of_mysql_proxy_pids -eq 0 ]; then
$mysql_proxy --defaults-file=$config_file
echo "mysql-proxy started."
else
echo "mysql-proxy is already running."
fi
}
 
stop_mysql_proxy(){
number_of_mysql_proxy_pids=`ps aux|grep -iv "grep"|grep -i "/usr/bin/mysql-proxy"|wc -l`
if [ $number_of_mysql_proxy_pids -ne 0 ]; then
mysql_proxy_pids=`pgrep mysql-proxy`
for mysql_proxy_pid in $(echo $mysql_proxy_pids); do
kill $mysql_proxy_pid 2> /dev/null
done
 
number_of_mysql_proxy_pids=`ps aux|grep -iv "grep"|grep -i "/usr/bin/mysql-proxy"|wc -l`
 
if [ $number_of_mysql_proxy_pids -eq 0 ]; then
echo "mysql-proxy stopped."
else
echo "Could not stop mysql-proxy."
fi
else
echo "mysql-proxy is not running."
fi
}
 
 
case "$1" in
'start' )
start_mysql_proxy
;;
'stop' )
stop_mysql_proxy
;;
'restart' )
stop_mysql_proxy
start_mysql_proxy
;;
*)
echo "Usage: $0 {start|stop|restart}" >&2
;;
esac