Introduction
| Summary | Linux firewall with Web GUI and built-in traffic shaping and IPsec VPN. Can support up to four network interfaces | ||||
| Update | None | ||||
| Pros | • Up to four network interfaces • Includes Traffic Shaping and IPsec VPN • Free | ||||
| Cons | • Incomplete documentation on more advanced features | ||||

Got an old Pentium 90 kicking around somewhere and a hankering to learn more about an Internet router than plugging it in? Building your own router using that old clunker is a good way to both peek under the hood of a piece of gear essential to most 'net-connected households today. And having it be Linux-based will get your feet wet with an operating system that continues to make inroads against the beast from Redmond.
There are many Linux-based router / firewalls available, and we've previously looked at m0n0wall , Smoothwall Express, LEAF-Bering uClibc and ClarkConnect. This time, we'll focus on IPCop, whose tagline is "The bad packets stop here".
Hardware Requirements
According to the manual, IPCop's minimum requirements are a motherboard with a 386 processor, 32MB of RAM and a 300MB hard drive. However, we recommend using faster hardware for a router that can handle bandwidths of up to 6 Mbps. A Pentium-class processor with 256MB of RAM should do quite well, and with a 20 GB hard drive it can pull double-duty as an efficient proxy cache.Trying to use hardware that is too modern can actually be problematic. For example, IPCop's support for the PCI Express architecture is still in its beginning stages, which may lead to issues with certain onboard LAN components. But NICs that use a conventional PCI connection, such as the Intel PRO-1000, shouldn't pose any problems.
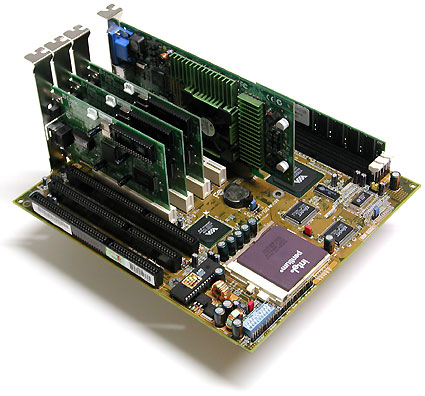
Figure 1: The Hardware - Pentium 75 Socket 7 system
IPCop's standard configuration requires at least one network adapter. Even cheaper Ethernet adapters of the 100MBit/s variety are easily up to the task, and shouldn't cost more than about $5 apiece. Cards based on Realtek's 8139 chip are a safe bet for this purpose, as the chip's widespread use guarantees equally widespread support. If you want to be completely certain that your network card is supported, check out IPCop's Hardware Compatibility List (HCL).Due to a lack of driver support, using the IPCop router as a wireless access point is rather difficult at the moment, and requires a great deal of manual configuration. Therefore, our current recommendation for using IPCop within a WLAN is to use a conventional network card and attach it to a WLAN access point. Such solutions already exist for PRISM chipsets. The Host AP-Project offers more information on how to do this.
How Many NICs?
The number of network interface cards (NICs) a router needs depends on its intended use. However, it will always require at least one card. In our example, we used two NICs, which corresponds to the classic DSL or cable setup (Figure 2). In this configuration, one NIC is attached to your home network (the "green interface") while the other connects directly to the DSL or cable modem (the "red interface").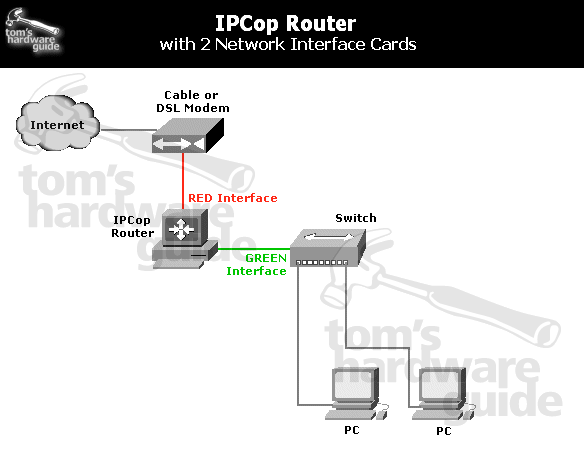
Figure 2: Topology of our two NIC router
An ISDN card or an analog modem can also replace this second card, depending on your connection. Additionally, a "blue" interface for WLAN, and an "orange" one for additional server-based services, are also possible. Figure 3 shows the maximum four-card configuration.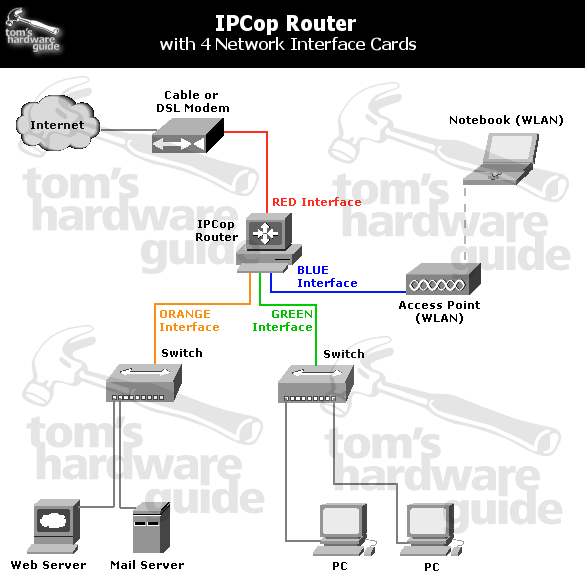
Figure 3: Network topology for the largest configuration
| IPCop Router Hardware Recommendations | |
| CPU/Motherboard | Intel or AMD CPU; Pentium class or above, 100 MHz minimum speed (Socket 7, Socket 370, Socket A) |
| RAM | 256 MB SDRAM or DDR-SDRAM |
| Storage | 20 - 40 GB for Website Cache (Proxy) |
| Network | Two 10/100 NICs |
| Graphics | Any 2MB card, no 3D features needed Only required for installation |
| CD-ROM | Any Only required for installation |
| Floppy | Not required |
| Keyboard | Any Only required for installation |
Installing the System
As mentioned before, we chose IPCop as the operating system for our router.This OS is based on Linux, and both it and its source code are freely available under the GPL license. An ISO CD image is available on the IPCop Website. The image weighs in at only 41 MB and can be burned to a disc with virtually any CD burning software. Alternatively, disk images are also available; In this case, the computer boots from a floppy and the installation proceeds over the network.
We're going to focus on the easiest and fastest kind of installation, namely installing from a CD or DVD drive attached directly to the designated router. The first step, after powering on the system, is changing the boot sequence in the BIOS-the optical drive has to be the first in the list for setup purposes. This option can be found in a variety of places in the BIOS menus, depending on the specific BIOS used by the motherboard. It is usually in the "Advanced Setup Options" or "Advanced BIOS Setup" areas.
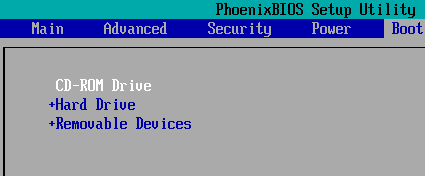
Figure 4: CDROM set as first boot device
After changing this setting, you can leave the BIOS, either by pressing the F10 key, or via the menu option "Exit Saving Changes" in the main BIOS screen.The system will now boot from the CD, and you will be greeted by the Isolinux boot loader.
The warning that all data on your drive will be wiped should be taken very seriously! This is the last dialog the installer will display before erasing and partitioning the drive. If you still have any important files left on the system, cancel the installation now and back them up to a safe location!
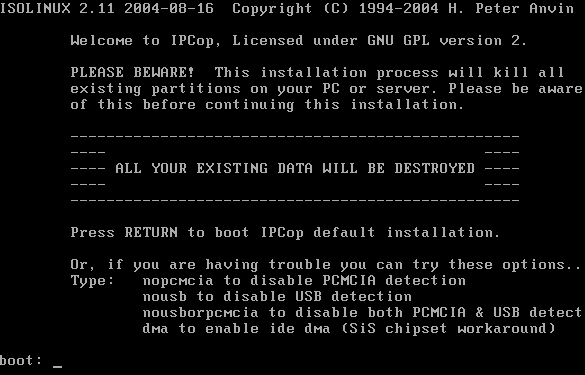
Figure 5: Final warning before disk is wiped
Pressing Return will load the Linux kernel. If you run into any problems at this point, try using the options nousb and nopcmcia to deactivate these interfaces.As the average router configuration does not require them anyway, this is not a problem.
The setup program automatically launches once the OS has finished loading. The first step is selecting the interface language. There are several languages available, although some translations are still incomplete, and we chose English.
Another popup informs you that selecting Cancel on any of the following screens will cancel the entire setup and reboot the machine. This can minimize the damage if you realize half way through the configuration that you still have important files on the drive. Next, the system will ask you from which medium
you wish to install: CDROM or HTTP/FTP. If you've booted from the floppy, you can now select the correct packages through the HTTP/FTP option. But since we're installing from CD, we selected CDROM.
Considering that we've come this far with our installation CD, the prompt to insert the install disk seems a little odd. The explanation is simple: Some users don't have a bootable optical drive, or are using a motherboard that does not allow booting from CD. This is especially common with older PCs, which again, are often used for DIY router setups. In this case, the solution is to boot from the floppy disk and then switch to CD at this point.
The real installation process begins as the installer partitions and formats the hard drive. The remarkable thing about this process is that no user interaction is required at all; the system inspects the hard drive, partitions it, and then formats the new partitions with the correct file system. The user is not bothered by questions about the size of the swap partition, and does not need to know whether the data partition should use the ReiserFS or ext3.
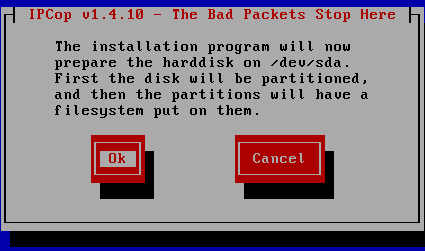
Figure 6: Just click OK
If the router requires reinstallation after a hardware failure, the venerable floppy drive lends a helping hand. If you have saved a previous system configuration to a floppy, you can now use it and skip the remaining configuration screens. Just select Restore, and let the installer do the rest. Since this is our first installation, however, we select Skip.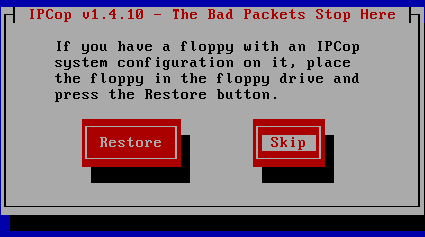
Figure 7: System configuration restore prompt
LAN Interface Setup
IPCop distinguishes between several interfaces and types of configuration. The "green" interface is present in every configuration: this is the adapter that connects to your home network. During the setup process, you are asked to select the correct driver for your card. In most cases, selecting Probe, which launches the automatic detection routine yields good results (Figure 9).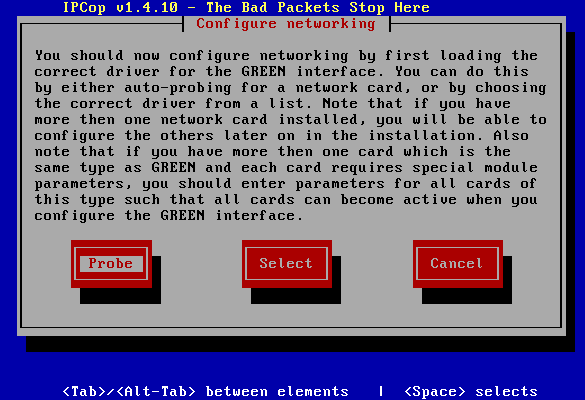
Figure 8: Network adapter configuration
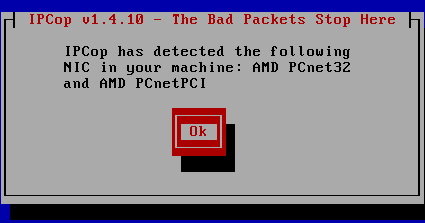
Figure 9: A successful Probe
If your card is not recognized by the automatic detection routine, you'll have to select it manually using the Select option. Don't worry if the name of your card does not match the one IPCop finds; the Linux kernel detects the cards by their chipset, not by the model number or similar. That's why a D-Link card may be detected as a Realtek 8139, for example.Once you've selected the correct network adapter, it's time to assign an IP address to the card. Since this is the LAN interface that connects to your home network, you should choose an IP address from the pool reserved for private use:
10.0.0.0 - 10.255.255.255 (10/8 prefix)
172.16.0.0 - 172.31.255.255 (172.16/12 prefix)
192.168.0.0 - 192.168.255.255 (192.168/16 prefix)
See RFC1918 - Address Allocation for Private Internets if you'd like more detail.
We chose the most commonly used address range (192.168.0.1 through 192.168.0.254) with our gateway receiving the last address in the block (Figure 10). For our subnet mask we used 255.255.255.0, since we're not going to be configuring more than 253 computers in this network.
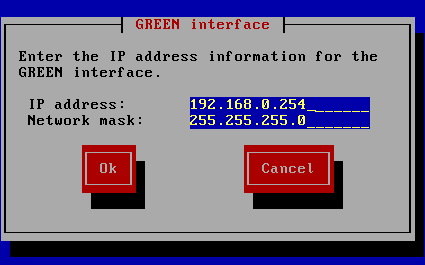
Figure 10: Setting the IPCop computer's IP address
This completes the first part of the setup (Figure 11). Although additional settings can be adjusted later on during the configuration, the system is now bootable.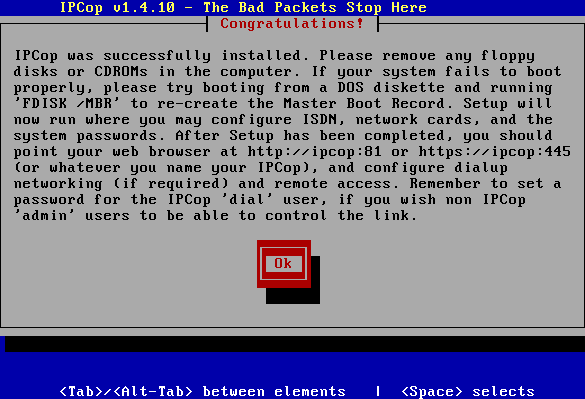
Figure 11: Installation completed
All too often, after installation, we forget important data provided by the setup program. The most crucial pieces of information are probably the IP address and the host name (which we will get to in a moment). Take a moment to write them down.http://ipcop:81
https://ipcop:445
Note that the port numbers, 81 and 445, are very important since they are close to, but not the same as, the standard ports for HTTP (80) and HTTPS (443). You can also use the IP address that was assigned in the last step - 192.168.0.254 - , instead of the hostname (ipcop), when entering the IPCop machine's URL.
Basic setup is now complete, but there are still a few other settings that need to be configured before we're done. The installer will next walk you through selecting a keyboard mapping if you're not going to use the standard "QWERTY" keyboard layout, and setting a timezone for the system clock.
Next, you'll be prompted to enter the IPCop machine's hostname, which is the TCP/IP equivalent of the computer name in Windows. This is the name under which the router will be visible on the network and can be used instead if the IP address in the URL for the admin web interface. The default is ipcop, which suits our purpose just fine, so we'll leave it. The default domain name can be left unchanged as localdomain, unless your network is part of a domain.
IPCop can also be used with ISDN cards, but that's not a very viable option in the U.S. due to cost and availability. So we'll select Disable ISDN and move on.
Configuring the WAN and DHCP server
Next up is finishing up the network configuration. We already selected the "green" LAN interface in the previous steps, but since we also need to select and configure a WAN or "red" interface. Figures 12 and 13 show the proper selections.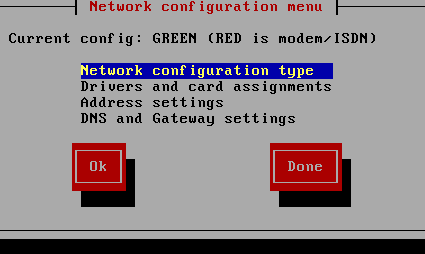
Figure 12: Setting the Network configuration type
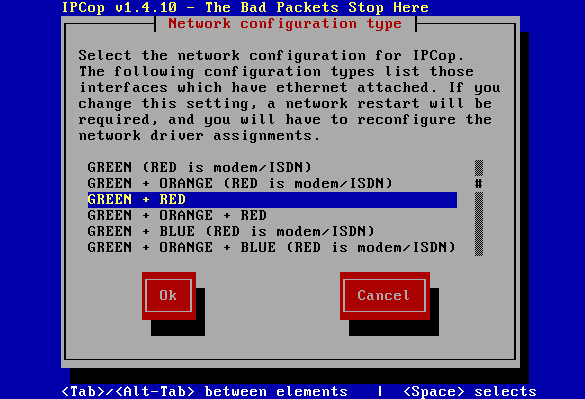
Figure 13: Green + red is what we need
If required, "blue" and "orange" interfaces can also be configured. The blue interface is used for wireless LAN adapters, with IPCop acting as a wireless router, while the "orange" interface is a dedicated "DMZ" port for servers that are to be accessed from the Internet, such as Web servers. That is not to say that a LAN-side server cannot be used with a simple "red" + "green" configuration. But having a dedicated network segment for servers that need direct Internet access ( in front of IPCop's firewall) is a more secure option.After selecting the desired configuration, you'll be back at the Network Configuration menu, where you'll select Drivers and card assignments and assign the "unclaimed" NIC to the RED interface. Just like the green interface, the red one also requires IP address configuration, which we do via the next configuration screen (Figure 14).
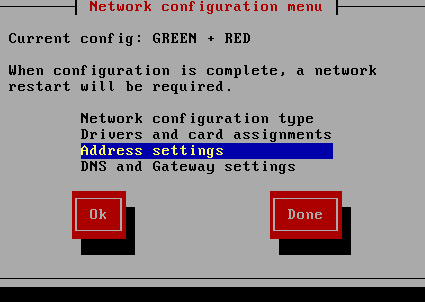
Figure 14: The red interface needs an IP-address
Configuring the WAN and DHCP server, C more
Since we're configuring the WAN (Internet) port, we'll have to tell IPCop what kind of Internet connection we have, so that it knows how to negotiate a successful service connection. Figure 15 shows the WAN connection types, which will be familar to anyone who has had to configure a store-bought router.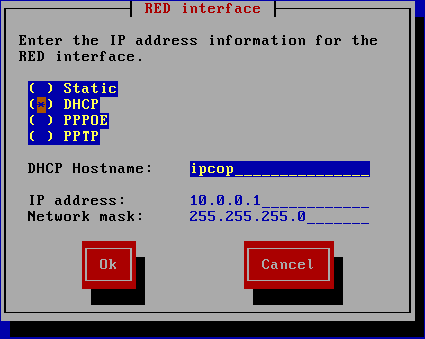
Figure 15: RED (Internet) connection types
The most common selections will be DHCP for cable modem users (Figure 15) and PPPoE for DSL users, but be sure to select the connection type that matches your service provider.Users with a static IP will need to enter the information for their DNS server and gateway, which is what the fourth menu option is for (Figures 16 and 17).
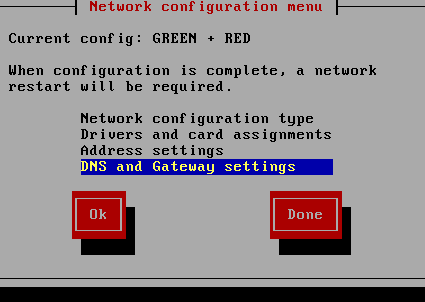
Figure 16: Getting to DNS and Gateway settings
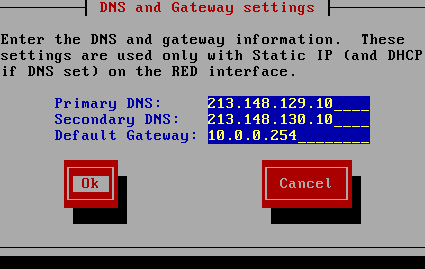
Figure 17: Entering DNS and Gateway settings
IPCop provides a DHCP server so that LAN clients can all grab an IP address along with proper gateway and DNS information As Figure 18 shows, start and end addresses of the DHCP range can be specified, along with DNS servers and DHCP lease duration. You can also reserve fixed IP addresses for certain PCs via the Web interface, ensuring that they will receive the same address each time they connect.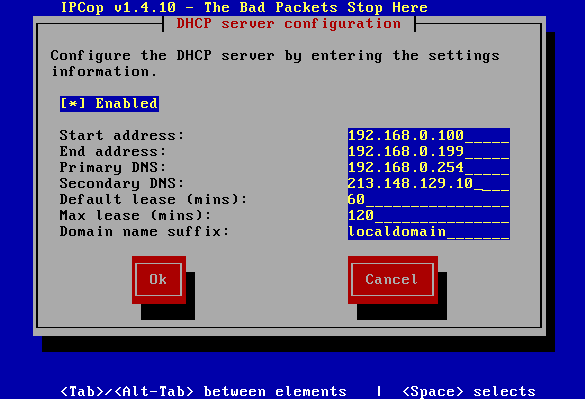
Figure 18: DHCP server settings
Installation Wrap-up
We're just about done and just need to assign "root" and "admin" user passwords. The "root" user has practically unlimited access and privileges on a Linux system. This is the user name you will need whenever you want to log onto the command shell, to install additional software for example. The "admin" user, on the other hand, only has full access to the Web front end. This user can change the DHCP server configuration, port forwarding settings, initialize connections, update IPCop, and restart the router.Congratulations! Installation is complete! If you wish, you can now turn off the system and disconnect the CD-ROM, as it is no longer needed. As an additional benefit, the system will boot faster and draw less power.
Important! During this next reboot, do not forget to enter the BIOS setup program and change the boot sequence, so that the system will start up properly from the hard drive.
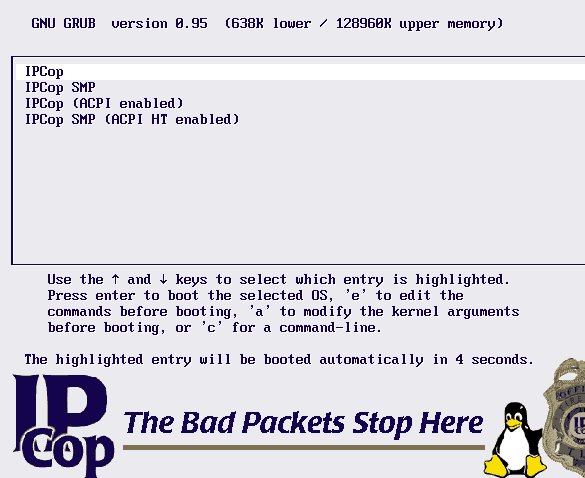
Figure 19: IPCop's Welcome Screen
The next time you power up the system, you will be greeted by the Grub boot manager (Figure 19) which allows you to select your startup options. There are four options available. The first is the normal IPCop configuration; next we have IPCop SMP for multiprocessor machines, Pentium 4 systems with hyper-threading or dual-core machines. For newer machines, IPCop also offers these two options with ACPI support. This option only has to be selected once; IPCop will remember the setting and apply it each subsequent time the system is booted.If the login screen (Figure 20) appears after the system has finished booting, then all is well. The monitor and keyboard are no longer required and can be disconnected.

Figure 20: Login screen
Note that if you do remove the I/O devices, we recommend connecting the case's PC speaker to the motherboard. This gives you a certain amount of feedback on the system's operation. A beep will inform you when the system is ready for use or when it establishes or closes an Internet connection. Also note that if the system hangs during the boot process after the keyboard is removed, this means the PC is objecting to being powered up without it. The option Halt on: No Error or All But Keyboard should be activated in the BIOS.IPCop Feature Tour
From this point on, the router's admin interface can be accessed via the URL you wrote down earlier using any web browser. Make sure you specify the port, or you'll just get a hung browser. IPcop has a rich feature set, so let's start the tour.The first thing DSL users will need to do is respond to the message they'll see upon accessing IPCop's Welcome page (Figure 21), which can be viewed by anyone entering the IPCop hostname or IP address (plus the proper port) into their web browser.
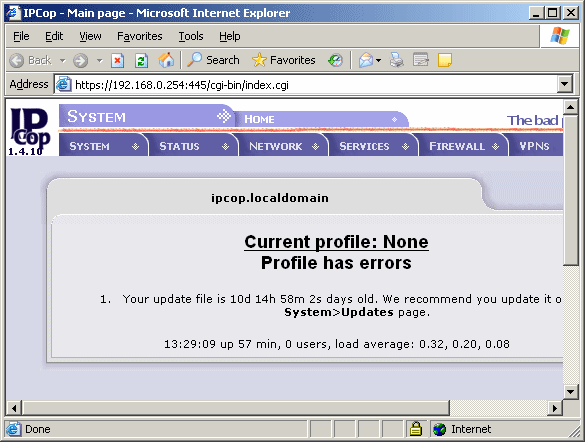
Figure 21: Error from missing DSL account info
The error is due to missing DSL account information, which can be entered in the Network menu under Dialup, after logging in as admin or root users. Figure 22 shows all of the PPPoE connection configuration options available.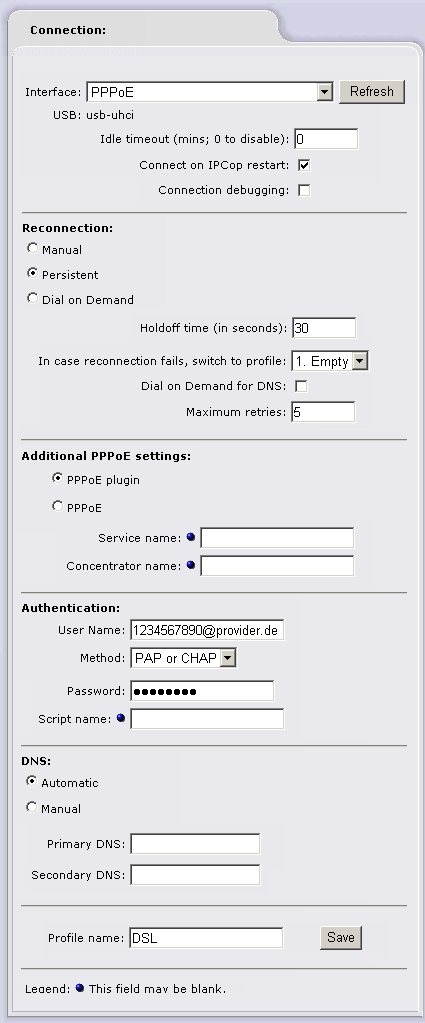
Figure 22: DSL account settings
Features - DHCP Server
As mentioned earlier, the DHCP server allows you to assign fixed IP addresses to specific LAN clients. But first check out Figures 23 and 24, which show the left and right sides of its web interface window (we split the screenshot for readability).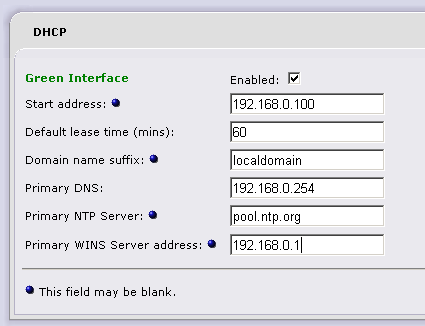
Figure 23: DHCP server options (left side)
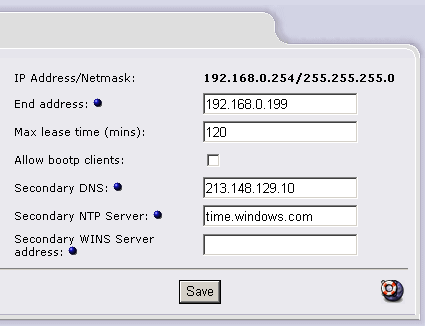
Figure 24: DHCP server options (right side)
Fixed IPs (also called "reserved") are assigned using the MAC (Media Access Control) address of each client's network adapter. Windows users can just open a command prompt and enter ipconfig /all, or check the Local Area Connection Status window Support tab for the NIC in Win XP.Once we have the MAC address, we can assign it a permanent IP address in the lower part of the DHCP configuration window. For the sake of simplicity, we'll use 192.168.0.168 (Figure 25).
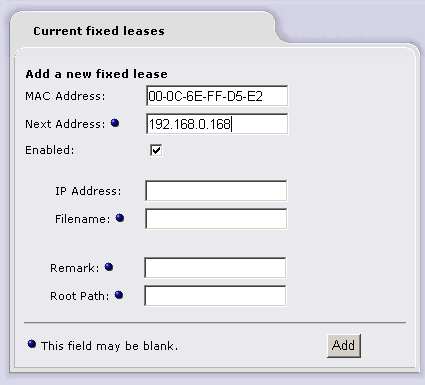
Figure 25: Assigning a client fixed IP
To help you find the client again later, you can enter additional information describing the client in the field labeled Remark. The fields Next Address, Filename and Root Path are only required for clients that boot from the network. Added clients can be viewed on a list (Figure 26).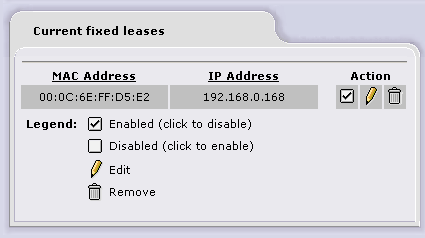
Figure 26: Fixed IP lease list
Port Forwarding and Dynamic DNS
A NAT-based router such as IPCop rejects all requests for data that originate from the Internet. While this keeps LAN computers safe from being directly accessed by unknown entities, it presents a problem when you want to allow such requests for say, a web or FTP server. So like commercial NAT-based routers, IPCop can forward requests for specific Internet services to certain machines on your LAN. This is done via a feature called Port Forwarding.An example of adding a Port Forwarding rule for a webserver is shown in Figure 27. This rule consists of our client's IP address, 192.168.0.168, as the destination IP, as well as the HTTP source port 80 (on the Internet side) and the destination port (on our local client at 192.168.0.168). The field Remark can be used to add a little information about the rule. In our case, this is simply "Webserver".
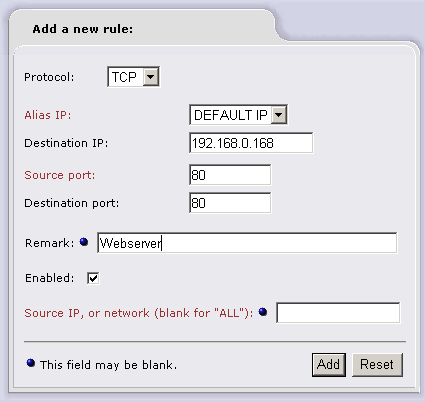
Figure 27: Adding a Port Forwarding rule
After clicking Add, the rule is added to the list in the lower part of the window, and instantly becomes active.If you want to access clients on your home network remotely, then you're often faced with another problem. Most ISPs assign IP addresses dynamically upon connection, which means that your router (and the services running on any Port-Forwarded servers behind it) will have a different IP address as often as every time the router connects. Fortunately dynamic DNS services provide a way around this problem.
Dynamic DNS service providers offer subdomain names that are kept pointed at the changing IP address of your router. Normally, this requires running a client somewhere on your LAN that detects when your WAN IP address has changed and tells the Dynamic DNS service's servers to grab the new IP address. However, IPCop comes with a built-in client that removes the need to run one on a LAN machine.
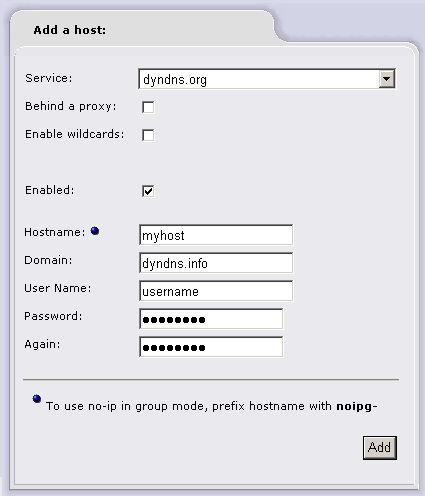
Figure 28: Setting up the Dynamic DNS client
Setup involves first creating an account with one of the Dynamic DNS services if you don't already have one. Some Dynamic DNS services, such as www.dyndns.org, are offered free of charge. The service then provides the account information, which is entered into IPCop's interface (Figure 28). IPCop's client can handle operating through an HTTP proxy (the Behind a Proxy checkbox), as some ISP's require, and the Enable Wildcards checkbox handles subdomains.Finally, IPCop needs to know how to determine its IP address. In most cases, the correct setting is that this is determined by the "red" interface, as shown in
Figure 29. The second option only applies if there is a second router between IPCop and the Internet.
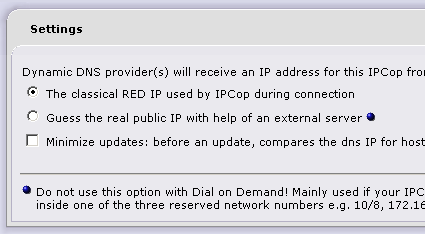
Figure 29: Dynamic DNS IP address determination method
Proxy Server
A proxy server is basically a cache for websites. When a proxy is used, the web browser does not contact the remote site directly, but rather queries the proxy.The proxy server will then check to see whether its cache already contains a copy of the requested site, and whether a newer version exists on the Internet.
This ensures that only new data must be downloaded from the Internet, while the rest is provided from within the local network. This can save a great deal of bandwidth, especially when many users are browsing simultaneously. Potentially even more important is the fact that sites load much faster.
There are two types of proxy servers. A classic proxy listens for requests on a specific port, usually 8080 or 3128. Every user that wishes to use this proxy must configure his browser manually to use it, otherwise it is bypassed.
The second type is the transparent proxy, which latches onto any HTTP connection without requiring any further configuration on the client side. In this case, bypassing the proxy is not possible, which is why large companies prefer this configuration: it allows them to limit access to certain websites.
IPCop supports both types of proxies, although the server is turned off by default. It can be enabled using the option Services > Proxy. Proxies can be activated individually for each of the interfaces. Therefore, the correct option for the green interface is called Enabled on Green in Figure 30. If a WLAN adapter is installed, it too can be configured to use a proxy, with the option Enabled on Blue.
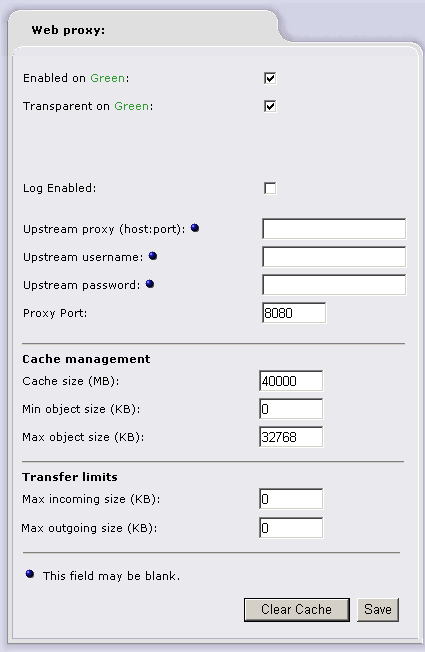
Figure 30: Proxy Server Settings
Checking the option Transparent makes the server a transparent proxy. In this case, the proxy port is ignored. If this setting is not enabled, the server and the corresponding port have to be entered manually in each browser on every client. The size of the proxy server's cache can be adjusted under Cache Management, while the cache itself is located on the router's hard drive. We chose a cache size of 40 GB and a maximum file size of 32 MB for cached objects; a minimum file size is not specified.Finally, there is also an option to limit the amount of data that is transferred. This is especially interesting for users who don't have flat rate Internet service, as it prevents exorbitant Internet bills as a result of large downloads.Tip: A word of warning about clicking the save button when a large cache size is selected: The web interface will not react for a while, as the router attempts to allocate the specified disk space. Don't panic, just be patient and wait for it to complete.
Monitoring Features
Once IPCop is configured and running, chances are that after a couple of weeks you'll forget it even exists - at least as long as it continues working! But if you like to be proactive in looking for problems, IPCop offers numerous System and Network Status screens as well as graphs of various System resource usages. Figures 31 through 34 show just a few.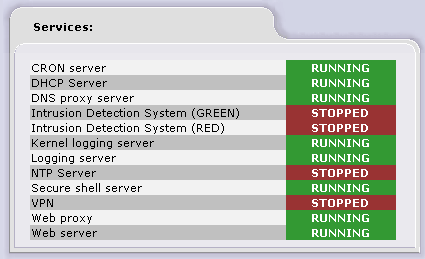
Figure 31: The Services List lets you check status at a glance
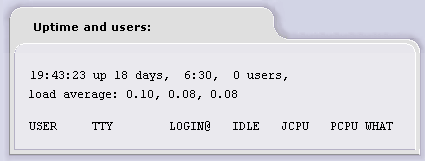
Figure 32: Uptime report
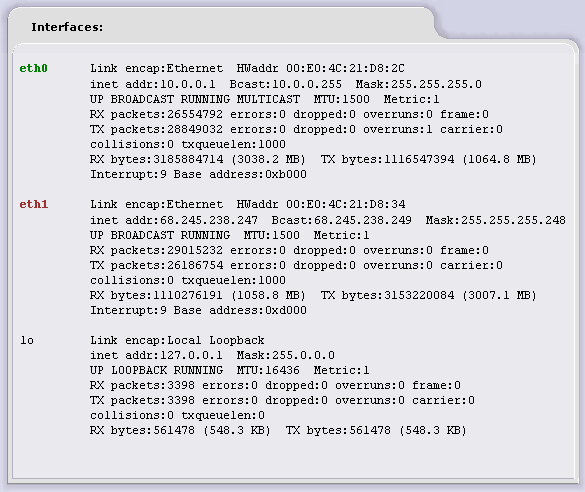
Figure 33: Network status view shows the results of the Linux command ifconfig
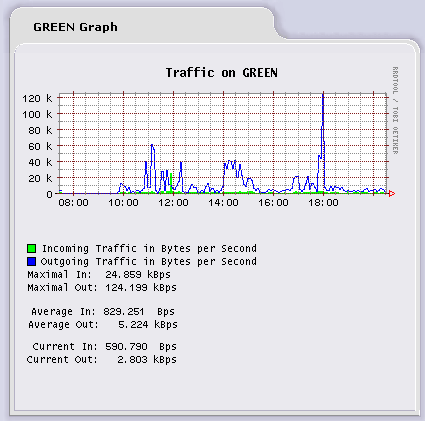
Figure 34: Green interface (LAN) traffic
Logging and Shell Access
Although log files are much more boring than the interactive status diagrams, the system log can be especially helpful when a problem actually does occur. The log files can be accessed through the Logs tab.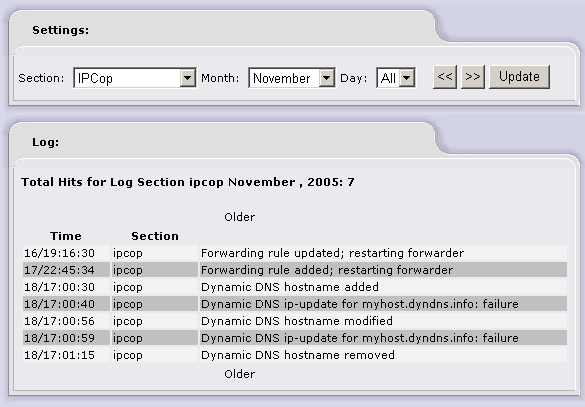
Figure 35: Dynamic DNS update failure log entry
For those more comfortable with a command line interface, IPCop provides direct shell access (to the "root" user only). This can also come in handy if the web interface becomes unresponsive. Figure 36 illustrates a shutdown now -r sequence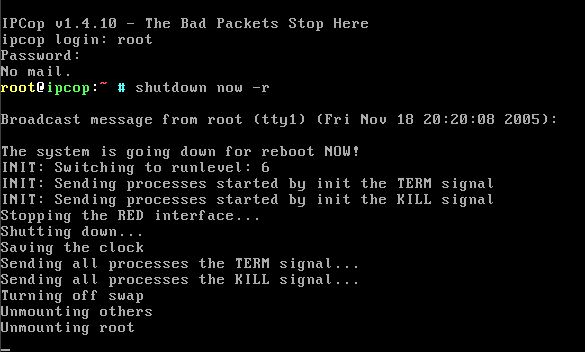
Figure 36: A command line shutdown
Of course, installing additional software is also possible through the command line. However, we recommend leaving anything that goes beyond the normal IPCop installation to the seasoned Linux professional. After all, additional software may even compromise the router's security!Closing Thoughts
IPCop has a few other useful features that we'd be remiss if we didn't at least let you know about them. It includes the Snort intrusion detection system, which can be set to monitor each interface for known data traffic signatures of suspicious activity.There are also bandwidth management ("Traffic shaping") features courtesy of the built-in WonderShaper package. Traffic shaping makes the most out of the upstream and downstream bandwidth doled out by your ISP by allowing you to assign high, medium and low priorities to specific web services (ports).
Wondershaper then takes it from there and manages traffic through the network interfaces to keep everything moving along according to the priorities you set.
Finally, IPCop includes a built-in IPsec VPN server that can handle both
Net-to-Net (such as between two IPCops or an IPCop and commercial IPsec gateway) and Host-to-Net (between a single machine running an IPsec client and the IPCop) tunnels. The IPsec server can handle pre-shared key/password/pass phrase or X.509 certificate authentication methods, but the
VPN section of the IPCop documentation is incomplete. So if you're interested in this feature, you'll probably need to use some of the resources linked in the
IPcop website's Support section to get a successful tunnel set up.
So if you're thinking of going down the DIY router path, you have many distros to choose from. IPCop's easy installation, extensive feature set and nicely-designed user interface should put it on your selection short list.
No comments:
Post a Comment